GIGAMEDIA GGM CCMLC17PM Скачать руководство пользователя страница 21

FR

21

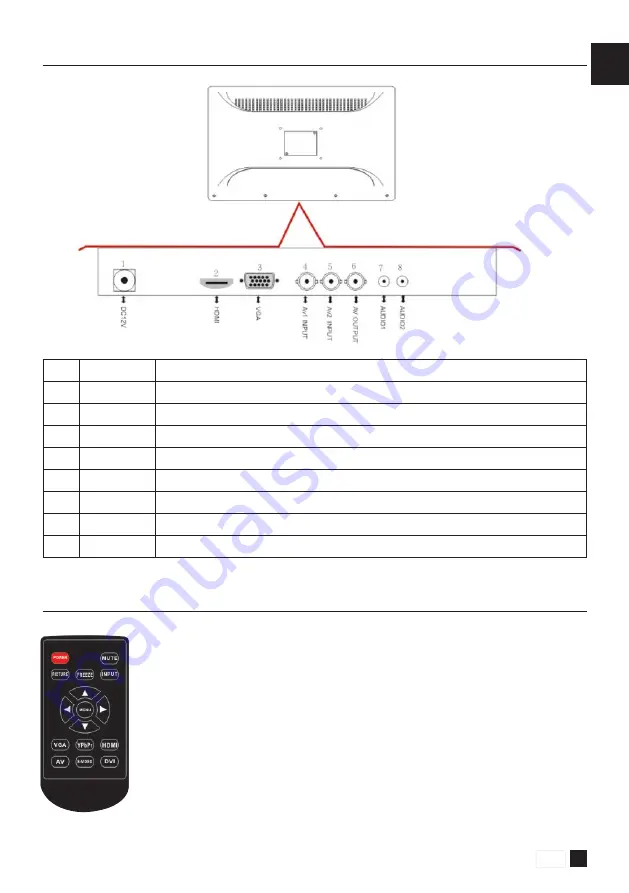
1 . 4 .   T é l é c o m m a n d e   :   p r i n c i p a l e s   f o n c t i o n s  

1)  

POWER :

    Démarrage / arrêt du moniteur 

2)  

MUTE :

       Coupe le son / active le son  (si carte audio) 

3)  

56

:      Menu sélection 

4)  

34

:

     Appuyez pour augmenter/baisser 

5)  

MENU :

      Appuyez pour voir apparaître le menu principal à l’écran 

6)  

INPUT :

      Appuyez pour sélectionner la source désirée (HDMI, BNC, VGA) 

7)  

PICTURE :

  Appuyez pour activer un cycle automatique / 
  boucle sur la vidéo à l’écran   

1 . 3 .   C o n n e x i o n s   o p t i o n n e l l e s

Item

Bouton

Description des fonctionnalités

1

DN IN

Entrée alimentation

2

HDMI

Entrée HDMI

3

PC-RCB-INPUT

Connexion RP RGB (non disponible sur les moniteurs CCTV GIGAMEDIA)

4

AV1 INPUT

Entrée BNC 1

5

AV2 INPUT

Entrée BNC 2

6

AV OUT

Sortie BNC

7

AUDIO 1

Entrée audio (non disponible sur les moniteurs CCTV GIGAMEDIA)

8

AUDIO 2

Sortie audio (non disponible sur les moniteurs CCTV GIGAMEDIA)

www.gigamedia.net

Содержание GGM CCMLC17PM

Страница 1: ...CMLCD19PP LCD monitor CCTV 19 Plastic case GGM CCMLCD19PM LCD monitor CCTV 19 Metal case EN USER S MANUAL MANUEL D UTILISATION GGM CCMLCD17PP Moniteur CCTV 17 Boîtier plastique GGM CCMLC17PM Moniteur CCTV 17 Boîtier métal GGM CCMLCD18PP Moniteur CCTV 18 5 Format 16 9 boîtier plastique GGM CCMLCD19PP Moniteur CCTV 19 Boîtier plastique GGM CCMLCD19PM Moniteur CCTV 19 Boîtier métal FR ...

Страница 2: ...nctions Page 07 1 5 Installing batteries Page 08 1 6 External equipment connections Page 08 2 Basic OSD setup OSD 2 1 Turning on and off the monitor Page 10 2 2 Selecting screen language Page 10 2 3 No sync Page 10 2 4 Selecting input source Page 11 2 5 OSD step under VGA input mode Page 11 2 6 OSD step under AV1 AV2 input mode Page 12 2 7 OSD step under HDMI input mode Page 12 3 Trouble shooting ...

Страница 3: ... used in accordance with the ins tructions it may cause harmful interference to radio communications however there is no guarantee that interference will not occur in a particular installation If this equipment does cause harmfut interference to radio or television reception which can be determinedbyturningtheequipmentoffandon theuserisencouragedtotrytocorrecttheinterferencebyoneormoreofthefol low...

Страница 4: ...aged in any way such as power supply cord or plug is damaged liquid has been spilled or objects have fallen into the apparatus the apparatus has been exposed to rain or moisture does not operate normally or has been dropped 13 Use only with a cart stand tripod bracket or table specified by the manufacturer or sold with the apparatus When a cart is used be cautious when moving the cart apparatus co...

Страница 5: ...dicates damage or deterioration unplug it discontinue use of the appliance and have the cord replaced with an exact replacement part by an authorized servicer Protect the power cord from physical or mechanical abuse such as being twisted kinked pinched closed in a door or walded upon Pay particular attention to plugs wall outlets and the point where the cord exits the appliance ON DISPOSAL The flu...

Страница 6: ...ere you purchased the product REMOTE CONTROL POWER SUPPLY VGA CABLE 1 5M USER MANUAL 1 Introduction 1 1 Controls Item Button Function description 1 Auto Press to select the input source and menu selection 2 Press to decrease the sound level menu adjustent 3 Press to increase the sound level menu adjustent 4 Menu Press to bring up the main menu to the screen and exit the current menu 5 Power Press ...

Страница 7: ...ress to cycle through the input source in following HDMI BNC VGA 7 PICTURE Press repeatedly to cycle through the available video picture 1 3 Connection Options Item Button Function description 1 DN IN DC input socket 2 HDMI HDMI input 3 PC RCB INPUT Connect the RP RGB output jack of PC 4 AV1 INPUT Connect the BNC output jack of processor 5 AV2 INPUT Connect the BNC output jack of processor 6 AV OU...

Страница 8: ...d with your monitor 1 6 External Equipment Connections 1 6 1 Power Cord Connection 1 5 Installing Batteries Open the batte ry compartment cover on the the back side Insert two 1 5V AA size batteries in correct polarity Do not mix old or used batteries with new ones Close the cover Point the remote towards the remole control sensor of the wireless monitor and use it within 7 meters Put the used bat...

Страница 9: ...DDC protocol Connect the BNC in cable output of the DVR to the BNC input on the set Connect the BNC out cable input of the other monitor to the BNC output on the set Select BNC1 or BNC2 input source with using the INPUT button on the remote control 1 6 3 PC Connection 1 6 2 BNC INPUT and BNC OUTPUT Connection Connect the RGB output of the PC to the VGA in jack on the set Turn on the PC and set Sel...

Страница 10: ...ions There is NO SYNC menu on screen when there is no input signal Connect the AC input cable to monitor then press the main power switch on monitor At this time the monitor will enter into stand by mode and the indicator light turn red Using buttons can turn on monitor from stand by mode as follows Press POWER key on front panel or on the remote control Press POWER button on front panel or on the...

Страница 11: ...U to exit the main menu 2 5 2 OSD menu options 2 5 3 GEOMETRY menu options A Press the MENU button to access Main Menu setting interface B Press the 34 to select the desired submenu C Press the 56 again to enter the submenu 2 5 1 PC menu options Press 34 button to select PC menu Use 56 to select what you want to adjust in the VGA mode Press 34 button to adjust When you are satisfied with your adju...

Страница 12: ... to select PICTURE menu Use 56 to select what you want to adjust in the AV1 AV2 mode Press 34 button to adjust When you are satisfied with your adjustment press MENU to exit the main menu 2 6 2 OSD menu options Press 34 button to select OSD menu Use 56 to select what you want to adjust in the AV1 AV2 mode Press 34 button to adjust When you are satisfied with your adjustment press MENU to exit the ...

Страница 13: ...enu 2 7 2 OSD menu options Press 34 button to select OSD menu Use 56 to select what you want to adjust in the HDMI mode Press 34 button to adjust When you are satisfied with your adjustment press MENU to exit the main menu 2 7 3 OSD menu options Press 34 button to select OSD menu Use 56 to select what you want to adjust in the HDMI mode Press 34 button to adjust When you are satisfied with your ad...

Страница 14: ... Picture appears slowly after switching on This is normal the image is muted during the product startup process Please contact your service center if the picture has not appeared after five minutes No or poor color or poor picture Adjust the color in menu option Keep a sufficient distance belween the product and the VCR Try another channel the problem may be with the broadcast Are the VIDEO cables...

Страница 15: ... the amount of time in that way you will have a new one Be sure to turn the power off and unplug the power cord before you begin any cleaning CLEANING THE SCREEN Here s a great way to keep the dust off screen for a while Wet soft cloth in a mixture of lukewarm water and a little fa bric softener or dish washing detergent Wring the cloth until it s almost dry and then used it to wipe the screen Mak...

Страница 16: ...incipales Page 21 1 5 Installation des piles Page 22 1 6 Connexions externes disponibles Page 22 2 Fonctions basiques OSD 2 1 Eteindre et allumer le moniteur Page 24 2 2 Séléction de la langue Page 24 2 3 Pas de synchronisation Page 24 2 4 Séléction source en entrée Page 25 2 5 Fonction OSD entrée mode VGA Page 25 2 6 Réglage OSD sous AV1 AV2 mode d entrée Page 26 2 7 Configuration OSD en mode d e...

Страница 17: ...peutcauserdesinterférencesnuisibles Cependant iln existeaucunegarantiequeces interférencesneseproduiront pas dans une installation particulière Si cet équipement génère des interférences nuisibles lors de l utilisation d appareils radio outélévision Ilestconseilléàl utilisateurd éteindreetderallumerlemoniteur Pourcorrigercesbrouillagesl utilisateuresten couragé à se conformer aux opérations suivan...

Страница 18: ...s fournis par le fabricant 12 Confiez toutes les réparations à un technicien qualifié Un entretien spécifique est nécessaire lorsque cet appareil a été endommagé que le cordon d alimentation ou la prise sont endommagés Egalement si du liquide a été renversé ou si l appareil est tombé 13 Faire preuve de prudence lors du déplacement de l appareil afin d éviter toutes blessures 14 N enlevez pas ou ne...

Страница 19: ...t changez le cordon uniquement par un produit identique et validé avec votre distributeur fabricant Protégez le cordon d alimentation contre les tensions physiques ou mécaniques afin d éviter sa détérioration Evitez que le cordon d alimentation ne soit pincé coincé entortillé plié dans une porte par exemple Portez une attention particulière aux prises murales où se trouve branché l appareil ainsi ...

Страница 20: ...aît votre distributeur fabricant auprès duquel vous avez acheté le produit TÉLÉCOMMANDE ALIMENTATION CABLE VGA 1 5M MANUEL 1 Introduction 1 1 Contrôle du moniteur Item Bouton Description des fonctionnalités 1 Auto Appuyez pour sélectionnez la source d entrée et les fonctions du menu 2 3 Appuyez pour diminuer le réglage du niveau sonore 3 4 Appuyez pour augmenter le réglage du niveau sonore 4 Menu ...

Страница 21: ...GA 7 PICTURE Appuyez pour activer un cycle automatique boucle sur la vidéo à l écran 1 3 Connexions optionnelles Item Bouton Description des fonctionnalités 1 DN IN Entrée alimentation 2 HDMI Entrée HDMI 3 PC RCB INPUT Connexion RP RGB non disponible sur les moniteurs CCTV GIGAMEDIA 4 AV1 INPUT Entrée BNC 1 5 AV2 INPUT Entrée BNC 2 6 AV OUT Sortie BNC 7 AUDIO 1 Entrée audio non disponible sur les ...

Страница 22: ...arrière de la télécommande pour insérer les piles Dans la majorité des moniteurs GIGAMEDIA la batterie est déjà installée sur la télécommande NB Les télécommandes inclus dans les moniteurs CCTV GIGAMEDIA peuvent être différentes du modèle présenté ci dessus Insérez la batterie à l emplacement indiquée Piles fournies Fermez le couvercle de la télécommande après insertion de la batterie Dirigez la t...

Страница 23: ...z sur l entrée BNC une ou deux caméras CCTV ou DVR SORTIE Connectez sur la sortie BNC un autre moniteur CCTV Sélectionnez l ENTREE 1 BNC ou L ENTREE2 BNC quand vous utilisez le bouton INPUT via la télécommande 1 6 3 Connexion à un ordinateur 1 6 2 Entrées BNC et sortie BNC Branchez la sortie RGB du PC à la prise VGA du moniteur Allumez le PC et le moniteur Sélectionnez la source d entrée VGA avec ...

Страница 24: ...s de signal d entrée Branchez le câble d entrée AC du moniteur puis appuyez sur l interrupteur principal du moniteur A ce moment là le moniteur reste sur STANDBY une lumière rouge indique cet état sur le panneau avant du moniteur Utilisez les touches suivantes pour passer du mode STANDBY à ALLUMER Appuyez sur POWER sur le panneau avant du moniteur ou directement sur le bouton POWER de la télécomma...

Страница 25: ...cipal 2 5 2 Options du menu OSD 2 5 3 Options du menu de géométrie A Appuyez sur le bouton MENU pour accéder aux fonctionnalités du menu principal B Appuyez sur la touche 34 pour choisir le menu désiré C Appuyez sur la touche 56 à nouveau pour entrer dans le sous menu 2 5 1 Options du menu PC Appuyez sur 34 pour sélectionner le menu PC Utilisez 56 pour sélectionner ce que vous voulez régler dans l...

Страница 26: ...ectionner le menu IMAGE Utilisez la touche 56 pour sélectionner ce que vous voulez régler dans le mode AV1 AV2 Appuyez sur le bouton 34 pour ajuster Lorsque vous êtes satisfait de votre ajustement appuyez sur MENU pour quitter le menu principal 2 6 2 Options du menu OSD Appuyez sur 34 pour sélectionner le menu OSD Utilisez 56 pour sélectionner ce que vous voulez régler dans le AV1 AV2 de mode Appu...

Страница 27: ...sur MENU pour quitter le menu principal 2 7 3 Options du menu OSD Appuyez sur 34 pour sélectionner le menu OSD Utilisez 56 pour sélectionner ce que vous souhaitez régler en mode HDMI Appuyez sur 34 pour régler Lorsque vous êtes satisfait de votre ajustement appuyez sur MENU pour quitter le menu principal HUE Réglage du niveau de gris PICTURE MODE Affichage de l éclairage Standard Dynamique Soft SL...

Страница 28: ...llumé le moniteur Ceci est normal L image est mise en attente pendant le processus de démarrage du produit Contactez votre distributeur fabricant si l image n est pas apparue au bout de 5 min Mauvaise colora tion de l image ou image de mau vaise qualité Réglez la couleur via les options du menu Gardez une distance suffisante entre le moniteur et le DVR Essayez un autre canal le problème peut venir...

Страница 29: ...ur GIGAMEDIA N oubliez pas de couper l alimentation en débranchant le cordon de la prise secteur avant de commencer toute opération de nettoyage NETTOYAGE DE L ÉCRAN Voici une excellente façon d enlever la poussière de l écran Utilisez un chiffon doux légèrement humide avec un mélange d eau tiède et un assouplissant léger ou du détergent type liquide de vaisselle Essorez le chiffon jusqu à ce qu i...

Страница 30: ... série Voir l étiquette apposée à l arrière du moniteur Transmettez ces informations à votre distributeur fabricant en cas de besoin Please read this manual carefully before operating your set Retain it for future reference Record model number and serial number of the set See the label attached on the back cover and quole this information to you r dealer when you require service ...

Отзывы: