background image

37

36

ENGLISH

37

36


My computer says: “CMOS Battery Low”, what should I do?

If your computer is without power (i.e. unplug the computer 
power source from the power outlet and remove the battery 
pack from it) for over 45 days, you would lose the information 
stored in CMOS.
Please  follow  the  steps  below  to  reconfigure  your  CMOS 
settings:
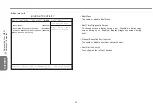
1. Press F2 to enter into the BIOS setup utility.
2. Select  “Load  Optional  Defaults?”.  When  you  see  the 

following prompt, choose <OK> and then press <Enter>.

3. Select “Save Changes and Exit”, select <OK> and press 

<Enter> to restart your computer.


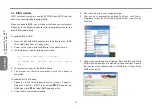
How to unplug or eject devices

1. In the notification area next to your task bar, double-click the 

Safe Removal icon. Safe removal displays a list of Plug and 
Play devices that support safe removal and that are currently 
attached to the system. If you do not see the Safe Removal 
icon, your device does not support safe removal, and you 
cannot unplug or eject your device using Safe Removal.

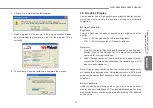
2. In Safely Remove Hardware, in the list of devices, select the 

device that you want to unplug or eject, and then click Stop.

  This tells the system that you will be unplugging or ejecting 

the device.

3. In Stop a Hardware device, click OK.

  A notification appears stating that it is now safe to unplug or 

eject the device.

Caution
Unplugging or ejecting a device that supports safe removal 
without first using the Safe Removal application to warn the 
system can cause data to be lost or your system to become 
unstable. For example, if a device is unplugged during a data 
transfer, data loss is likely. If you use Safe Removal, however, 
you can warn the system before you unplug or eject a device, 
preventing possible loss of data.

Note
For removable storage devices that can safely be removed 
while the system is on, the system disables write caching by 
default. It does this so the devices can be removed without loss 
of data. When write caching is disable, however, the system 
will likely experience slower performance, so be sure to enable 
write caching when you have finished removing the device.

Troubleshooting

Содержание W551

Страница 1: ...onic mechanical photocopy recording or otherwise without prior written consent Trademarks Product names used herein are for identification purposes only and may be the trademarks of their respective companies Microsoft MS DOS Windows and Windows Sound System are trademarks of Microsoft Corporation Intel Centrino Centrino Duo Pentium M Banias Calexico are registered trademarks of Intel Corporation S...

Страница 2: ...and may result in fire or electri cal shock Use only the AC adapter and batteries that are supplied by your notebook manufacturer Using other types of battery or AC adapter may heighten the risk of fire or explosion Incorrectly placed batteries may result in an explosion Replace only with the same or compatible battery recommended by the manufacturer Please discard used batteries according to the ma...

Страница 3: ...pt to the new environment before turning on power When unplugging the power cord please make sure that you pull on its connector or on its strain relief loop and not on the power cord itself As you pull out the connector please ensure that it is pulled out evenly in order not to bend its connecting pins Also be fore you connect the power cord make sure that both connectors are correctly oriented a...

Страница 4: ... cables connecting to PCMCIA cards see the option manual or installation instructions Federal Communications Commission FCC PART 68 Warning This equipment complies with Part 68 of the FCC Rules On the bottom of the computer is a label that contains among other in formation the FCC Registration Number and Ringer Equivalence Number REN for this equipment You must upon request provide this informatio...

Страница 5: ...patibility EMC Chapter 3 Limits Section 3 Limits on the voltage fluctuations and flicker in low voltage power supply systems for equipment with rate cur rent up to and including 16 A EN 60950 Safety of Information Technology Equipment NOTE EN 55022 emissions requirements provide for two classificaatios Class A governs commercial use Class B is governs residential use BSMI Notice Taiwan Only Most note...

Страница 6: ...ted architecture providing you with a personal computer that is compact powerful and easy to use Designed for a wide range of general business and personal productivity applications this notebook is an ideal choice for use in the office at home and on the road This Manual contains all the information you need to set up and use your notebook computer It describes all of its features in a thorough ye...

Страница 7: ...Notebook Computer 3 1 How to restore to factory default settings 16 3 2 BIOS Settings 18 3 3 BIOS Update 24 3 4 Graphics Display 25 3 5 Protecting Your W551 Notebook Computer 27 Chapter 4 Connecting Peripherals 4 1 Using the USB Port 29 4 2 Connecting to an External Monitor via the VGA Port 29 4 3 Using the Port Replicator Connector 30 4 4 Using the LAN Port 31 4 5 Using the Modem Port 31 4 6 Usin...

Страница 8: ...1 W551 NOTEBOOK USER S MANUAL ENGLISH Chapter 1 The Grand Tour This chapter will show you basic components of the computer and briefly explain how they function The Grand Tour ...

Страница 9: ... Type with a mirror like screen giving you clearer viewing experiences 3 Launch Keys Buttons for launching frequently used programs 4 Light Sensor To activate deactivate Light Sensor press Num Lk key first When Num Lock light beside Power Button is on release Num Lk key and press Fn Home 5 Power Button Turn the computer on and off or resumes whenever it is in suspend mode 6 Touchpad Use it to move ...

Страница 10: ... Modules insert only one card at a time 2 PCI Express Card New Card Slot Accepts additional New Card compatible modules 3 USB Port Connects to USB Devices 4 Optical Drive Internal optical drive loads programs from a Compact Disc CD or a Digital Versatile Disc DVD 5 Optical Drive Indicator The light flickers to indicate activity when the ODD is playing a media disc or is being accessed by the operat...

Страница 11: ...94 Port Connects to your IEEE1394 Firewire compatible devices Bottom View 1 Battery Bay Equipped with a Lithium Ion Li Ion battery pack 2 Battery Latch Push latch to remove battery 3 Fan Heat Vent The built in fan ventilates heat inside your computer 4 Stereo Speakers The built in dual speakers output stereo sound 5 CPU Memory Wireless LAN Card Compartment This compartment contains CPU Memory and ...

Страница 12: ...or not your computer is connected to a wireless network Media Card Status Indicator This light flicks when computer is reading a multimedia or SD card Caps Lock Lights up when the alphabet keys are locked in uppercase Press Caps Lock to turn on or turn off this mode Num Lock Lights up when the numeric mode is turned on by pressing Num LK Press Num LK again to turn off the embedded numeric keyboard ...

Страница 13: ...ur W551 notebook computer including connecting the AC adaptor turning the computer on off using touch pad keyboard hot keys battery and so on If you are new to computers and to the operating system this chapter will guide you through some of the new exciting features Operating Basics ...

Страница 14: ...rge it with other power adap ter otherwise fire or explosion may occur Replacing the Battery The battery will gradually weaken over time We recommend that you replace your battery when you notice a significant decrease of battery capacity To change the battery pack follow the steps below 1 Turn off the computer 2 Close the lid and flip the computer over 3 Slide the side battery latch 1 to the left C...

Страница 15: ...ss and hold the power button for one or two seconds The power indicator will glow blue once the computer is powered on Turning off the power If you are not going to use your notebook computer for a while it is best to turn off its power Before turning off power close all programs first and shut down the operating system After turning off your notebook computer make it a habit to leave the LCD panel...

Страница 16: ...like the one shown below 2 Put the CD into the CD R W or DVD RW optional Drive An Auto Run installation screen will appear 2 5 Using the Launch Keys The easy access buttons located on the top of the left side allow you to easily access the internet and your E Mail client such as Microsoft Outlook There are 5 launch keys found next to the power button Internet Opens up your Internet Explorer browse...

Страница 17: ...n Home key To activate deactivate Light Sensor Press Num Lk first When Num Lock light beside Power Button is on release Num Lk and press Fn Home Pause key Press this key to temporarily halt execution of a command Pressing any other keys to resume execution of a command Shift key Press this key in combination with letters to produce uppercase letters in typing Use this key in combination with those ...

Страница 18: ... a time PgDn key Moves the cursor down one screen at a time End key Moves the cursor to the end of a screen or a line Special Function Keys Embedded Numeric Keypad The embedded numeric keypad functions like the one on a desktop keyboard It is indicated by small characters located on the upper left hand corner of the keycaps Desired Access Num Lock On Num Lock Off Number keys on embedded keypad Typ...

Страница 19: ... Fn key with other keys it can simulate all keyboard functions of a regular desktop keyboard Fn F1 Suspend switch Fn F2 Activate or deactivate wireless functions Fn F3 Switch between LCD or CRT monitor Fn F4 Increase screen brightness Fn F5 Decrease screen brightness Fn F6 Audio mute Fn F7 Decrease audio volume Fn F8 Increase audio volume Fn F9 Play or pause media player Fn F10 Stop media player F...

Страница 20: ...ve the pointer over to the item with your finger on the pad and click twice on the left button to select menu items or simply tap twice on the touchpad To drag and drop Move the pointer over to the item with your finger on the pad click once on the left button beneath the Touchpad and select the item you want once the item is selected you can then drag the item by gliding your finger on the Touchpad ...

Страница 21: ... drive is normally used for installing operating system and software programs To insert and remove a disc from the drive 1 Press the button on the front of the drive to eject the disc tray and gently pull out the tray 2 Place the disc on the tray with label side up 3 Place the disc on the spindle and press it down gently until the disc clicks into place 4 Slide the tray back until it clicks shut 1...

Страница 22: ...the BIOS setup utility The W551 Notebook Computer has a BIOS setup utility which allows you to configure important system settings You will also learn how to upgrade components in order to improve system performance If you have questions about any of these settings please contact your vendor Personalize Your W551 Notebook Computer ...

Страница 23: ...ill see the Select Recover Type menu 2 Select a recovery option Click on the desired option or Press the Tab key until the desired option is highlighted then press the space bar Recover Boot Partition Select this option if you know that your hard drive is already partitioned into several drives if you would like to recover only the boot partition then select this option However the Recover Boot Pa...

Страница 24: ...y completed Time elapsed Estimated time remaining The time it takes FirstWare Recover Pro to complete the recovery process ranges from 15 minutes to an hour depending on the size of the recovery image The more applications and utilities that were included in the factory setup the longer the process will take Amount of data in Kilobytes to be recovered Cancel If you select Cancel the recovery proce...

Страница 25: ...d on reboot your computer and press the F2 key to enter the setup utility Navigating and Entering Information in BIOS Use the following keys to move between fields and to enter information Item Description Select Screen Push the up and down arrow keys to move among selections then press Enter to make a selection Change Option F1 General Help F10 Save and Exit ESC In any area you can simply Press E...

Страница 26: ... ROM have been configured for this notebook Under normal conditions please do not change the configuration Main Advanced Boot Security Exit System Time 23 43 17 System Date 01 01 2006 SATA Hard Drive ST98823AS CD ROM DVD ROM None Item Specific Help TAB Shift Tab or Enter Selects field F1 Help Select Item Change Values F9 Setup Defaults ESC Exit Select Menu Enter Select SubMenu F10 Save and Exit BIOS S...

Страница 27: ...isplay device LCD CRT LCD CRT and TV Mode NTSC or PAL in the Sub Menu Internal Devices Configurations To select options for advanced chipset features You can enable disable the following devices in the Sub Menu CD ROM DVD ROM controller USB Host Controller Bluetooth Audio controller LAN controller Wireless LAN controller New Card Controller Card Reader and 1394 Controller Plug Play OS To select th...

Страница 28: ... to confirm The password you enter should contain up to 6 alphanumeric characters If you make a mistake while entering your password you can always press Esc to start over User Password You can enter into the setup utility to change or remove user pass words however you can not change or remove the Supervisor Password nor can you access the diskette HDD Password To input change or disable hard dri...

Страница 29: ...9 Setup Defaults ESC Exit Select Menu Enter Select SubMenu F10 Save and Exit Boot Menu To enable or disable Boot Menu Boot Time Diagnostic Screen To choose screen display during boot Disabled display Logo screen during boot Enabled display Diagnostic screen during boot Preboot Execution Environment To enable or disable boot from network server Boot Device Priority To configure order of boot device...

Страница 30: ...hanges To load previous values from CMOS for all BIOS setup items Save Changes To save BIOS setup data to CMOS Main Advanced Boot Security Exit Exit Saving Changes Exit Discarding Changes Load Setup Defaults Discard Changes Save Changes Item Specific Help Exit System Setup a n d s a v e y o u r changes to CMOS F1 Help Select Item Change Values F9 Setup Defaults ESC Exit Select Menu Enter Select Sub...

Страница 31: ...ier Batch pour fichier BIOS 4 The system will now run the BIOS update 5 The system will restart automatically once the update is completed To update BIOS in Windows 1 Please go to http www gigabyte com tw Home Support Notebook BIOS W551 to download BIOS update tool WinPhlash and the latest BIOS upgrade utility 2 Unzip the file you just downloaded 3 Run the setup exe in your unzipped folder 4 After y...

Страница 32: ...CD panel brightness Resolution 1 Click My Computer Control Panel Appearance and Themes Display Click on the Settings tab The dialog box will display your monitor s current resolution 2 Under Screen resolution use the slide bar to adjust monitor s resolution Normally you should use the resolution your LCD monitor was designed for Note Using a lower resolution than the screen was designed for will r...

Страница 33: ... keys are available You can select different video outputs by pressing Fn F3 repeatedly Clone for W551N Extended Desktop for W551U In Clone Extended Desktop mode the video display hot keys are available You can select different video outputs by pressing Fn F3 repeatedly If the external monitor is connected the display on LCD and external monitor is the same Dualview for W551N Dual Display Clone fo...

Страница 34: ... may appear on the LCD screen as a result of LCD s manufacturing limitations however this will not effect your LCD screen s normal functions 3 5 Protecting Your W551 Notebook Computer W551 Notebook Computer provides both hardware and software security locks to protect your computer Using a security lock A security lock notch can be found on the right side of the com puter This notch allows you to ...

Страница 35: ...28 ENGLISH 28 Chapter 4 Connecting Peripherals This chapter will show you step by step how to connect your peripherals to the W551 notebook computer Connecting Peripherals ...

Страница 36: ...ur W551 notebook and make sure the monitor power switch is turned off 2 Connect the connector cable of the monitor to the VGA port on the left side of your notebook Secure the cable connection with the screws provided 3 Connect the monitor power cable and plug it into a properly grounded wall outlet 4 Turn on the monitor 5 Turn on your W551 notebook Both the LCD panel and the monitor screen will s...

Страница 37: ...t The external monitor port allows you to connect an external monitor 5 Parallel Port The parallel port or LPT port allows you to connect parallel devices such as a printer to your notebook 6 USB V2 0 Port The two USB ports allow you to connect USB devices such as external game pads pointing devices key boards and or speakers 7 RJ45 10 100 1000Mbps Ethernet LAN Port Internal LAN port connects your...

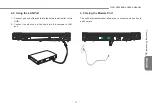
Страница 38: ...t 1 Connect one end of the cable into the network wall outlet or the HUB 2 Connect the other end of the cable into the computer s LAN port 4 5 Using the Modem Port The built in fax data modem allows you to connect a phone line to a phone jack Connecting Peripherals ...

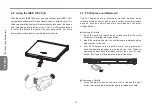
Страница 39: ...our computer and a variety of communication devices such as network adapters fax modems or external storage devices Inserting a Card 1 Insert the card with label side up make sure that the metal connector is inserted into the card slot 2 Insert the card into the slot You will feel some resistance as the card reaches to the end 3 Your PCI Express cards require drivers or programs that allow the ope...

Страница 40: ... MMC MS MS Pro cards 4 10 Using your Bluetooth optional and Wireless devices Your W551 computer supports both Bluetooth and Wi Fi compatible devices To enable both wirless and Bluetooth functions at first please press the wireless Launch key which is located on the top of the left side Therefore you can press Fn Esc to enable or disable Bluetooth function only and press Fn F2 to turn on off wirele...

Страница 41: ...34 ENGLISH 34 Chapter 5 Troubleshooting In this chapter we will list some frequently encountered technical problems and tell you how to resolve them Troubleshooting ...

Страница 42: ...mentation The dial tone volume of the internal fax modem is too low How can I increase its volume Go to Start Control Panel Sounds Speech and Audio Devices under Device volume adjust your speaker volume by controlling the volume bar What kind of external microphone can I use with my notebook computer You will need to use a self amplifying microphone There are echoes coming from my speakers What ca...

Страница 43: ...ce using Safe Removal 2 In Safely Remove Hardware in the list of devices select the device that you want to unplug or eject and then click Stop This tells the system that you will be unplugging or ejecting the device 3 In Stop a Hardware device click OK A notification appears stating that it is now safe to unplug or eject the device Caution Unplugging or ejecting a device that supports safe removal...

Страница 44: ...ical and hardware specifications of your W551 notebook computer Please note that the information mentioned here may not completely match your notebook computer s actual specifications Specification is subject to change without notice and the present manual may be modified at a later time Appendix ...

Страница 45: ...upport Dual indenpendent display Connectivity Intergrated 10 100 1000 Mbps Fast Ethernet connection Built in 56Kbps V 92 fax data modern Four Universal Serial Bus USB 2 0 ports Dual band antenna WLAN Intel PRO Wireless 3945ABG IEEE 802 11a b g Option Audio Built in High Definition Audio Built in two stereo speakers Dual Array Microphone Separate audio ports for headphone out and microphone in devi...

Страница 46: ...39 39 W551 NOTEBOOK USER S MANUAL ENGLISH Appendix B Service Centers This appendix will list our global service centers for your W551 notebook computer Appendix ...

Страница 47: ... 1 626 854 9338 FAX 1 626 854 9339 WEB Address http www gigabyte us Japan NIPPON GIGA BYTE CORPORATION TEL 81 3 5791 5438 FAX 81 3 5791 5439 WEB Address http www gigabyte co jp China G B T TECH TRADING CO LTD Shanghai TEL 86 21 63410999 FAX 86 21 63410100 GuangZhou TEL 86 20 87586074 FAX 86 20 85517843 Beijing TEL 86 10 62102838 FAX 86 10 62102848 Chengdu TEL 86 28 85236930 FAX 86 28 85256822 Wuha...

Страница 48: ...Co Ltd WEB Address http www gigabyte ru Poland Office of GIGA BYTE TECHNOLOGY Co Ltd in PO LAND WEB Address http www gigabyte pl Czech Republic Representative Office Of GIGA BYTE Tech nology Co Ltd in CZECH REPUBLIC WEB Address http www gigabyte cz Romania Representative Office Of GIGA BYTE Technology Co Ltd in Romania WEB Address http www gigabyte com ro Serbia Montenegro Representative Office Of GIG...

Отзывы: