


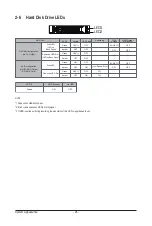


- 33 -
System Hardware Installation
R262-ZA2
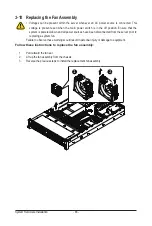
Follow these instructions to remove/install the fan duct:
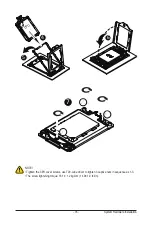
1. Loosen the captive screws securing the heatsink in place in reverse order (4
g
3
g
2
g
1).
2. Lift and remove the heat sink from the system.
3. To reinstall the heat sink reverse steps 1-2 while ensuring that you tighten the captive screws in
sequential order (1
g
2
g
3
g
4) as seen in the image below.
33
11
22
44
When installing the heatsink to CPU, use PHILLIPS #2-Lobe driver to tighten 4 captive nuts in
sequence as 1-4. The screw tightening torque: 10 ± 0.5 kgf-cm (8.7 ± 0.4 lbf-in).
Содержание R262-ZA1
Страница 1: ...R262 ZA1 R262 ZA2 AMD EPYC 7003 UP Server System 2U 14 Bay User Manual Rev 1 0 ...
Страница 10: ... 10 This page left intentionally blank ...
Страница 17: ... 17 Hardware Installation 1 3 System Block Diagram R262 ZA1 ...
Страница 18: ...Hardware Installation 18 R262 ZA2 ...
Страница 27: ... 27 System Appearance This page left intentionally blank ...
Страница 49: ... 49 System Hardware Installation Front HDD Backplane Board Power Cable Front HDD Backplane Board Signal Cable ...
Страница 50: ...System Hardware Installation 50 Rear HDD Backplane Board Power Cable Rear HDD Backplane Board Signal Cable ...
Страница 51: ... 51 System Hardware Installation ATX Power Cable ...
Страница 53: ... 53 System Hardware Installation Slimline SAS Cable 0 1 Slimline SAS to SATA Cable 2 3 ...
Страница 64: ...BIOS Setup 64 When Boot Mode Select is set to Legacy in the Boot Boot Mode Select section ...
Страница 75: ... 75 BIOS Setup 5 2 7 PCI Subsystem Settings ...
Страница 86: ...BIOS Setup 86 5 2 16 Intel R I350 Gigabit Network Connection ...
Страница 92: ...BIOS Setup 92 5 3 1 CPU Common Options ...