background image

- 9 -

Software Installation

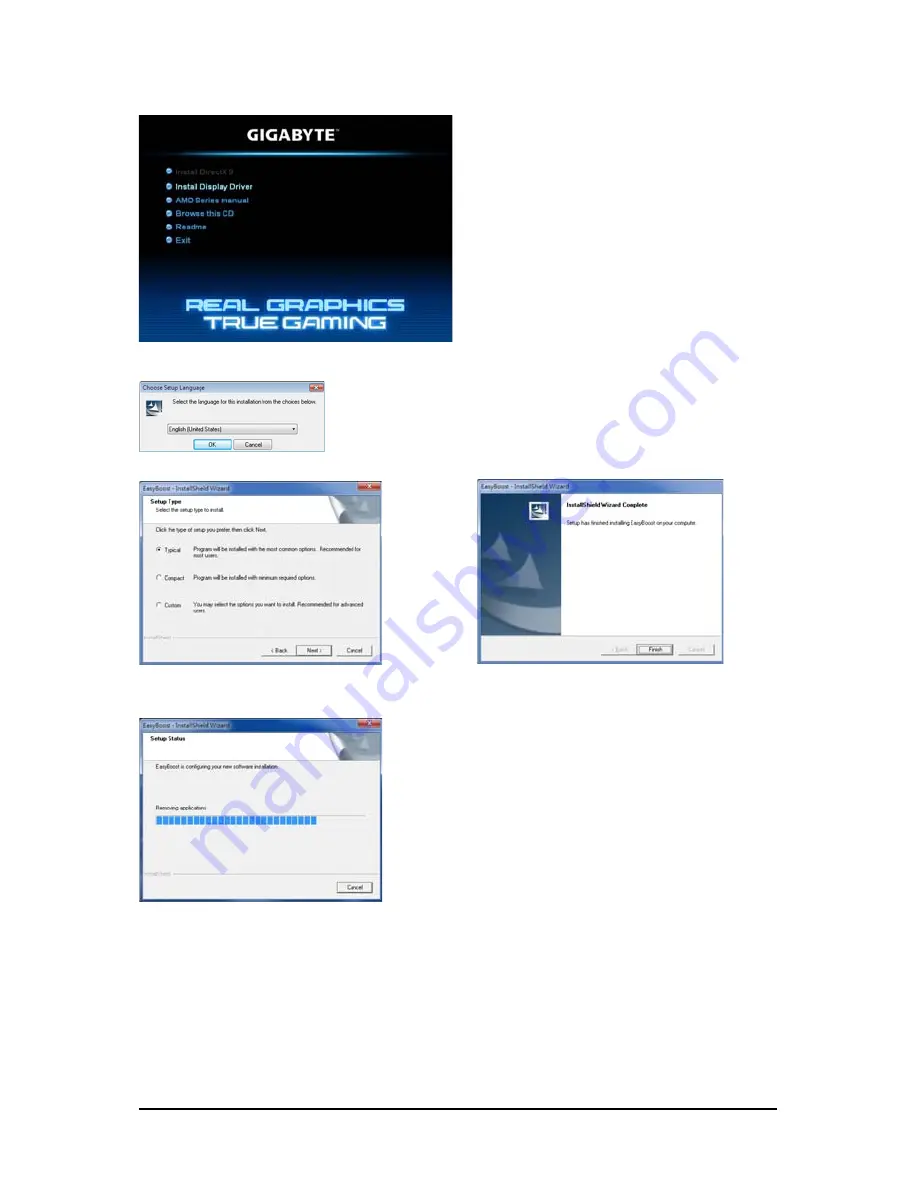
3.1.2. GIGABYTE Easy Boost  on Driver Disk

Step 1:
Click the GIGABYTE Easy Boost item.

Step 2:
Choose the language for the installation and click the OK button.

Step 3:
Choose the Typical and click the Next button

Step 4:
Click the Finish button. Then the installation of
the GIGABYTE Easy Boost is completed.

The system is installing the components.

Содержание GV-R545-1GI

Страница 1: ...pid change in technology some of the specifications might be out of date before publication of this this manual The author assumes no responsibility for any errors or omissions that may appear in this...

Страница 2: ...Installation 4 2 1 Hardware Installation 4 2 1 1 AMD Crossfire 5 3 SoftwareInstallation 7 3 1 Driver and Utility Installation 7 3 1 1 Driver Installation 7 3 1 2 GIGABYTE Easy Boost on Driver Disk 9 3...

Страница 3: ...l Pentium 4 Core TM 2 or AMD Athlon TM Phenom TM 1 GB or more of system memory for best performance Optical drive for software installation CD ROM or DVD ROM drive Operating System Windows 7 Windows V...

Страница 4: ...itor To connect a flat panel display to your graphics card use the DVI I connector To connect an HDMI monitor to your graphics card use the HDMI connector To connect a DisplayPort monitor to your grap...

Страница 5: ...1 Then users can enable the CrossFireX technology through the graphics card driver Two CrossFire bridge interconnect cables Two CrossFire graphics cards of the same type Example GV RX195P256D RH Figu...

Страница 6: ...cking and installation should be done on a grounded anti static mat The operator should be wearing an anti static wristband grounded at the same point as the anti static mat Inspect the card carton fo...

Страница 7: ...perating system insert the driver disk into your optical drive The driver Autorun screen is automatically displayed which looks like that shown in the screen shot below If the driver Autorun screen do...

Страница 8: ...tor Setp 4 Click the Express or Custom icon and then click Next Step 5 Click the Accept button The system is installing the components Step 6 Click the Finish button to restart the computer Then the d...

Страница 9: ...GIGABYTE Easy Boost item Step 2 Choose the language for the installation and click the OK button Step 3 Choose the Typical and click the Next button Step 4 Click the Finish button Then the installati...

Страница 10: ...chnical Support Live Update function Over Clock User can adjust GPU clock Memory clock Shader clock and Fan speed here User can also monitor graphics card current parameters OSD Turning User can set h...

Страница 11: ...User can back up current BIOS flash BIOS from selected file and auto flash BIOS on line Technical Support User can get information of VGA CPU motherboard system memory and monitor User also can press...

Страница 12: ...on in the notification area Right click the icon to enter the AMD Catalyst Control Center The AMD Catalyst Control Center is used to configure all your graphics card settings Right click the ATI icon...

Страница 13: ...ware and Sound Manage audio devices Using the picture to the left as the example to set HDMI audio to be the default Sound Playback device select Digital Output Device HDMI Otherwise select Digital Ou...

Страница 14: ...ck the Advanced button for advanced settings 3 3 Display Properties Pages Display Settings Resolutions and Color Quality for Windows To access Display Settings page right click on desktop and select P...

Страница 15: ...ew and Advanced View at any time To access more settings in Basic View click Basic and then click Next Easy Setup Wizards Choose a wizard from the central list and click Go for step by step assistance...

Страница 16: ...er the new name in the Output File area Finally click Next to start file conversion The video file has been successfully converted Setup my display configuration This wizard allows you to configure di...

Страница 17: ...Setup This option allows you to configure your desktop including changing desktop resolution and desk top mode setting up extended desktop requires more than one display and rotating desktop image to...

Страница 18: ...nced features on each page The left navi gation pane displays a tree view that lists all the advanced features The Advanced view is rec ommended for experienced users Custom View The Custom view allow...

Страница 19: ...aphics card If there is more than one graphics card installed in your computer you need to select the appropriate card before creating loading or activating a Profile Preferences Properties The Prefer...

Страница 20: ...ure allows you to access the comprehensive online help register your product or generate a problem report should you require technical support The Catalyst Control Center Help feature offers the follo...

Страница 21: ...supported on systems running Windows Vista Note On systems Windows XP this page will show up the 3D Refresh Rate Override item Use 3D Re fresh Rate Override to set a refresh rate of your choice when...

Страница 22: ...onitor to determine the limits for the resolution and re fresh rate Adjustments Use Monitor Adjustments to resize and reposi tion the computer desktop on your monitor s display screen You can also adj...

Страница 23: ...s center anti aliasing samples multiple locations within each pixel and blends the results together to pro duce the final color Anti Aliasing can be set to favor either system pro cessing performance...

Страница 24: ...h applications that display highly detailed scenes backgrounds and textured objects like those seen in 3D games If you are unsure how to configure anisotropic filtering use the Use application setting...

Страница 25: ...ightness Contrast Saturation and Tint for video playback Note Certain video formats do not support these adjustments These settings will only affect ap plications with video overlay support Advanced C...

Страница 26: ...video overlay support TheaterMode Use Theater Mode to change the way you view streaming video Note These settings will only affect applications with video overlay support Extended Desktop Mode is not...

Страница 27: ...p until you hear three beeps Once your computer has full booted disable Preserve AMD Overdrive settings at logon CrossFireXTM CrossFireX delivers exceptional performance on a single display by combini...

Страница 28: ...28 AMD Series Graphics Accelerator AMD Eyefinity setting Select Create Eyefinity Display Group Select Display 3 x 1 Arrange the order of your displays then the setting is completed...

Страница 29: ...ted the appropriate display device and graphics card when you install the graphics driver For more troubleshooting information please right click the ATI icon in the notification area Restart your com...

Страница 30: ...ver we at GIGABYTE are continuing our efforts to develop products that do not use internationally banned toxic chemicals Waste Electrical Electronic Equipment WEEE Directive Statement GIGABYTE will fu...

Страница 31: ...s properly With your help we can reduce the amount of natural resources needed to produce electrical and electronic equipment minimize the use of landfills for the disposal of end of life products and...

Страница 32: ...32 AMD Series Graphics Accelerator...

Отзывы: