6
To Check Valves
2. Remove the exposed
spring tension cap
(30) from valve seat by
pushing it sideways with
a screwdriver. Remove
spring tension cap (30),
valve spring (29), and
valve plate (28).
30 29 28
4. Remove hexagon socket
screws (34) and remove
valve casing (26) by
pulling them frontwise
over the plungers (16).
1. Remove plugs (32) with
socket wrench.
3. Pull out valve seat (27) and
O-ring (31) with a valve puller.
Check O-ring for wear.
REPAIR INSTRUCTIONS - P470H PUMPS
5. Using two screwdriv-
ers, remove seal case
(21) out of the valve
casing (26) or inter-
mediate casing (25).
6. The exposed suction valve parts
are to be removed the same
way as the discharge valves
as described above. Check
valve components for wear and
damage. Check O-rings (21A,
31, 33). Replace worn parts.
Reassemble in same order.
Coat new o-rings with oil before
installation. Coat O-rings (25B)
with silicon grease and place
them in their re cessses.Insert
seal cases (21) into valve casing
(26) before mounting the whole
unit. Slide valve casing (26)
over plungers. Tighten hexagon
socket screws (34) crosswise
and evenly at 36 ft-lbs. Tighten
plugs (32) at 125 ft.-lbs. (170
Nm).
lmportant:
When extracting the
valve holders (22), make sure not
to scratch the outer bore diameter
as this is a sealing.
To Check To Check Seals and Plunger Pipe
7. Remove hexagon socket
screws (34) and remove
valve casing (26) by pulling
them frontwise over the
plungers (16).
8. Using two screwdrivers,
gently pry seal cases (21)
out of the valve casing
(26) or intermediate cas-
ing (25). Press grooved
rings (23) and support
rings (24) out of inter-
mediate casing (25) us-
ing a screwdriver. Check
O-rings (21A/25B). Ex-
amine seals (23). Replace
worn seals.
Содержание P470H
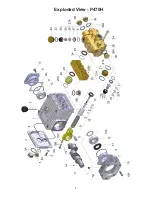
Страница 4: ...4 Exploded View P470H ...


