background image

6

Electrical Safety

The wires in the power cable of this product are coloured in accordance with 


the following code:

Blue = Neutral      Brown = Live      Green/Yellow  = Earth

If the markings on the terminals of your plug do not correspond to the colours 

of the wires in the power cable, proceed as follows:

• 

 The wire which is coloured Blue must be connected to the terminal which is 

marked N or coloured Black.

• 

 The wire which is coloured Brown must be connected to the terminal which is 

marked L or coloured Red. 

• 

 The wire which is coloured Green/Yellow must be connected to the terminal 

which is marked with the earth symbol ( ) or coloured Green, or Green/Yellow

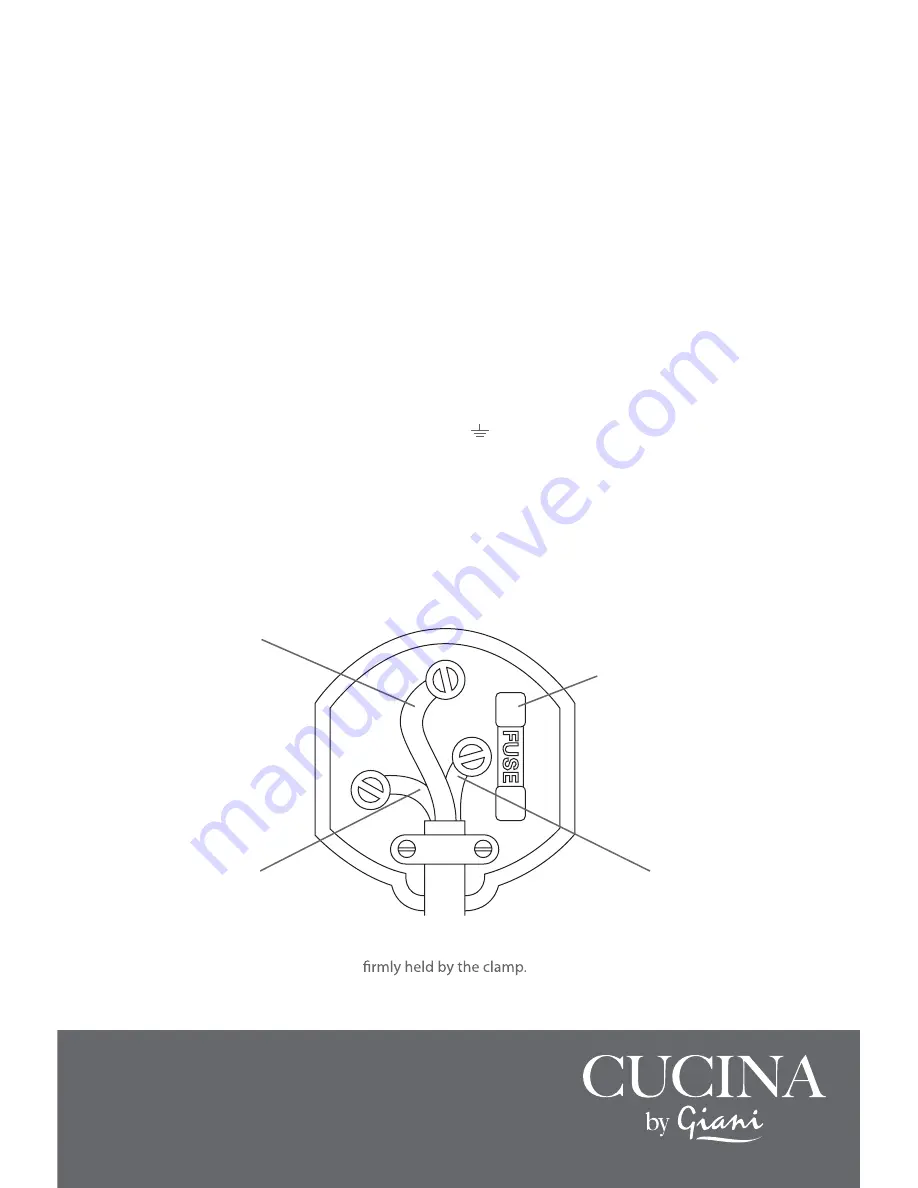
Plug should be BS1362/ASTA approved.


Fit a 13 Amp fuse.

Ensure that the outer sheath of the cable is 

NEUTRAL

(Blue)

EARTH

(Green/Yellow)

LIVE

(Brown)

13 Amp Fuse

Содержание CUCINA GCSM-983

Страница 1: ...Stand Mixer IM GCSM 983160513 Stand Mixer Instruction Manual Model Reference GCSM 983...

Страница 2: ...ety of others please ensure you read the Prod uct Safety and Electrical Safety Information before you operate this product Keep these instructions in a safe place for future reference Technical Inform...

Страница 3: ...RUCTIONS FOR USE GCSM 983 Contents Product Safety 4 Electrical Safety 5 6 Features 7 Before First Use 8 UsingYour Stand Mixer 9 10 The Accessories 11 12 Hints and Tips 12 Care and Cleaning 13 Guarante...

Страница 4: ...e device must be operated with the plate If you are unsure about the details of the available power supply ask your dealer or the local power supply company Unplug the appliance when not in use or bef...

Страница 5: ...uct to be exposed to rain or moisture during use or storage Before switching on make sure that the voltage of your electricity supply is the same as that indicated on the rating plate Connecting it to...

Страница 6: ...e which is coloured Blue must be connected to the terminal which is marked N or coloured Black The wire which is coloured Brown must be connected to the terminal which is marked L or coloured Red The...

Страница 7: ...Stainless Steel Mixing Bowl Splash Guard Whisk Suction Feet Upper Main Body Head Lift Lever Lower Main Body Speed Control Dial Due to our policy of continuous improvement the actual product Dough Hoo...

Страница 8: ...cloth Rinse and dry thoroughly Wipe the stand mixer with a soft damp cloth to remove any manufacturing dust Before assembling ensure the speed control dial is turned to the OFF position The suction fe...

Страница 9: ...to the blade connector and rotate the blade connector clockwise until it engages 5 Turn the head lift lever 2 in the direction of the arrow on the machine and press the upper main body 1 downward with...

Страница 10: ...f the mixer head and turn anti clockwise to lock into position 4 Insert the required tool 5 Lower the mixer head 6 Remove the splashguard by raising the mixer head and turn it clockwise to un lock Dur...

Страница 11: ...mixing to stop the machine and lift the upper main body to scrape down the bowl to ensure all ingredients are incorporated fully The Dough Hook This is used for mixing bread and pizza dough 1 2 Selec...

Страница 12: ...ine at room temperature this beats with the sugar easier and you will incorporate more air for a better result When making pastry it is best to use very cold butter and ice cold water Eggs at room tem...

Страница 13: ...n cleaning the interior and exterior and splash guard do not use any abrasive detergents or alcohol 5 To clean the unit NEVER submerge it in water or any other liquid 6 The beater whisk and dough hook...

Страница 14: ...product itself or the packaging The symbol aims to encourage you to identify and dispose of a WEEE product separately from other household waste when it reaches the end of its life old electrical and...

Страница 15: ...2011 65 EU Giani Ltd Manchester UK SK2 6RH e mail info gianiuk co uk...

Отзывы: