


www.ghibliwirbel.com
Professional Cleaning Machines Since 1968
ENGLISH
- 8
9.1 OPERATION
9.1.a - Checks before use (Fig. 12)
- Check that the exhaust tube (15) of the
recovery tank is properly coupled and
properly sealed.
- Check that the squeegee water aspira-
tion hose (16) is correctly inserted in the
recovery tank.
- Check that the connector (53) on the
squeegee (14) is not blocked and that the
hose is connected correctly.
- To check the status of the battery charge;
press the switch (26), controlling the
LEDs (24) indicator (only for version BC).
9.1.b - Preparing the machine and
choosing the cycle (Fig. 12)
- Press the button (26) that illuminates.
- Lower the wiper (14), using the pedal (3),
releasing it from its coupling.
Working cycle:
- The machine can perform 4 working cy-
cles:
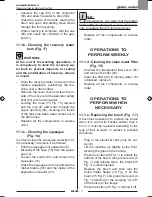
Drying only cycle:
- To perform the drying cycle only, press
button (25). The aspirator starts up.
Brushing only cycle:
- To effect only the brushing cycle, press
the levers (4), releasing the levers (4)
stops the brush.
Washing, brushing cycle:
- Press the button (27) to prepare for the
dispensing of water, then press levers (4)
to start the cycle.
Washing, brushing, drying cycle:
- Press the button (25) to start the aspira-
tor, the button (27) to prepare the dis-
pensing of water, then press the levers
(4) to start the cycle.
9.1.c - Adjusting the brush ground
contact (Fig. 13)
The machine has an adjustment system that
makes it possible to have constant contact
on the ground independently of the type and
size (thickness) of the accessories that are
used.
This adjustment is obtained by turning the
handwheel (23) located in the front part of
the machine.
If while cleaning (brushes rotating) you no-
tice that the machine does not move straight
but tends to go to the right or the left, this can
be corrected using the same handwheel (23)
with small rotations.
- Start the machine and begin the rotation
of the brushes.
If the car tends to go to the right, gently
turn the wheel button (23) to “S” until the
direction is right;
If the car tends to go to the left, gently
rotate the wheel button (23) to “D” until
the direction is right.
9.1.d - Adjusting the front wheel (Fig.
13)
(only for BC version)
The pressure of the brush on the floor can
be adjusted as follows, based on the type of
floor to be cleaned:
- Turn the handwheel (56) until lifting the
wheel (22) off the ground;
- Turn the handwheel (56) until the wheel
(22) touches the ground, then start the
machine and check while moving it that
the wheel (22) turns in the “ position of
maximum brush pressure”.
- The pressure of the brush on the floor
can be reduced using the handwheel
(56) in order to slightly lift the brush; this
adjustment can be useful when cleaning
floors that are particularly porous/delicate
or antislip floors.
Manuale FRECCIA 15_49021800_1ed_06-2017_a.indd 8
15/06/17 11:43
Содержание FR 15 E 38
Страница 4: ......
Страница 6: ......
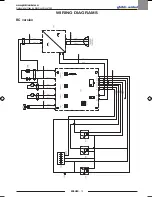
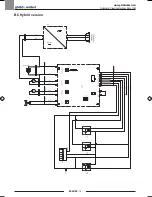
Страница 21: ...www ghibliwirbel com Professional Cleaning Machines Since 1968 ENGLISH 15 WIRING DIAGRAMS BC version...
Страница 25: ...www ghibliwirbel com Professional Cleaning Machines Since 1968...
Страница 26: ...www ghibliwirbel com Professional Cleaning Machines Since 1968...
Страница 27: ......


