background image


TECHNICAL MANUAL: BINDING BETWEEN GWA1521 AND GWA1502   |  Z

IG

B

EE

  |   page 9 

CONFIGURATION 

If the ZigBee network hasn't yet been created, proceed as follows: 

1.  Choose which device will have the role of coordinator 
2.  Activate the procedure to create the ZigBee network via the coordinator 
3.  After creating the network, activate 

Permit Join


4.  Power the devices that you want to join to the network (GWA1521 and GWA1502) 
5.  Make th

binding

 between the GWA1521 and GWA1502 devices 

If the ZigBee network has already been created, only the last three points of the list are required: 

1.  After creating the network, activate 

Permit Join


2.  Power the devices that you want to join to the network (GWA1521 and GWA1502) 
3.  Make th

binding

 between the GWA1521 and GWA1502 devices 


Creating and joining to the ZigBee network: 


1.  Make sure the actuator is in its factory-set condition (if it isn't, make a factory reset) 

2.  The LED on the device must have a fixed red light 

3.  Press the Permit Join activation button key quickly for 3 times. The LED will turn green for a few 

seconds and then begin flashing. From this moment, Permit Join is activated for 15 minutes (this 
device is now the network coordinator). 

4.  Make sure the interface is in its factory-set condition (if it isn't, make a factory reset) 

5.  When the device is powered, a scan will be launched (red LED) to identify an open ZigBee network 

6.  When the association has been made, the status LED will begin flashing red (or it will switch off) 

7.  Briefly press the button key of the actuator (network coordinator) to close the network 

Association between devices: 

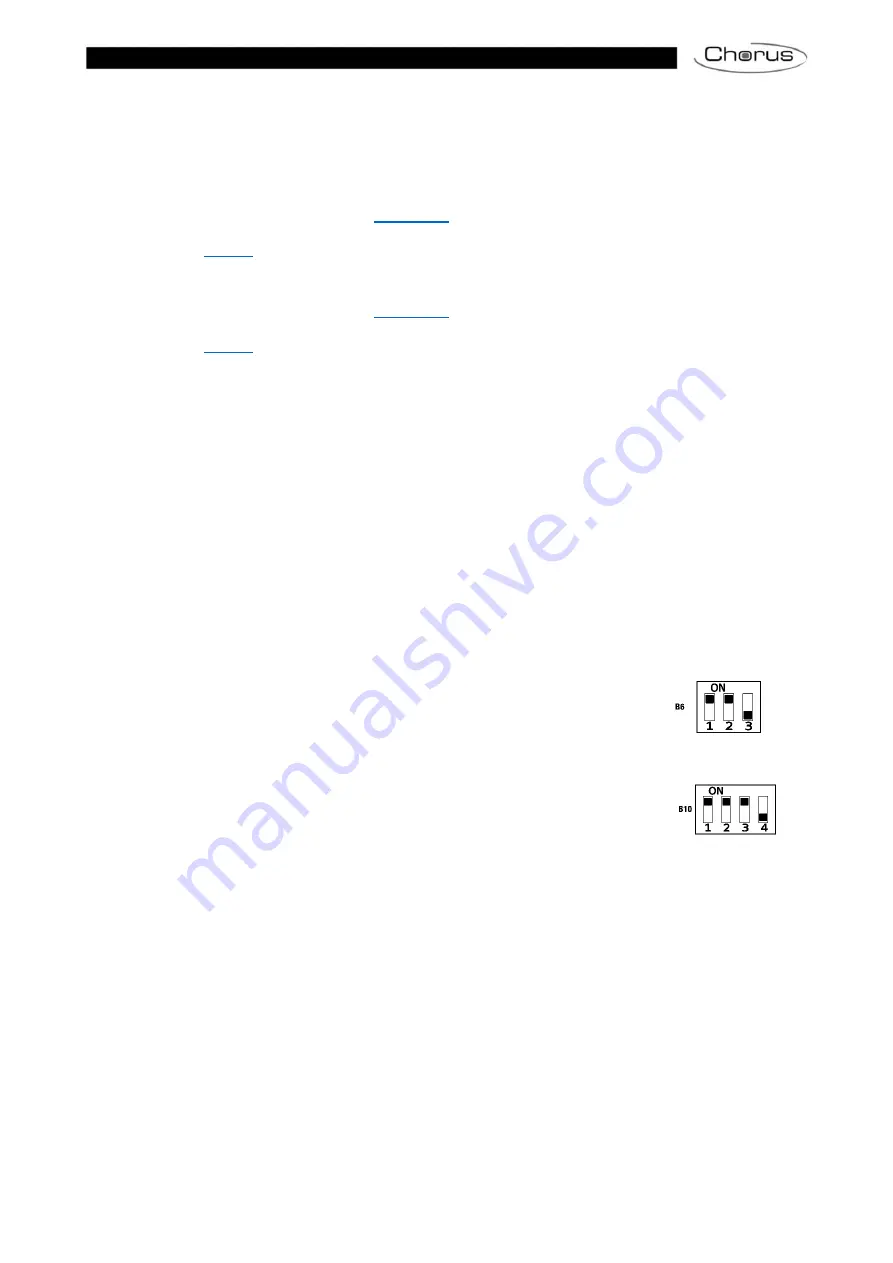
1.  On the GWA1521 actuator, bring the dip-switches to the positions shown 

B6


2.  The status LED will have a fixed yellow light 

3.  Press the button connected to the actuator on local input I1 

4.  The status LED will make a double yellow flash and this will continue cyclically 

5.  On the GWA1502 interface, bring the dip-switches to the positions shown 

B10


6.  The status LED will turn yellow 

7.  Now use the button key connected to the interface that you want to associate (I1 or I2). 

8.  The identification phase will normally terminate automatically (the LED will have a fixed yellow light 

again). If this doesn't happen, wait 3 minutes. 

9.  Set the dip-switches on the basis of the functions required 


Содержание Chorus GWA1521

Страница 1: ...MANUAL ZIGBEE CONFIGURATION BINDING BETWEEN THE GWA1521 ACTUATOR AND THE GWA1502 INTERFACE TECHNICAL MANUAL ...

Страница 2: ...page 2 ZIGBEE TECHNICAL MANUAL BINDING BETWEEN GWA1521 AND GWA1502 ...

Страница 3: ...NICAL FILES 5 DIMENSIONS 6 BREAKDOWN OF THE ZIGBEE DEVICES 7 ELECTRIC DIAGRAMS 8 CONFIGURATION 9 CREATING AND JOINING TO THE ZIGBEE NETWORK 9 ASSOCIATION BETWEEN DEVICES 9 ACTUATOR PARAMETERS GWA1521 10 HOW TO SET THE DURATION OF THE TIMING 10 INTERFACE PARAMETERS GWA1502 11 INTERFACE GWA1502 FACTORY RESET 12 ACTUATOR GWA1521 FACTORY RESET 12 ...

Страница 4: ... will use 3 Generate the PAN Personal Area Network 4 Generate the decoding key used by that specific network 5 Assign a short address to all the devices which are part of that ZigBee network 6 Transmit the decoding key to those devices End device Battery controlled ZigBee devices Joining Operation via which a ZigBee device becomes part of a ZigBee network Permit Join Operation via which a ZigBee n...

Страница 5: ...DEGREE OF PROTECTION IP20 OPERATING TEMPERATURE 5 45 C STORAGE TEMPERATURE 25 70 C RELATIVE HUMIDITY NON CONDENSATIVE Max 93 DIMENSIONS L X H X D MM 42x40x20 COMMUNICATION PROTOCOL ZigBee IEEE 802 15 4 REFERENCE STANDARDS 2014 53 EU GWA1502 CATEGORY Contact interface SUPPLY VOLTAGE 230V AC 50 Hz INPUT VOLTAGE 230V AC OUTPUT POWER 8 dBm NO OF INPUT CHANNELS 2 MAX CABLE LENGTH DEGREE OF PROTECTION I...

Страница 6: ...page 6 ZIGBEE TECHNICAL MANUAL BINDING BETWEEN GWA1521 AND GWA1502 DIMENSIONS GWA1521 GWA1502 ...

Страница 7: ...IGBEE page 7 BREAKDOWN OF THE ZIGBEE DEVICES GWA1502 A1 DIP switch with 4 one way switches A2 Miniature button key for joining functions A3 Status LED GWA1521 A1 DIP switch with 3 one way switches A2 Miniature button key for joining functions A3 Status LED ...

Страница 8: ...ETWEEN GWA1521 AND GWA1502 ELECTRIC DIAGRAMS GWA1502 L Power supply neutral N Power supply phase I1 Channel 1 input I2 Channel 2 input GWA1521 N Power supply neutral L Power supply phase 1 Output common wire 2 NO output I1 Local command input ...

Страница 9: ...n for a few seconds and then begin flashing From this moment Permit Join is activated for 15 minutes this device is now the network coordinator 4 Make sure the interface is in its factory set condition if it isn t make a factory reset 5 When the device is powered a scan will be launched red LED to identify an open ZigBee network 6 When the association has been made the status LED will begin flashi...

Страница 10: ...ated when the contact opens no command is sent The selected position merely determines the behaviour of the local input it doesn t influence overall product operation How to set the duration of the timing The duration of the timing function activation time stair raiser light can be modified as follows 1 Bring the dip switches to the position shown to enter activation time configuration mode 2 Wait...

Страница 11: ...operating mode selected and the actuators associated the behaviour of each channel upon the closure opening of the corresponding input is as follows MODE ASSOCIATION WITH ON OFF ACTUATOR Independent push button Closure inversion of current load status toggle Opening no effect Combined push button Closure sends ON if channel 1 OFF if channel 2 Opening no effect Toggle switch Closure and opening inv...

Страница 12: ...tivation push button A2 for at least 10 seconds The status LED will flash red and green alternately for 3 seconds then become red fixed ACTUATOR GWA1521 FACTORY RESET Press and hold the Permit Join activation push button A2 for at least 10 seconds The status LED will flash red and green alternately for 3 seconds then become red fixed ...

Страница 13: ...TECHNICAL MANUAL BINDING BETWEEN GWA1521 AND GWA1502 ZIGBEE page 13 LAST REVISION 07 2020 code 70194238 ...

Отзывы: