background image


Using Getac Software   

6-5


Charging Mode 

The lower left portion of the screen allows you to select the charging mode. 


Normal Mode

 – The battery will be fully charged. When remaining 

charge reaches below 95%, then charging will start until it is fully 
charged. 


Economy Mode 

– This mode helps prolong battery life by charging up to 

80% of its total capacity only. It is highly recommended if you are using 
AC power most of the time. 

Gauge Reset 

The lower right portion of the screen contains the battery health bar and 
provides the battery calibration function. 

The health bar shows the batter’s health by percentage. A low percentage 
indicates poor health and therefore the need to perform a gauge reset to 
calibrate the battery’s capacity and improve the battery’s performance. The 
gauge reset process includes discharging and then fully recharging the 
battery in two cycles. It can take several hours. 

To perform a gauge reset: 

1.


Connect the AC adapter. 

2.


Click 

Start

, located next to the health bar 

3.


In the pop-up dialog box, click 

Yes

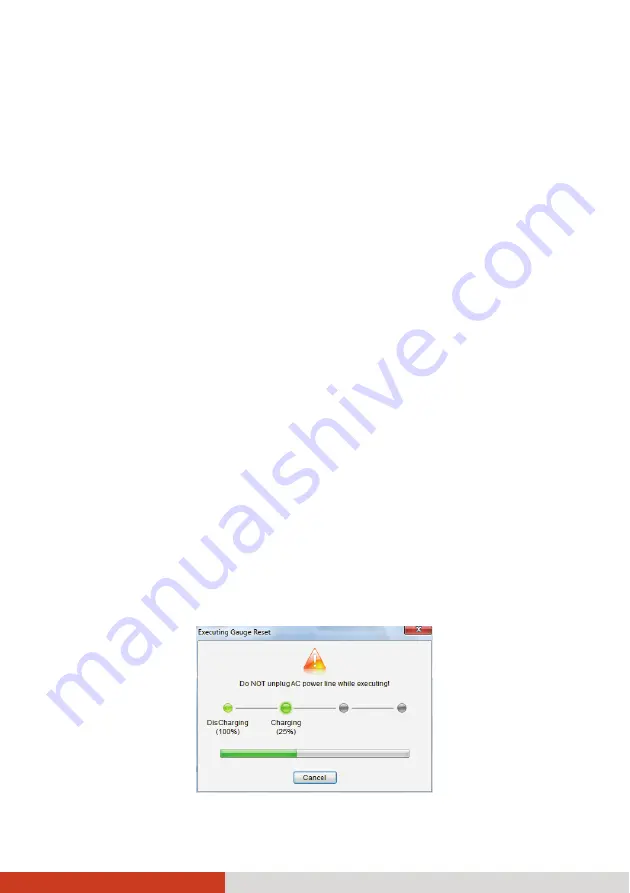
 to start the process. The window as 

below appears displaying the progress bar. 


Содержание 320GOBI3

Страница 1: ...Rugged Mobile Computing Solutions B320 USER S MANUAL ...

Страница 2: ...rademarks of their respective owners NOTE The information in this manual is subject to change without notice Most screens and operating instructions in this manual are based on Windows 7 If you re using a different version of Windows the screens and related operations may not be the same For the latest version of the manual please visit the Getac website at www getac com ...

Страница 3: ...abled power management features Earning the ENERGY STAR When every home office is powered by equipment that has earned the ENERGY STAR the change will keep over 289 billion pounds of greenhouse gases out of the air If left inactive ENERGY STAR qualified computers enter a low power mode and may use 15 watts or less New chip technologies make power management features more reliable dependable and us...

Страница 4: ...nagement sleep settings on computers and monitors can result in much savings annually Remember saving energy prevents pollution Because most computer equipment is left on 24 hours a day power management features are important for saving energy and are an easy way to reduce air pollution By using less energy these products help lower consumers utility bills and prevent greenhouse gas emissions ...

Страница 5: ...ents 1 10 Right Side Components 1 11 Left Side Components 1 13 Bottom Components 1 14 Chapter 2 Operating Your Computer 2 1 Using the Keyboard 2 2 Typewriter Keys 2 2 Cursor Control Keys 2 2 Numeric Keypad 2 3 Function Keys 2 4 Fn Key 2 4 Hot Keys 2 4 Using the Touchpad 2 6 Configuring the Touchpad 2 8 Using the Touchscreen Optional 2 9 Using Multi touch Gestures Optional 2 10 Using the Input Pane...

Страница 6: ...n 2 29 Chapter 3 Managing Power 3 1 AC Adapter 3 2 Battery Pack 3 3 Charging the Battery Pack 3 3 Initializing the Battery Pack 3 4 Checking the Battery Level 3 4 Replacing the Battery Pack 3 5 Battery Low Signals and Actions 3 7 Power Management 3 8 Hibernation 3 9 Power Saving Tips 3 10 Chapter 4 Expanding Your Computer 4 1 Connecting a VGA or HDMI Display Monitor 4 2 Connecting a Serial Device ...

Страница 7: ...Chapter 6 Using Getac Software 6 1 Using G Manager 6 2 Starting G Manager 6 2 System Tab 6 3 Battery Tab 6 4 ECO Tab 6 6 ECO Information 6 7 Light Sensor Tab 6 8 Antenna Tab 6 9 Monitoring Tab 6 10 GPS Status Tab 6 12 Quick Button Definition Utility 6 13 Chapter 7 Caring for the Computer 7 1 Protecting the Computer 7 2 Using an Anti Virus Strategy 7 2 Using Windows Action Center 7 2 Using the Cabl...

Страница 8: ... 8 6 Keyboard Mouse and Touchpad Problems 8 6 LAN Problems 8 7 Power Management Problems 8 7 Software Problems 8 8 Sound Problems 8 8 Startup Problems 8 9 WLAN Problems 8 10 Other Problems 8 11 Resetting the Computer 8 12 Appendix A Specifications A 1 Appendix B Regulatory Information B 1 On the Use of the System B 2 Class B Regulations B 2 Safety Notices B 3 On the Use of the RF Device B 6 USA an...

Страница 9: ...tting Started Congratulations on purchasing this rugged computer This chapter first tells you step by step how to get the computer up and running Then you will find a section briefly introducing the external components of the computer ...

Страница 10: ...the shipping carton you should find these standard items Rugged computer Accessories AC adapter AC power cord Driver disc Document s Stylus and tether depending on your model Inspect all the items If any item is damaged or missing notify your dealer immediately Keep the shipping carton and packing materials in case you need to ship or store the computer in the future ...

Страница 11: ... tether s loop ends through the hole of the stylus as indicated by below Then insert the other end through the first loop as indicated by below and pull it tight 2 Insert the other loop end to the tether hole on the computer as indicated by below Then insert the stylus end through the loop as indicated by below and pull it tight ...

Страница 12: ...he AC adapter included with your computer Using other AC adapters may damage the computer 1 Plug the DC cord of the AC adapter to the power connector of the computer 2 Plug the female end of the AC power cord to the AC adapter and the male end to an electrical outlet 3 When the AC adapter is connected power is being supplied from the electrical outlet to the AC adapter and onto your computer Now y...

Страница 13: ...ter When unplugging the connector always hold the plug head Never pull on the cord NOTE When the AC adapter is connected it also charges the battery pack For information on using battery power see Chapter 3 Turning On and Off the Computer Turning On 1 Open the top cover by pulling the cover latch and lifting up the cover You can tilt the cover forward or backward for optimal viewing clarity ...

Страница 14: ...ng it in Sleep or Hibernation mode To Do this Power off Shutdown Use the Windows Start menu in the lower left and follow the shutdown procedure Sleep Press the power button or use the Windows Start menu to put the computer in Sleep mode Hibernate Use the Windows Start menu to put the computer in Hibernation mode See Hibernation in Chapter 3 for more information Sleep is the default setting of the ...

Страница 15: ... exactly the same as those shown in this manual CAUTION You need to open the protective covers to access the connectors or devices inside When not accessing a connector or device make sure to close the cover completely for water dust and fire proof integrity of your computer Engage the locking mechanism if existing Top open Components ...

Страница 16: ...inks green when the computer is accessing the hard disk Card Reader Blinks green when the computer is accessing the storage card P 4 14 Caps Lock Lights green when Caps Lock is on P 2 3 Num Lock Lights green when Num Lock is on P 2 3 Fingerprint Scanner Serves as the fingerprint verification preventing unauthorized access to your computer P 2 29 Microphone Receives sound and voice for the computer...

Страница 17: ...o is on P 2 22 WWAN Lights green when the WWAN radio is on P 2 29 Quick Buttons P 2 13 P1 Toggles Blackout mode on or off The function can be redefined Brings up the ECO menu for selecting a power profile when using battery power Toggles the sunlight readable mode on or off Enables or disables the light sensor Power Button Turns the power on or off Sleep mode by default P 1 5 Touchpad Serves as th...

Страница 18: ...ra joystick and more P 4 5 WLAN Pass through Connector optional Connects the external antenna for WLAN wireless local area network connectivity NOTE Must be connected via docking WWAN Pass through Connector optional Connects the external antenna for WWAN wide area network transmission NOTE Must be connected via docking Docking Connector Connects to the Vehicle Dock purchased separately VGA Connect...

Страница 19: ... AC adapter P 1 3 Kensington Lock Locks the computer to a stationary object for security P 7 2 Right Side Components Ref Component Description See Also PC Card Slot Accepts a PC card for additional functions There are two slots P 4 9 SIM Card Slot Accepts a SIM card for models having the WWAN module NOTE The slot still exists but cannot be used for models without the WWAN module ...

Страница 20: ... MMC or Secure Digital SD card for removable storage media P 4 14 USB 3 0 Port Connects a USB device such as a USB flash disk printer digital camera joystick and more P 4 5 RF radio frequency Switch Serves as the master on off control of the RF radio When set to OFF all wireless modules such as WLAN Bluetooth and WWAN cannot be used When set to ON individual settings of the module work P 2 19 P 2 ...

Страница 21: ...4 6 Can also function as a USB port P 4 5 GPS Pass through Connector optional Connects to the external antenna for GPS signal reception Left Side Components Ref Component Description See Also ExpressCard Slot Accepts an ExpressCard 34 or ExpressCard 54 for additional functions P 4 12 Smart Card Reader Accepts a smart card for additional security feature P 4 9 ...

Страница 22: ... be replaced by a secondary hard disk drive or battery pack purchased separately P 4 19 Battery Pack Supplies power to your computer when external power is not connected P 3 3 Bottom Components Ref Component Description See Also Stereo Speaker Sends out sound and voice from the computer Memory Slots Inside are the memory slots for expanding the memory size of your computer P 4 15 ...

Страница 23: ...ose to read only the parts containing information unique to your computer CAUTION Do not expose your skin to the computer when operating it in a very hot or cold environment The computer can get uncomfortably warm when you use it in high temperatures As a safety precaution in such a circumstance do not place the computer on your lap or touch it with your bare hands for extended periods of time Pro...

Страница 24: ... the lock keys Caps Lock and Num Lk are pressed their corresponding indicators light up The Control Ctrl Alternate Alt key is normally used in combination with other keys for program specific functions The Escape Esc key is usually used for stopping a process Examples are exiting a program and canceling a command The function depends on the program you are using Cursor Control Keys Cursor control ...

Страница 25: ...eypad A 15 key numeric keypad is embedded in the typewriter keys as shown next Numeric keys facilitate entering of numbers and calculations When Num Lock is on the numeric keys are activated meaning you can use these keys to enter numerals ...

Страница 26: ...o perform a desired function first press and hold Fn then press the other key Hot Keys Hot keys refer to a combination of keys that can be pressed any time to activate special functions of the computer Most hot keys operate in a cyclic way Each time a hot key combination is pressed it shifts the corresponding function to the other or next choice You can easily identify the hot keys with the icons ...

Страница 27: ...the touchpad off and on Switches the system sound output off mute and on Switches the display on and off Serves as the sleep button that you can define with Windows Power Options Windows Keys The keyboard has two keys that perform Windows specific functions Windows Logo key and Application key The Windows Logo key opens the Start menu and performs software specific functions when used in combinati...

Страница 28: ...e location of the pointer on the screen and making selection with the buttons The touchpad consists of a rectangular pad work surface and a left and right buttons To use the touchpad place your forefinger or thumb on the pad The rectangular pad acts like a miniature duplicate of your display As you slide your fingertip across the pad the pointer also called cursor on the screen moves accordingly W...

Страница 29: ...ly tap twice on the pad and on the second tap keep your finger in contact with the pad Then move your finger across the pad to drag the selected object to your destination When you lift your finger from the pad the selected object will drop into place Scroll To scroll is to move up and down or left and right in the working area on the screen To move vertically place your finger on the right or lef...

Страница 30: ...d Configuring the Touchpad You may want to configure the touchpad to suit your needs For example if you are a left handed user you can swap the two buttons so that you can use the right button as the left button and vice versa You can also change the size of the on screen pointer the speed of the pointer and so on To configure the touchpad go to Control Panel Mouse Properties ...

Страница 31: ...eyboard touchpad or mouse Use the included stylus to select objects on the screen The stylus can be stretched for better grip and handling The following table shows how you use the touchscreen to obtain equivalent mouse functions Term Action Equivalent Mouse Function Tap Touch the screen once Click Point Double tap Touch the screen twice rapidly Double click Tap and hold Tap and hold until a popup...

Страница 32: ...r up Descriptions Pan Scroll or Drag 1 or 2 fingers up or down Use panning to see another part of a page that has scroll bars Zoom Pinch Move two fingers apart toward each other Use zooming to make an item a photo for example on the screen larger or smaller The gesture works in applications that support mouse wheel zooming Rotate or Move two fingers in opposing directions or Use one finger to pivo...

Страница 33: ...Two finger Tap Tap two fingers at the same time where the target is in the midpoint between the fingers The function is defined by applications that support the specific gesture Flicks Make quick drag gestures in the desired direction Flick left or right to navigate back and forward in a browser and other applications The gesture works in most applications that support back and forward ...

Страница 34: ...your stylus like pressing the keys on a standard keyboard Writing Pad allows you to write on the writing pad like writing on a piece of paper Your handwriting will be converted into typed text To open the Input Panel tap the Input Panel tab which appears by default on the left edge of the screen To switch between the two types tap or at the upper left corner of the Input Panel NOTE For more inform...

Страница 35: ...t and LED indicators are all turned off and the sound is muted To bring the computer out of Blackout mode press the same button again or the power button NOTE The button works only when using battery power Brings up the ECO menu as shown below Select a mode before the ECO menu disappears You can select a mode by pressing the ECO button or arrow key The button lights up when the mode is on ECO Menu...

Страница 36: ...e mode is on In sunlight readable mode the LCD brightness is increased to the highest level The mode automatically ends when the brightness setting is changed the computer resumes from Sleep Hibernation mode or the computer is restarted Toggles the light sensor on or off An OSD On Screen Display pops up on the screen indicating the current status The button lights up when the function is activated...

Страница 37: ...require the following statement for all laser based devices Caution Use of controls or adjustments or performance of procedures other than those specified herein may result in hazardous radiation exposure NOTE The DVD drive is classified as a Class 1 laser product This label is located on the DVD drive NOTE This product incorporates copyright protection technology that is protected by method claim...

Страница 38: ...r computer Slide the lock downward to the unlocked position and then slide the latch toward the left to open the protective cover 3 Press the eject button and the DVD tray will slide out partially Gently pull it until it is fully extended 4 To insert a disc place down the disc in the tray with its label facing up Slightly press the center of the disc until it clicks into place ...

Страница 39: ...ose the cover Make sure the latch is engaged and slide the lock upward to the locked position completely not revealing the underneath red part Correct Incorrect revealing red part NOTE In the unlikely event that you are unable to release the drive tray by pressing the eject button you can manually release the disc See Optical Drive Problems in Chapter 8 ...

Страница 40: ...rs by fax email or connect to an online service or bulletin board To connect the telephone line to the modem connect one end of the modem cable to the RJ 11 connector on the computer and the other end to the phone line NOTE When using the communication software you may have to disable power management Do not enter the Sleep mode when using the communication software ...

Страница 41: ...ector on the computer and the other end to the network hub Using the Wireless LAN The WLAN module of your computer supports IEEE 802 11a g n Turning On Off the WLAN Radio NOTE The FAA Federal Aviation Agency has deemed it unsafe to operate wireless devices in aircraft as this may interfere with flight safety Remember to turn off wireless LAN when using your computer in the airplane To turn on the ...

Страница 42: ...ithout a red X In case you have previously turned it off in Windows Mobility Center be sure to turn it on when using the function the next time To turn off the WLAN radio You can turn off the WLAN radio by pressing Fn F1 or using the Quick Bar If you want to turn off all wireless radio slide the RF switch to the OFF position Connecting to a Wireless Network 1 Make sure that the WLAN function is en...

Страница 43: ...our network administrator or Internet service provider ISP for the security key or passphrase For more information on setting a wireless network connection refer to Windows online help NOTE You can use Intel PROSet Wireless to take full advantage of the WiFi capabilities of your computer See the Help of the utility for instructions ...

Страница 44: ...ong as two devices are within range Turning On Off the Bluetooth Radio To turn on the Bluetooth radio 1 Make sure that the RF switch is at the ON position Open the cover to access the switch 2 To turn on the Bluetooth radio click the Bluetooth button in the Quick Bar as shown below an X over the button means the radio is currently off NOTE To open the Quick Bar right click the Getac Utility icon l...

Страница 45: ...sition Connecting to another Bluetooth Device 1 Make sure that the Bluetooth function is enabled as described above 2 Make sure that the target Bluetooth device is turned on discoverable and within close range See the documentation that came with the Bluetooth device 3 To search for Bluetooth devices right click the Bluetooth icon and select Add a Device 4 Select the device you want to connect fro...

Страница 46: ... Your Computer 5 Depending on the type of Bluetooth device that you want to connect to you will need to enter the pertinent information For detailed information on using the Bluetooth feature see Windows online Help ...

Страница 47: ...operation The fingerprint scanner provides a strong authentication mechanism based on fingerprint recognition It features Website Log On Logon to your web accounts like banks webmail and more with a simple swipe of your finger Windows Log On Logon to Microsoft Windows with a simple swipe of your finger every time you turn on your computer or log onto your desktop QuickLaunch Quickly launch all you...

Страница 48: ... Operating Your Computer To register your fingerprint click Start All Programs AuthenTec TrueSuite AuthenTec TrueSuite Click the finger you want to register and follow the onscreen instructions to complete ...

Страница 49: ...ng Your Computer 2 27 You can then use the Fingerprint Software to set up how the fingerprint authentication works For detailed information click the Help button of the software App Store Settings Options Help ...

Страница 50: ... WWAN feature to connect to the Internet you need to subscribe to WWAN service and acquire a SIM card from the service provider To install the SIM card follow these steps 1 Turn off the computer and disconnect the AC adapter 2 Locate the SIM card slot on the left side of the computer Lift the latch to open the protective cover 3 Insert the SIM card into the holder Make sure the golden contact area...

Страница 51: ...s currently off NOTE To open the Quick Bar right click the Getac Utility icon located on Windows taskbar and select Quick Bar To turn off the WWAN radio You can turn off the WWAN radio by using the Quick Bar or WWAN utility If you want to turn off all wireless radio slide the RF switch to the OFF position Setting up a WWAN Connection To set up a WWAN connection for the first time follow these step...

Страница 52: ...Turn Radio On to turn on the radio 4 Use AirCard Watcher to manage your broadband wireless network connections such as Connect to the Internet Configure user options Send and receive SMS messages Manage profiles Use GPS to track your position for models having the GPS module NOTE For detailed information on using AirCard Watcher see the program s online help ...

Страница 53: ...wer Your computer operates either on external AC power or on internal battery power This chapter tells you how you can effectively manage power To maintain optimal battery performance it is important that you use the battery in the proper way ...

Страница 54: ...wer cord When you disconnect the AC adapter disconnect from the electrical outlet first and then from the computer A reverse procedure may damage the AC adapter or computer When unplugging the connector always hold the plug head Never pull on the cord The AC adapter serves as a converter from AC Alternating Current to DC Direct Current power because your computer runs on DC power but an electrical...

Страница 55: ...pter and wait for the battery to return to room temperature before charging again During charging do not disconnect the AC adapter before the battery has been fully charged otherwise you will get a prematurely charged battery To charge the battery pack connect the AC adapter to the computer and an electrical outlet The Battery Charge Indicator on the computer glows amber to indicate that charging ...

Страница 56: ... information on using the tool Checking the Battery Level NOTE Any battery level indication is an estimated result The actual operating time can be different from the estimated time depending on how you are using the computer By Operating System You can check the approximate battery level using the battery meter function of the operating system To read the battery level in Windows click the batter...

Страница 57: ...d batteries according to the dealer s instructions Do not attempt to disassemble the battery pack If you often rely on battery power for a long period of time while traveling you may consider the purchase of an additional battery pack from your dealer and keep it with you in a fully charged state as a backup To replace the battery pack follow these steps 1 Turn off the computer and disconnect the ...

Страница 58: ...e the battery pack out of the compartment 4 With the strip facing outward insert the new battery pack all the way into the compartment 5 Close the cover press the latch downward to engage and then slide the lock towards the right to the locked position ...

Страница 59: ...level Low The battery charge has reached the low battery level 10 by default Critically low The battery charge has reached the critical battery level 5 by default By default Windows will display a notification and put your computer into Hibernation When the battery is low the computer s Battery Charge Indicator also blinks red to alert you to take actions Always respond to low battery by connectin...

Страница 60: ...management works in this way What When Power to the hard disk is turned off When the hard disk has been idle for a set period Power to the display is turned off When the display has been idle for a set period The computer enters the Sleep mode The hard disk and display are turned off and the entire system consumes less power When the entire system has been idle for a set period When you manually a...

Страница 61: ...hese applications open and running and normally they all have to be closed before the computer can be turned off When you use the hibernation feature you do not have to close the applications The computer stores the state of your computer to a file on the hard disk and then shuts down The next time you turn on your computer you return to exactly where you left off ...

Страница 62: ...ness to the lowest comfortable level Shorten the length of time before Windows turn off the display Many USB devices use power just by being connected If you use a USB mouse you can save power by disconnecting the mouse and using the touchpad If you use a USB flash drive unplug it when you are not using it Remove the card such as PC card ExpressCard and Smart Card if not using it Turn off the wire...

Страница 63: ...Expanding Your Computer You can expand the capabilities of your computer by connecting other peripheral devices When using a device be sure to read the instructions accompanying the device together with the relevant section in this chapter ...

Страница 64: ...an audio video interface that transmits uncompressed digital data and therefore delivers true HD quality As a home theater system most likely includes a widescreen HDTV and surround sound system you can use the home theater system to view play media stored on your computer by connecting via the HDMI interface Follow this procedure to connect an external monitor 1 Turn off the computer 2 Depending ...

Страница 65: ...uter 5 The connected device should respond by default If not you can switch the display output by pressing the Fn F5 hot keys You can also change the display through Windows Control Panel Display Settings Properties CAUTION Do not disconnect the external monitor while the computer is in the Sleep mode or Hibernation mode If no external monitor is connected when the computer resumes the LCD might n...

Страница 66: ...dure to connect a serial device 1 Turn off the computer 2 Plug the device cable to the serial port on the rear of the computer 3 Turn on the computer NOTE Portable modems that derive power through the serial port cannot be used with the computer Instead use a modem that is powered by its own internal battery or external AC power COM2 COM1 ...

Страница 67: ... ports at the left side and one USB 2 0 port at the back for connecting USB devices such as a digital camera scanner printer modem and mouse USB 3 0 supports a transfer rate up to 5 Gbit s and USB 2 0 a transfer rate up to 12 MB s To connect a USB device plug the device cable to a matching USB port ...

Страница 68: ...TA devices such as an external hard drive and external optical drive USB 3 0 devices see previous section The port supports SATA II with transfer rate up o 3 0Gbit s It can provide 5V power if a certified USB eSATA combo cable is used To connect an external eSATA device simply plug the device cable to the eSATA port ...

Страница 69: ...ude not only computer peripheral devices such as scanner printer and high quality CCD but also consumer electronic equipment such as DVCAM and VCR To connect an IEEE 1394 device prepare an IEEE 1394 cable Plug the appropriate end of the cable to the computer s mini IEEE 1394 connector and the other end to the device s corresponding connector ...

Страница 70: ...en can be connected to speakers headphones or earphone set Microphone Connector pink can be connected to an external microphone for recording voice or sound NOTE After connecting an external audio device make sure that you specify the use of the correct audio device in Windows When using the external speakers headphones or microphone you cannot use the internal one ...

Страница 71: ... a smart card reader To insert a smart card 1 Locate the smart card slot on the left side of the computer and open the protective cover 2 Slide the smart card with its label and embedded chip facing up into the slot 3 Close the cover 4 When a new card is seated use the third party smart card software to allow your computer to read it To remove a smart card 1 Make sure that the third party smart ca...

Страница 72: ... II and CardBus specifications To insert a PC card 1 Locate the PC card slot on the right side of the computer Lift the latch to open the protective cover 2 Slide the PC card with its label facing up into the slot until the eject button pops out 3 Close the cover 4 When a new card is seated the computer will detect it and try to install the appropriate driver Follow the on screen instructions to c...

Страница 73: ...xpanding Your Computer 4 11 2 Select highlight the PC card from the list to disable the card 3 Push the eject button and the card will slide out slightly 4 Pull the card out of the slot 5 Close the cover ...

Страница 74: ...ications including memory wired and wireless communication cards and security devices Shown next are the appearances of ExpressCards for your reference ExpressCard 54 ExpressCard 34 To insert an ExpressCard 1 Locate the ExpressCard slot on the left side of the compute Lift the latch to open the protective cover 2 Slide the ExpressCard with its label facing up all the way into the slot until the re...

Страница 75: ...nstructions to complete the process To remove an ExpressCard 1 Double click on the Safely Remove Hardware icon found on the Windows taskbar and the Safely Remove Hardware window appears on screen 2 Select highlight the ExpressCard from the list to disable the card 3 Slightly push the card to release and then pull it out of the slot 4 Close the cover ...

Страница 76: ... supports SD Secure Digital MMC MultiMediaCard and MMC Plus cards To insert a storage card 1 Locate the storage card reader on the right side of the computer Lift the latch to open the protective cover 2 Align the card with its connector pointing to the slot and its label facing up Slide the card into the slot until it reaches the end 3 Windows will detect the card and assign it a drive name To re...

Страница 77: ...to static electricity There are cases where static electricity generated by the human body has adversely affected such modules When inserting or removing a RAM module do not touch the terminals or internal components insert objects other than the module or allow foreign particles to enter Doing so has been known to cause damage fire or electrical shock To install the RAM module 1 Turn off the comp...

Страница 78: ...nding Your Computer 5 Remove the 2 screws to detach the fixing plate 6 To install the RAM module match the module s notched part with the socket s projected part and firmly insert the module into the socket at a ...

Страница 79: ...nto position CAUTION If the RAM module is difficult to insert or difficult to push down do not force it Check once more to ensure that the module is positioned correctly 7 Replace the fixing plate and secure with 2 screws 8 Replace the compartment cover and secure with 6 screws 9 Replace the battery pack ...

Страница 80: ...de of your computer Slide the lock toward the left to the unlocked position and then lift the latch to open the protective cover 4 Pull the strip and slide the hard disk drive out of the slot 5 With the strip facing outward insert the new hard disk drive all the way into the slot 6 Close the cover press the latch downward to engage and then slide the lock towards the right to the locked position ...

Страница 81: ...ur computer Slide the lock downward to the unlocked position and then slide the latch toward the left to open the protective cover 2 Pull the strip and slide the existing device out of the bay 3 With the strip facing outward insert the new device all the way into the bay 4 Close the cover Make sure the latch is engaged and slide the lock upward to the locked position completely not revealing the u...

Страница 82: ......

Страница 83: ...led firmware that translates instructions from other layers of software into instructions that the computer hardware can understand The BIOS settings are needed by your computer to identify the types of installed devices and establish special features System Recovery reinstalls Windows to your system and configures it to the system s factory default settings This chapter tells you how to use the B...

Страница 84: ...creen during system startup The prompt shows up on the screen for only a few seconds You must press F2 quickly The BIOS Setup Utility main screen appears as shown next Information Main Advanced Security Boot Exit Model NO Serial NO Processor Info Installed System Memory SATA HDD SATA ODD BIOS Revision EC Revision LAN MAC Address IEEE 1394 GUID Operating Time B320 RC7XXB0019 Intel R Core TM i7 3517...

Страница 85: ...ide similar settings in BIOS Setup Utility Information Menu The Information menu contains the basic configuration information of the system There are no user definable items in this menu Information Main Advanced Security Boot Exit Model NO Serial NO Processor Info Installed System Memory SATA HDD SATA ODD BIOS Revision EC Revision LAN MAC Address IEEE 1394 GUID Operating Time B320 RC7XXB0019 Inte...

Страница 86: ...Select Sub Menu F10 Save and Exit System Date sets the system date System Time sets the system time Legacy USB Support enables or disables the system s support for Legacy USB device in DOS mode Wireless LAN specifies the on off state of the wireless LAN radio when the system starts up When set to Last State the on off state remains the same as the last state before you turn off the system Bluetoot...

Страница 87: ...evice Configuration ZPODD Performance Disabled AHCI Item Specific Help iRST Intel R Rapid Start Technology Configuration F1 Help Select Item Change Values F9 Setup Defaults Esc Exit Select Menu Enter Select Sub Menu F10 Save and Exit Intel R Rapid Start Technology cofigures iRST Press Enter to access the submenu as shown below Advanced Intel R Rapid Start Technology Item Specific Help iRST Support...

Страница 88: ...ep state Press Enter to access the submenu as shown below Advanced Wake Up Capability Item Specific Help Any key Wake Up From S3 Ring Wake Up From S3 USB Wake Up From S3 Disabled Disabled Disabled Allow any key to wake up the system from S3 Sleep state F1 Help Select Item Change Values F9 Setup Defaults Esc Exit Select Menu Enter Select Sub Menu F10 Save and Exit Any key Wake Up From S3 allows any...

Страница 89: ...ecific Help Intel AMT Intel AMT Setup Prompt Disabled Disabled Enable Disable Intel R Active Management Technology BIOS Extension Note iAMT H W is always enabled This option just controls the BIOS extension execution If enabled this requires additional firmware in the SPI device F1 Help Select Item Change Values F9 Setup Defaults Esc Exit Select Menu Enter Select Sub Menu F10 Save and Exit Intel A...

Страница 90: ...t Item Change Values F9 Setup Defaults Esc Exit Select Menu Enter Select Sub Menu F10 Save and Exit Intel R Virtualization Technology enables or disables Intel VT Intel Virtualization Technology feature which provides hardware support for processor virtualization When enabled a VMM Virtual Machine Monitor can utilize the additional hardware virtualization capabilities provided by this technology I...

Страница 91: ...cs Device This has no effect if external graphics are present F1 Help Select Item Change Values F9 Setup Defaults Esc Exit Select Menu Enter Select Sub Menu F10 Save and Exit NOTE Graphic Setup parameters apply to the internal graphics device only DVMT Pre Allocated sets the amount of pre allocated fixed graphics memory for use by the internal graphics device Total Graphics Memory sets the amount ...

Страница 92: ...ect Item Change Values F9 Setup Defaults Esc Exit Select Menu Enter Select Sub Menu F10 Save and Exit P1 Function specifies the P1 quick button function When set to Blackout the P1 quick button allows you to turn off the LCD backlight and LED indicator When set to Quick Btn the P1 quick button serves as a user defined quick launch key When set to Emergency Btn the P1 quick button serves as the Eme...

Страница 93: ... Audio Modem Fingerprint Scanner 1394 Port E SATA Port Enabled Enabled Enabled Enabled Enabled Enabled Enabled Enabled Enabled Set WLAN device to enable disable F1 Help Select Item Change Values F9 Setup Defaults Esc Exit Select Menu Enter Select Sub Menu F10 Save and Exit You can enable or disable the following items Wireless LAN WWAN Bluetooth Media Card Reader MMC SD Smart Card Reader HD Audio ...

Страница 94: ... Save and Exit NOTE You can set the user password only when the supervisor password has been set If both the administrator and user passwords are set you can enter any of them for starting up the system and or entering BIOS Setup But the user password only allows you to view change the settings of certain items A password setting is applied right after it is confirmed To cancel a password leave th...

Страница 95: ... password TPM Setup Menu sets various TPM parameters Press Enter to access the submenu as shown below TPM Support enables or disables TPM Trusted Platform Module support TPM Trusted Platform Module is a component on your computer s main board that is specifically designed to enhance platform security by providing a protected space for key operations and other security critical tasks Current TPM St...

Страница 96: ...t 1 enables or disables a device Del deletes an unprotected device F1 Help Select Item Change Values F9 Setup Defaults Esc Exit Select Menu Enter Select Sub Menu F10 Save and Exit The bootable devices will be automatically detected during POST and shown here allowing you to set the sequence that the BIOS uses to look for a device from which to load the OS Below is a brief description of keyboard u...

Страница 97: ...Exit Saving Changes Exit Discarding Changes Load Setup Defaults Discard Changes Save Changes Item Specific Help Equal to F10 save all changes of all menus then exit setup configure driver Finally resets the system automatically F1 Help Select Item Change Values F9 Setup Defaults Esc Exit Select Menu Enter Select Sub Menu F10 Save and Exit Exit Saving Changes saves the changes you have made and exi...

Страница 98: ...re it to the system s factory default settings All data on the hard disk drive will be lost Make sure that power is not interrupted during the recovery process An unsuccessful recovery may result in Windows startup problems To run System Recovery 1 Connect the AC adapter 2 Turn on the computer During system startup when the following screen appears press Ctrl Alt F2 keys for four second 3 In the s...

Страница 99: ...he system turns off 5 Turn on the Tablet PC The Windows setup wizard starts Follow the onscreen prompts to continue 6 When the system restarts the installer screen appears The installer will perform system hardware detection and driver installation 7 When completed the system restarts and displays Windows desktop ...

Страница 100: ......

Страница 101: ... Software 6 1 Chapter 6 Using Getac Software Getac software includes application programs for specific computer components and utility programs for overall management This chapter describes how to use the programs ...

Страница 102: ...g G Manager You can start up G Manager by any of the following methods Click Start All Programs Getac Utility G Manager or Click and hold the icon located on the taskbar until a ring appears From the small menu that pops up click G Manager The G Manager window appears containing 7 tabs as described later NOTE Depending on your model the actual items appearing on the screen may differ from those sh...

Страница 103: ...Tab The System tab provides system information To view specific information select the component from the list on the left side of the screen The information of the selected component will be displayed on the right side of the screen ...

Страница 104: ...1 or Battery 2 to view the information of each battery if your model has a second battery NOTE When the percentage Left is less than 10 then the value will be displayed in red When an abnormal battery condition is detected Battery Status value will be displayed in red Battery Information The upper portion of the screen displays the current status of the selected battery ...

Страница 105: ...portion of the screen contains the battery health bar and provides the battery calibration function The health bar shows the batter s health by percentage A low percentage indicates poor health and therefore the need to perform a gauge reset to calibrate the battery s capacity and improve the battery s performance The gauge reset process includes discharging and then fully recharging the battery i...

Страница 106: ...the process is completed Click Exit when finished ECO Tab The ECO tab allows you to configure ECO modes or called power profiles To put the system into an ECO mode use the ECO button See Using the Quick Buttons in Chapter 2 for information ...

Страница 107: ... in the list Profile Settings The right portion of the screen displays the settings of the current selected profile You can set up the following items WWAN Bluetooth and WLAN can be on or off Power Scheme can be Balanced High Performance or Power Saver The settings here correspond to the settings in Windows See Windows Help for the description to each of the power scheme After changing the setting...

Страница 108: ... the sensor modes Normal Light sensor sensitivity is set at normal environment lighting condition Bright Light sensor sensitivity is set at bright environment lighting condition e g outdoors Dark Light sensor sensitivity is set at dark environment lighting condition e g indoors storage warehouse etc Click to select a mode Click Apply or OK to save the changes ...

Страница 109: ...vironment click the checkbox Automatic Keyboard Backlit Click Apply or OK to save the changes Antenna Tab The Antenna tab allows you to set if your system will automatically use the external GPS or WWAN antenna when connected to the Docking Station Select the checkbox es accordingly Click Apply or OK to save the changes ...

Страница 110: ... to include it as a monitored component Click Apply or OK to save the changes NOTE Different models have different supported monitoring items non supported items cannot be selected grayed out items Monitoring Options The right portion of the screen allows you to set how the monitored items are displayed and how often the monitoring is updated Always On Top allows the monitoring window to remain on...

Страница 111: ... save the changes Starting and Stopping the Monitoring To start monitoring click START Monitor The monitoring window similar to the one below appears displaying requested information at specified intervals To stop monitoring click the Close button at the upper right corner of the monitoring window or click Stop Monitor on the Monitoring tab page of G Manager ...

Страница 112: ...rt GPS The screen displays Ongoing raw data strings in the Message Log section Overhead satellite positions in the Satellite Map section Signal strength of the satellites in the Signal Indicator section When GPS positioning is completed the Data Summary section shows the GPS information of the current location To stop GPS positioning click Stop GPS ...

Страница 113: ...g this procedure NOTE If you want to re define P1 make sure the P1 Function item in the BIOS Setup Utility is set to Quick Btn default setting See Advanced Menu in Chapter 5 for information 1 Right click the Getac utility icon on the Windows taskbar and select Quick Buttons Definition 2 The following window appears Click the Open button ...

Страница 114: ...box browse to the destination folder and select the desired program file Then click Open to complete 4 A matching program icon will appear in the settings window NOTE You can restore the quick buttons to the default settings by clicking Get Default ...

Страница 115: ...Caring for the Computer Taking good care of your computer will ensure a trouble free operation and reduce the risk of damage to your computer This chapter gives you guidelines covering areas such as protecting storing cleaning and traveling ...

Страница 116: ...i Virus Strategy You can install a virus detecting program to monitor potential viruses that could damage your files Using Windows Action Center Windows Action Center alerts you to take action on the following security essentials Windows Firewall Windows Update Malware Protection anti virus anti spyware Others Internet security user account control For detailed information on Windows Security Cent...

Страница 117: ... lock to protect your computer against theft The cable lock is available in most computer stores To use the lock loop the lock cable around a stationary object such as a table Insert the lock to the Kensington lock hole and turn the key to secure the lock Store the key in a safe place ...

Страница 118: ...pact by dropping or hitting may damage the computer Do not cover or block any ventilation openings on the computer For example do not place the computer on a bed sofa rug or other similar surface Otherwise overheating may occur that results in damage to the computer As the computer can become very hot during operation keep it away from objects that are vulnerable to heat Keep the computer at least...

Страница 119: ... exterior of the computer Gently wipe the display with a soft lint free cloth Do not use alcohol or detergent on the display Dust or grease on the touchpad can affect its sensitivity Clean the pad by using adhesive tape to remove the dust and grease on its surface If water or liquid is split onto the computer wipe it dry and clean when possible Though your computer is water proof do not leave the ...

Страница 120: ...th the computer s power off To maintain the battery pack s operating efficiency store it in a cool dark place removed from the computer and with 30 40 charge remaining Important guidelines when using the battery pack When installing or removing the battery pack take note of the following avoid installing or removing the battery pack when the computer is in Sleep mode Abruptly removing the battery ...

Страница 121: ...cial protective coating that prevents dirt from sticking to it Not using a soft cloth may cause damage to the special protective coating on the touchscreen surface Turn off the computer power when cleaning the display Cleaning the display with the power on may cause improper operation Do not use excessive force on the display Avoid moving the computer while holding the display or twisting the disp...

Страница 122: ...connect the AC adapter from the computer and take it with you Use the AC adapter as the power source and as a battery charger Hand carry the computer Do not check it in as luggage If you need to leave the computer in the car put it in the trunk of the car to avoid exposing the computer to excessive heat When going through airport security it is recommended that you send the computer and flash disk...

Страница 123: ...shooting Computer problems can be caused by hardware software or both When you encounter any problem it might be a typical problem that can easily be solved This chapter tells you what actions to take when solving common computer problems ...

Страница 124: ...e that the cable connections are correct and secure Make sure that the configuration information is properly set in the BIOS Setup program Make sure that all the device drivers are correctly installed Make notes of your observations Are there any messages on the screen Do any indicators light Do you hear any beeps Detailed descriptions are useful to the service personnel when you need to consult o...

Страница 125: ...lly charged battery becomes shorter If you often partially recharge and discharge the battery might not be charged to its full potential Initialize the battery to solve the problem See Initializing the Battery Pack in Chapter 3 for instructions The battery operating time indicated by the battery meter does not match the actual operating time The actual operating time can be different from the esti...

Страница 126: ... or change the display through the Display Settings Properties The characters on the screen are dim Adjust the brightness and or contrast The display brightness cannot be increased As a protection the display brightness will be fixed at a low level when the surrounding temperature is too high or too low It is not a malfunction in this situation Bad dots appear on the display at all times A small n...

Страница 127: ...ure that the disc is not dirty Clean the disc with a disc cleaning kit available in most computer stores Make sure that the computer supports the disc or the files contained You cannot eject a disc The disc is not properly seated in the drive Manually release the disc by inserting a small rod such as a straightened paperclip into the drive s manual eject hole and pushing firmly to release the tray...

Страница 128: ...dow s Disk Defragmenter to defragment the files The hard disk drive in use indicator glows without blinking The data files stored on the hard disk drive may be fragmented Use a tool such as Window s Disk Defragmenter to defragment the files Keyboard Mouse and Touchpad Problems The keyboard does not respond Try connecting an external keyboard If it works contact an authorized dealer as the internal...

Страница 129: ...ss the network Make sure that the LAN cable is properly connected to the RJ 45 connector and the network hub Make sure that the network configuration is appropriate Make sure that the user name or password is correct Power Management Problems The computer does not enter Sleep or Hibernation mode automatically If you have a connection to another computer the computer does not enter Sleep or Hiberna...

Страница 130: ...nts the computer from entering Hibernation mode To enter the mode stop the communication program and then remove the card or stop the card Software Problems An application program does not work correctly Make sure that the software is correctly installed If an error message appears on the screen consult the software program s documentation for further information If you are sure the operation has ...

Страница 131: ... the computer it does not seem to respond Make sure that either the AC adapter is connected or the battery has power For models with the hard disk drive heater option When turning on the computer in an extremely low temperature environment the computer will heat up the hard disk before starting up The HDD Heater indicator lights amber to indicate the heater is on Wait till the heating is finished ...

Страница 132: ...uter into an outlet on a different branch circuit from that used by the affecting device Consult your dealer or an experienced radio technician for help I cannot connect to another WLAN device Make sure that the WLAN feature is turned on Make sure that the SSID setting is the same for every WLAN device in the network Your computer is not recognizing changes Restart the computer Make sure that the ...

Страница 133: ... Point I cannot access the network Make sure that the network configuration is appropriate Make sure that the user name or password is correct You have moved out of range of the network Turn off power management Other Problems The date time is incorrect Correct the date and time via the operating system or BIOS Setup program After you have performed everything as described above and still have the...

Страница 134: ...cator if it flashes irregularly the program may be accessing data and preventing you from using the keyboard If you are sure the operation has stopped and you cannot use the restart function of the operating system reset the computer Reset the computer by any one of these methods Press Ctrl Alt Del on the keyboard If the above action does not work press and hold the power button for more than 5 se...

Страница 135: ...troller Intel HD Graphics 4000 Audio Features Azalia interface 2 channel analog output internal microphone Speaker 2 watt 8 ohm stereo 2 Microphone Integrated microphone Keyboard Standard keys with numeric pad keys 12 function keys special Fn Function key and Windows keys with water proof membrane or backlight option Pointing device Glide touchpad with 2 buttons scroll bar Storage device Hard disk...

Страница 136: ...00 1000 Mbps Wireless LAN Bluetooth Jason Peak 2 Advanced N 6235 BT4 0 combo 802 11 a g n GPS option GPS module GPS pass through WWAN option 3G or 4G LTE WWAN minicard external accessible SIM card slot Security Kensington lock TPM 1 2 Fingerprint scanner Smart Card Reader Power AC adapter Universal AC adapter 90 W input 100 240 V output 19 V Battery Li ion smart battery 9 cell 8700 mAH 10 8 V Dime...

Страница 137: ...statements and safety notices on your computer NOTE Marking labels located on the exterior of your computer indicate the regulations that your model complies with Please check the marking labels and refer to the corresponding statements in this appendix Some notices apply to specific models only ...

Страница 138: ... is no guarantee that interference will not occur in a particular installation If this equipment does cause harmful interference to radio or television reception which can be determined by turning the equipment off and on the user is encouraged to try to correct the interference by one or more of the following measures Reorient or relocate the receiving antenna Increase the separation between the ...

Страница 139: ...numériques de la classe B prescrites dans le Règlement sur le brouillage radioélectrique édicté par le ministère des Communications du Canada Safety Notices About the Battery Keep the battery pack out of the reach of children Caution Texts Concerning Lithium Batteries DANISH ADVARSEL Lithiumbatteri Eksplosionsfare ved fejlagtig håndtering Udskiftning må kun ske med batteri af samme fabrikat og typ...

Страница 140: ... Remplacer uniquement avec une batterie du même type ou d un type équivalent recommandé par le constructeur Mettre au rebut les batteries usagées conformément aux instructions du fabricant Attention for USA Users The product that you have purchased contains a rechargeable battery The battery is recyclable At the end of its useful life under various state and local laws it may be illegal to dispose...

Страница 141: ... INSTALLATION INSTURCTIONS Installation instructions are provided with each device and shall include the following or equivalent wording This equipment is suitable for use in Class I Division 2 Groups A B C and D OR non hazardous locations only WARNING EXPLOSION HAZARD Do not disconnect equipment unless power has been removed or the area is known to be non hazardous WARNING EXPLOSION HAZARD Substi...

Страница 142: ... by FCC certified equipment The wireless LAN module meets the Human Exposure limits found in OET Bulletin 65 2001 and ANSI IEEE C95 1 1992 Proper operation of this radio according to the instructions found in this manual will result in exposure substantially below the FCC s recommended limits The following safety precautions should be observed Do not touch or move antenna while the unit is transmi...

Страница 143: ...nts Explosive Device Proximity Warning WARNING Do not operate a portable transmitter such as a wireless network device near unshielded blasting caps or in an explosive environment unless the device has been modified to be qualified for such use Antenna Warning WARNING To comply with the FCC and ANSI C95 1 RF exposure limits it is recommended that the antenna for this device be installed so as to p...

Страница 144: ...manual and operated in a commercial environment However there is no guarantee that interference will not occur in a particular commercial installation or if operated in a residential area If harmful interference with radio or television reception occurs when the device is turned on the user must correct the situation at the user s own expense The user is encouraged to try one or more of the follow...

Страница 145: ...rnir un écran de blindage maximal Si le matériel ou son antenne d émission est installé à l extérieur il doit faire l objet d une licence European Union CE Marking and Compliance Notices Statements of Compliance English This product follows the provisions of the European Directive 1999 5 EC Danish Dette produkt er i overensstemmelse med det europæiske direktiv 1999 5 EC Dutch Dit product is in nav...

Страница 146: ...y 802 11a g n wireless LAN devices may not yet be harmonized in all countries 802 11a g n products are designed for use only in specific countries or regions and is not allowed to be operated in countries or regions other than those of designated use As a user of these products you are responsible for ensuring that the products are used only in the countries or regions for which they were intended...

Страница 147: ...currently be used indoors only in the following 38 departments of mainland France Please turn off your wireless LAN radio when operating the device in areas places other than the 38 departments listed 01 Ain Orientales 36 Indre 66 Pyrénées 02 Aisne 37 Indre et Loire 67 Bas Rhin 03 Allier 41 Loir et Cher 68 Haut Rhin 05 Hautes Alpes 42 Loire 70 Haute Saône 08 Ardennes 45 Loiret 71 Saône et Loire 09...

Страница 148: ...Ministry of Defense approval Turning Off the Wireless LAN Radio NOTE Turning the wireless LAN radio off is not the same as disabling the wireless LAN card It is not necessary to disable the card to meet the regulatory requirements While operating the computer in those French departments that do not allow use of the wireless LAN equipment the user of the equipment must turn off the wireless LAN rad...

Отзывы: