16
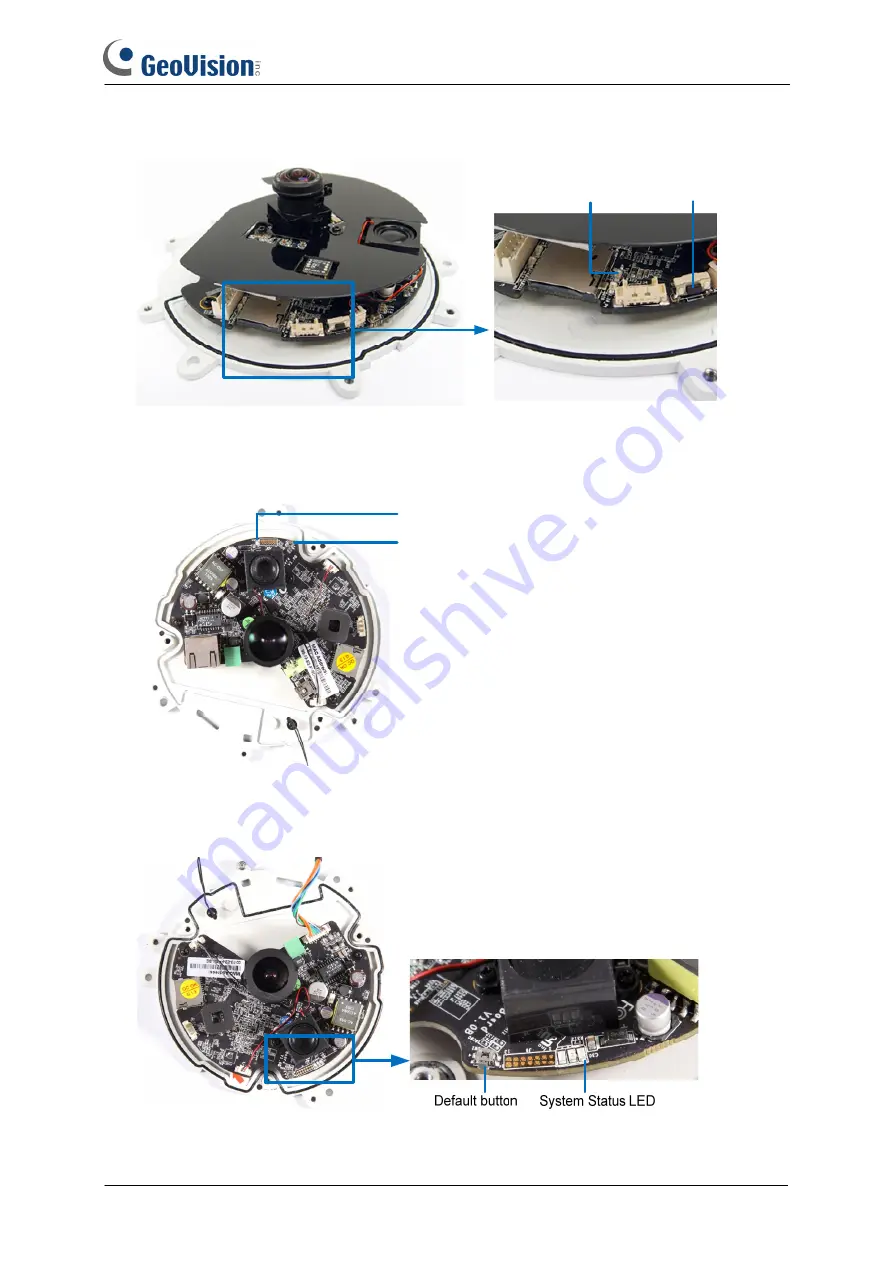
GV-FER521
System Status LED Default button
GV-FE2302 / 3402 / 3403 / 5302 / 5303
System Status LED
Default button
GV-FER3402 / 3403 / 5302 / 5303
Страница 1: ...19 2015 Applied to GV IPCAM H 264 Series Summary Among different models of GV IP cameras you can restore factory default settings through the Web interface or directly on the camera The time of loadin...
Страница 2: ...i Fixed Rugged Dome 7 IR Arctic Box Camera 7 Target Mini Fixed Target Mini Fixed Rugged Dome 8 Bullet Camera 9 Ultra Bullet Camera 9 Target Bullet Camera 10 Vandal Proof IP Dome 10 Target Vandal Proof...
Страница 3: ...Mini Fixed Rugged Dome Bullet Ultra Bullet PTZ and PT Vandal Proof IP Dome Fixed IP Dome Cube and Advanced Cube 1 Using the Web Interface 1 On the left menu of Web interface select Management and sele...
Страница 4: ...pin to press and hold the default button on the back panel of the camera Default button 3 Release the default button when the status LED blinks This shall take about 8 seconds Status LED 4 When the s...
Страница 5: ...ault button on the back panel of the camera Default button 3 Release the default button when the status LED blinks This shall take about 8 seconds Status LED 4 When the status LED fades the process of...
Страница 6: ...t button GV MFD120 130 320 Default button Status LED GV MFD1501 Series 2401 Series 3401 Series 5301 Series 3 Release the default button when the status LED blinks This shall take about 8 seconds 4 Whe...
Страница 7: ...a reboots automatically IR Arctic Box Camera Note the following procedure is only applicable to GV BX2510 E 5310 E To restore default settings of other IR Arctic Box Cameras access the load default fu...
Страница 8: ...ni Fixed Target Mini Fixed Rugged Dome 1 Keep the PoE cable connected to the camera 2 Press and hold the default button for about 8 seconds Default button 3 Release the default button when the status...
Страница 9: ...he process of loading default settings is completed the camera reboots automatically 5 Insert a new Silica Gel Bag and fasten the camera s cover immediately Ultra Bullet Camera 1 Keep the power and ne...
Страница 10: ...e default button When the process of loading default settings is completed the camera reboots automatically 5 Replace the Silica Gel Tape inside the camera cover and fasten the camera s cover immediat...
Страница 11: ...eted and the camera reboots automatically Target Vandal Proof IP Dome 1 Keep the power and network cables or PoE connected to the camera 2 Press and hold the default button for about 8 seconds 3 Relea...
Страница 12: ...Status LED 3 Release the default button when the status LED blinks This shall take about 8 seconds 4 When the status LED fades the process of loading default settings is completed and the camera reboo...
Страница 13: ...ally Cube Camera 1 Keep the power and network cables connected to the camera 2 Use a pin to press and hold the default button on the panel Status LED Default button 3 Release the default button when t...
Страница 14: ...t button 3 Release the default button when the status LED blinks This shall take about 8 seconds 4 When the status LED turns green the process of loading default settings is completed and the camera i...
Страница 15: ...dy 2 Use a pin to press and hold the Load default button on the panel Load Default Status LED 3 Release the default button when the status LED blinks This shall take about 8 seconds 4 When the status...
Страница 16: ...16 GV FER521 System Status LED Default button GV FE2302 3402 3403 5302 5303 System Status LED Default button GV FER3402 3403 5302 5303...
Страница 17: ...Default button System Status LED 3 Release the default button when the system status LED blinks 4 When the status LED fades the process of loading default settings is completed and the camera reboots...