background image

G-105 User Manual                                                                                                              Document: G-105-01 
------------------------------------------------------------------------------------------------------------------------------------------------ 

22 


Example B:


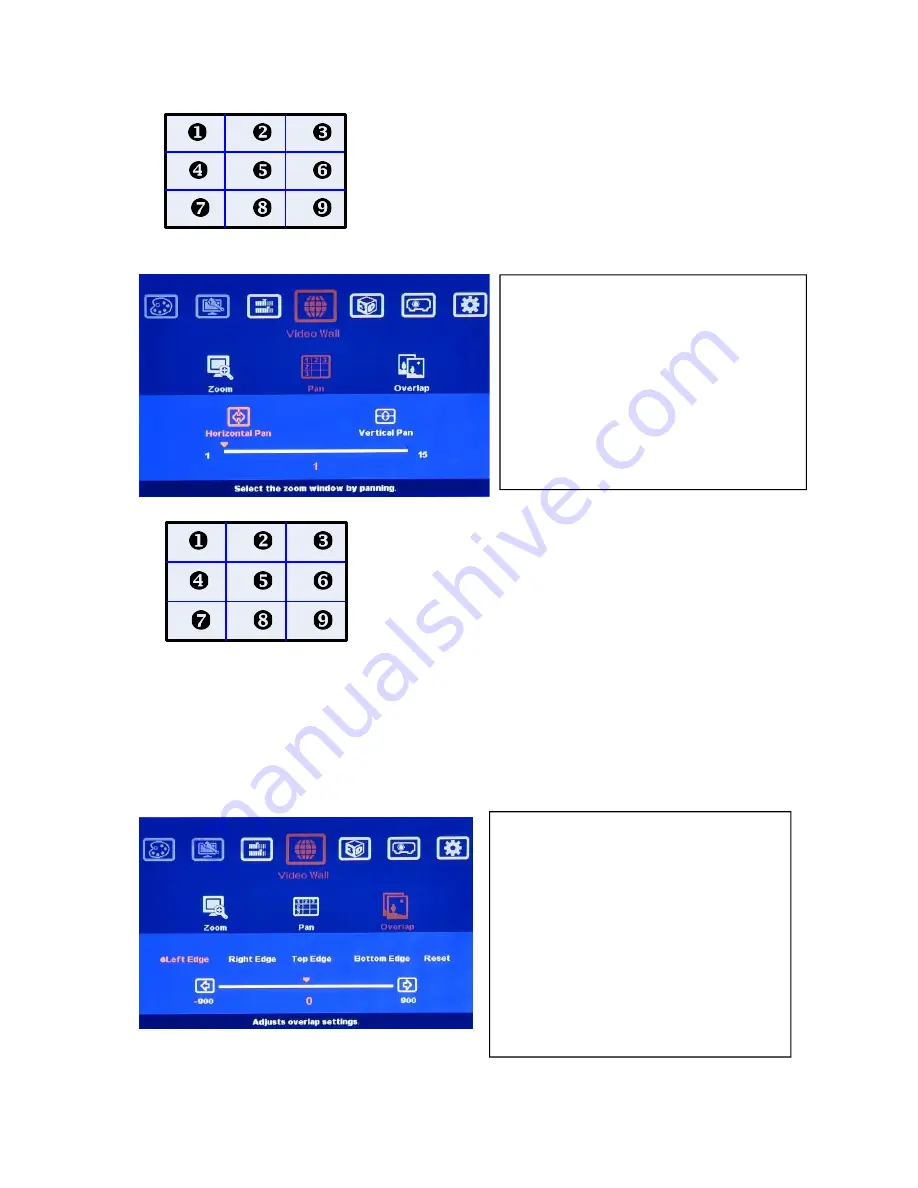
7.4.2  Pan: Select cropping area or assign image location in video wall application 


After split the image by ZOOM, user can select required section of the image by PAN to achieve cropping 

function. 


In video wall application, user can split (ZOOM) and assign (PAN) the image for each G-105 to build big 

video wall display. 

7.4.3  Overlap: to shift cropping area or to align image position in video wall application 


Note: 

The [Overlap] value will change the image capture area and scaling factor. User can use [Overlap] adjustment 

to change aspect ratio in video wall. 

  [Pan] is to select the split image location. 

  Horizontal value is calculated from LH to 

RH direction and Vertical value is 

calculated from top to bottom. 

  User needs to set H & V [Pan] value to 

assign the image location for each G-105 

to build a large video wall display. 

  [Overlap] is to shift the cropping area 

performed by ZOOM & PAN or to align 

the location of the image for each G-105. 

  User can adjust the image location in 

H&V position up to +_900 pixels.   

  Through [Overlap] adjustment, user can 

align the image position in video wall. 

  Overlap adjustment range should be 

inside image active display region. 

In 3x3 G-105 cascade video wall application: 

For No. 

 G-105:                  For No. 

 G-105:


Horizontal Pan = 3                Horizontal Pan = 3 

Vertical Pan = 1                    Vertical Pan = 2


In 3x3 G-105 cascade: 

--Horizontal Zoom=3 

--Vertical Zoom=3 

Содержание G-105

Страница 1: ...rt DVI I RS 232 HDMI OUTPUT INPUT CONTROL IR Ext Model No G 105 Made in Taiwan DVI D MENU ENTER AUDIO OUT AUDIO IN IR MANUAL INFO INPUT OUTPUT Exit Multi function video processor G 105 GeoBox OSD Audio PROFILE INDEX SPDIF OUT PWR OUT Audio HDMI VGA IN IN 1 2 3 4 5 Multi function video processor ...

Страница 2: ...Select cropping area 22 8 Passive 3D Display 23 8 1 System configuration 23 8 2 GeoBox setup for Stereoscopic 3D Display 23 8 3 Procedures for passive 3D setting in GeoBox 24 8 4 3D signal conversion 25 9 Anyplace Warp and geometry correction 25 9 1 Keystone correction 26 9 2 Image Rotation 27 9 3 4 Corner adjustment 27 9 4 Warp Image curved display 28 9 4 1 Corner curve adjustment 28 9 4 2 Edge c...

Страница 3: ...position fine tune via remote controller 41 11 Options OSD Miscellaneous Functions 41 11 1 Information System Information 41 11 2 Language OSD language 42 11 3 Reset 42 11 4 Accessibility 42 11 4 1 Bottom Repeat Rate 42 11 4 2 Menu Time Out 43 11 4 3 Logo Time out 43 11 4 4 Standby Time Out 44 11 5 Setting 44 11 5 1 Frame Lock and Free Run mode 44 11 5 2 Box ID 45 11 5 3 Profile setting 45 11 5 4 ...

Страница 4: ...or repair Manufacturer will pay shipping charges for return shipments to customers Manufacturer does not assume responsibility for consequential damages expenses or loss of revenue inconvenience or interruption in operation experienced by the customer Warranty service shall not automatically extend the warranty period FCC CE statement This equipment has been tested and found to comply with the lim...

Страница 5: ...DVI D mirrored Selectable output resolutions Max output resolution 1920 1200 Audio input HDMI embedded audio PC audio jack Audio output 1x SPDIF RCA output HDMI embedded audio DisplayPort and HDMI DVI support WQXGA 3840x1080 60Hz 4k 2k 30Hz input with 4 4 4 full color sampling without compression 2 2 Warp and geometry alignment Quick corner adjustment H V keystone correction Pincushion and barrel ...

Страница 6: ... I or VGA port 2 8 Video wall function Video wall function to split crop and location assignment with pixel based cropping range adjustment up to 900 pixels at H V directions Pixel by pixel precise bezel compensation Video wall control up to 15x15 matrix displays Image PIP POP flip and rotation function can be applied to video wall Input Top Left and Top Right corner coordinates to crop image of i...

Страница 7: ...selectable full screen or original aspect ratio POP supports two landscape contents to displays in one portrait LCD at top bottom position 2 13 Looping playback with different display mode User can select different display modes created from Manual Mode menu for looping playback with selected time interval Maximum display modes can be selected is 10 The display modes created from Aspect Ratio adju...

Страница 8: ...tallation and control keypad Lock press menu key for 5 seconds to avoid setting loss due to negligence Up to 5 settings can be saved and recalled at any time Integrated with IR extender up to 20 meters RS 232 control port Dimension and weight 303x155x44mm 2 35k 3 Application case studies 3 1 Image warp and geometry alignment 3 2 Image stacking for flat and curved screen 3 3 Image flip and rotation...

Страница 9: ...play mobile image on portrait LCD Rotate image and adjust aspect ratio 360 degrees Image rotation with one degree interval and maintain original aspect ratio 3 4 Image flip Image flip and POP to get portrait display with two landscape contents ...

Страница 10: ...o 3 7 Image POP side by side for landscape and portrait display Passive 3D display system Decode all kinds of 3D signal with side by side output for conventional 3d display devices and bare eye 3D system Decode all kinds of 3D signal with side by side output for conventional 3d display devices and bare eye 3D system ...

Страница 11: ...nual Document G 105 01 11 3 8 Dynamic aspect ratio adjustment 3 9 Any location cropping with 16 9 aspect ratio at arbitrary angle POP with dynamic aspect ratio and position shift No source image rotation is required ...

Страница 12: ...G 105 User Manual Document G 105 01 12 3 10 Dynamic image position shift 3 11 Looping playback with different display mode settings from single content ...

Страница 13: ...G 105 User Manual Document G 105 01 13 3 12 Irregular video wall with multiple units of G 105 ...

Страница 14: ... When continuously press MENU key in IR Remote Controller for 5 seconds the OSD function will be locked to prevent from changes of the settings To press MENU key for 5 seconds again it will unlock OSD and user can manipulate OSD again 4 6 Box ID allows user to control multiple G 105 at the same time without interference Press remote controller number keys as below and then function keys to execute...

Страница 15: ...orage 1 3 4 10 Video wall Main menu Image position adjustment Pattern for geometry alignment Image aspect ratio adjustment Top Right coordinate menu Top Left coordinate menu Profile selection Manual mode Index selection Manual mode Index number OSD Menu Exit Input port selection Output resolution selection Manual Mode Menu shortcut OSD Enter Input port selection Output resolution selection Cropped...

Страница 16: ...ex key functions 7 1 Picture Color Adjustment a This menu is only available under below conditions Picture menu will be grayed out and not functional when the color setting is in Preset Mode under Image Properties menu User needs to get into Custom menu and press Save menu to activate Picture menu When the input signal is in YUV domain all the items under menu are free to be accessed If the input ...

Страница 17: ...es Image properties is designed to select image color temperature adjust independent RGB color select input port output resolution set display aspect ratio set PIP POP function and image flip rotation There are six sub menus 7 3 1 Color 7 3 2 Input Signal Image Setup menu can only be activated when video input is from analog VGA input signal Under Color menu 4 Preset modes for color temperature se...

Страница 18: ...orm different display styles Full Screen To fit source image for full screen display Original AR To display source image with the same aspect ratio as source image The setting will also affect POP image display with full screen or original aspect ratio User can select input port from this menu or shortcut keys on remote controller and front control panel VGA and DVI A input are through the same in...

Страница 19: ...ee items Disable to Disable PIP or POP function PIP to select PIP display function POP to select POP side by side display mode User can select maintain original image aspect ratio or full screen mode through Scaling OSD menu under Image properties Size Only apply to PIP function The size of the PIP image can be adjusted though Size OSD menu pixel by pixel The maximum size of PIP image is 1024x768 ...

Страница 20: ... into Profile under Option menu and recall at any time Please note that VGA and DVI A input is through the same input port in the system User can t use these two input ports at the same time Rotating function combined with PIP POP User can apply image flip and rotation function with PIP POP please see next section When apply POP function and rotate the image at 90 270 degrees user can display two ...

Страница 21: ...split the image or to build video wall In below example each number means one cropped image section or one G 105 in video wall application Example A 3x1 G 105 horizontal cascade Horizontal Zoom 3 Vertical zoom 1 Zoom function is to split the source image content into variable sections User can cut the image for each LCD and build big video wall while in video wall application Two major purpose for...

Страница 22: ...video wall Pan is to select the split image location Horizontal value is calculated from LH to RH direction and Vertical value is calculated from top to bottom User needs to set H V Pan value to assign the image location for each G 105 to build a large video wall display Overlap is to shift the cropping area performed by ZOOM PAN or to align the location of the image for each G 105 User can adjust...

Страница 23: ...the polarized filter in front of the projectors so that the right eye can only see the scene for right eye and the left eye can only see the scene for left eye A 3D screen is also required to preserve the polarization of the light for 3D display It is possible to use optic spectrum method from Dolby Infitec or Omega Optical for 3D display without using 3D screen 8 2 GeoBox Setup for Stereoscopic 3...

Страница 24: ...tion the two projectors should be placed as close as possible and the screen must be flat or smooth curve f Please note that if HDMI device is not HDMI 1 4 version with HDCP repeater 3D 1080p 24Hz frame packed 3D signal may be not able to transfer to GeoBox and user can only see 2D signal 8 3 Procedures for passive 3D Setting in GeoBox 1 After 4 Corner adjustment to activate 3D Properties in OSD t...

Страница 25: ...age f Is there any HDMI or signal source compatibility issue and only one projector shows image g Are the HDMI cables qualified and the length not too long 8 4 3D signal converted to side by side format a In additional projector active 3D and passive 3D application G 105 can convert below 3D formats into one Side by Side 3D format output to meet the requirement in most of 3D display RH LH discrete...

Страница 26: ... settings f Each function in OSD menu can t be functional simultaneously User can only select one function at one time 9 1 Keystone Correction a If the projection direction of the light path from projector is not the desired angle to the screen the image on the screen will have keystone shape as below In order to compensate this kind of distortion Keystone Correction is required b User can use 4 C...

Страница 27: ... Wall Overlap function to improve this issue c If user wants to rotate the image at _90 or 180 with full screen image without pixel loss please use Orientation function under Image Properties d Pin Barrel function will still remain functional and co exist with Rotation function Bigger geometry adjustment range can be implemented in Warp Menu 9 3 4 Corner Adjustment 4 Corner menu can adjust each co...

Страница 28: ...le applying Warp function other functions will be disabled b Under Warp menu it consists of the menu for the control of the image in nine points through 5 control items Corner curve Edge curve Center curve and Shift 9 4 1 Corner Curve Adjustment Under Corner curve menu user can adjust the curve in each corner While adjusting one corner the other corresponding corner will be adjusted simultaneously...

Страница 29: ...dge Top Edge Bottom Edge and Reset The range is 300 pixels in horizontal position and 200 pixels in vertical position Example Curve adjustment in all Corners Example After adjustment at Top and Bottom Edges This can be applied to concave screen projection User can adjust the curve in each edge of the image independently ...

Страница 30: ... axis of the image to get non symmetrical curved image Example After applying 4 Edges curve adjustment The center axis can be adjusted horizontally and vertically with the range of 300 pixels in horizontal position and 200 pixels in vertical position Corner Curve and Edge Curve adjustment can co exist with Center Curve adjustment Example 4 Edge adjustment Center to right side ...

Страница 31: ... for each Index Execute looping playback of display modes Index by selecting the Index and time interval through Loop menu Shift function is to adjust the corners of the image before or after Curved adjustment It can co exist with other functions under Warp Menu This function is the same as 4 Corner adjustment The menu under Shift has the same function as 4 Corner adjustment to allow the adjustmen...

Страница 32: ...p image for each Index Under Manual Mode there are 10 Index modes and Loop menu Each Index represents one display mode created by user User can apply different input source and resolution without affecting display mode settings Top LH Top RH are the shortcut keys for coordinates input User can select Index directly from remote controller After Top Right adjustment user can press BACK key and press...

Страница 33: ...justment in aspect ratio and position Inside TV1 user needs to input coordinates of Top Left and Top Right corners to crop a 16 9 image for each Index Position allows user to do further adjustment in H V position of the image without affecting image size and display angle settings Reset will reset the coordinates to default settings Under Ratio menu user can adjust entire image display aspect rati...

Страница 34: ...irection by Up Down keys 2 The aspect ratio adjusting range is from 25 to 200 3 If the image is not created by Manual Mode the Ratio adjustment range is from 67 200 1 This function can execute Image Zoom In Zoom Out to change the aspect ratio in Horizontal direction by R L direction keys 2 The aspect ratio adjusting range is from 25 to 200 3 If the image is not created by Manual Mode the Ratio adj...

Страница 35: ... image is missing see below c If image is ZOOM OUT to 50 the image can be shifted up to video wall center line half image is blank see below 200 Horizontal Ratio Max shift to right Max shift to left 50 Horizontal Ratio Max shift to left Max shift to right 9 5 3 4 Vertical Position adjustment 1 Image horizontal position shift can be executed by R L direction keys 2 Horizontal adjusting range will d...

Страница 36: ...n User can display 3 products in Index one then pop up product A in Index 2 product B in Index 3 and product C in Index 4 After set looping playback user will see advertisement for complete image then highlight each product in sequential order Another example is for the stage on wedding house User can use high resolution camera to capture complete image on the stage and pop up special areas in dif...

Страница 37: ...inal images on all LCD then combine them into one big image gradually Looping playback is only functional for Index 1 Index 10 under Manual Mode It is nothing to do with Index under Profile menu 1 User can select the Index for looping playback in Loop Range 2 If select 3 then only Index 1 Index 2 and Index 3 can be selected for looping playback 1 The time interval to switch among different Index c...

Страница 38: ...n angle at Horizontal and Vertical positions till the cropping image touches original borders f User can create all kinds video wall with multiple units of G 105 including regular portrait and irregular video wall with different size resolution and bezel LCDs at any angle and position through input the coordinates of two corners in each LCD Top left and Top Right g PIP POP function is still availa...

Страница 39: ...t 517 0 Top Right X coordinate 1920 X X2 Y coordinate 1080 Y Y1 Result 1276 531 c Multiple units cascade Through multiple units cascade user can build irregular video wall Each G 105 should connect to one LCD User needs to crop an area for each G 105 LCD to combine all G 105 LCD into one big screen ...

Страница 40: ...nd collect 8 points of the coordinates for 4x LCD then input these numbers into G 105 Below are the processes The photo shall be corrected without distortion If distortion happens user can use RealWorld Paint freeware to correction image distortion in advance Use Microsoft Picture Manager to trim the edge of the display area or directly use Paint software to trim the image Resize to 1920x1080 imag...

Страница 41: ...e recommend to use remote controller for upload coordinated and image position fine tune GAlign PC tool is available in the website for download It will be more convenient to do cropping and alignment image position 11 Options OSD Miscellaneous Functions 11 1 Information System Information Five sub menu under Options Information Language Reset Accessibility Setting Top LH Top RH are the shortcut k...

Страница 42: ... settings stored Profile will not be deleted Reset Video Wall will reset the settings in Video Wall function to factory default Reset Anyplace will reset geometry to original position If user can t see OSD menu for reset please press Index to see full OSD then execute Reset Three OSD menu languages can be selected English Simplified Chinese and Traditional Chinese Four sub menu under Accessibility...

Страница 43: ...Time Out menu For Anyplace geometry adjustment we recommend user to set OSD Menu Time Out to Off to maintain continuously display of the pattern and OSD on the screen 14 4 3 Logo Time Out Before the time out of the Splash screen GeoBox will not execute other commands in the system When the input is VGA if any geometry adjustment occurred the image position may change due to OSD Button Repeat Rate ...

Страница 44: ...me Lock will ensure the input and output frame rate synchronize together This is mainly for multiple G 105 applications If Flame Lock is disabled the system will be in Free Run mode and keeps continuous output timing This will provide quicker input source or input timing change under below conditions Five sub menu under Setting menu Mute Audio mute or enable Frame Lock system synchronization Box I...

Страница 45: ... Profile settings will remain the same without change If the settings in Dip SW on the front panel are different from the settings in Profile Dip SW setting will have the 1st priority For example if your Dip SW selects Display mode 02 and you select mode 05 via Box ID is identification in each G 105 for individual RS232 or IR remote control GeoBox ID No is from 1 99 After set Box ID user can contr...

Страница 46: ... not be able to do the right settings c High end media player or server can support big range of outputs from 720p to 4k 2k If no EDID selection function only one default EDID can be selected by media player The system may not show the best video wall output quality d Different display modes may show different final image aspect ratio User can ultilize different EDID setting to change input signal...

Страница 47: ...ution in PC use needs to go back to Resolution Selection Window in PC to select the desired output timing Note a Please open GeoBox 2 3 seconds before open signal source so that signal source can detect the EDID setting in GeoBox and sends out the right timing b After finish FW update please select a different EDID resolution in EDID selection menu then turn back to the EDID resolution you need Th...

Страница 48: ...m our website at www vnstw com 2 GAlign directory should consist three files GAlign PC tool user guide GAlign exe UI INI 3 User can create Language based on his requirement Please open UI INI and add new string set into UI INI and save this modification inside the same GAlign directory to get new language 4 Open GAlign exe file and user will see operation window 5 This PC tool is exe file and may ...

Страница 49: ...p Ratio is to adjust aspect ratio image width and height for the complete image in horizontal and vertical directions 10 Warp Position is to adjust complete image position in the video wall in horizontal and vertical directions No position can be shifted before user adjusts the Warp Ratio 11 Profile is to save all settings inside G 105 including input source PIP POP video wall settings ratio loopi...

Страница 50: ...e time for the setup Please download GPM backup tool from our website 13 2 GPM installation 1 Decompressed the attached GPM 7Z file with RAR 7Z or WinZip 2 The password for the decompression is VNS if required 3 Execute GPM exe and user will see below operation window and show up COM 4 GPM exe program may be locked by Windows or anti virus software Please select Accept to continuously run this sof...

Страница 51: ...e Index 1 5 GPM will only save all the data inside Profile from Index 1 Index 5 6 When user wants to restore xxx GPD data back to GeoBox please CHECK Profile only and click Restore button browse xxx GPD file and load it into GeoBox 7 GPM can t identify GeoBox model now To restore different model parameter will cause system reset all data to default 8 GeoBox will auto reset after restore the parame...

Отзывы: