Geo Solo II CT Скачать руководство пользователя страница 8

Solo II CT: Consumption

8

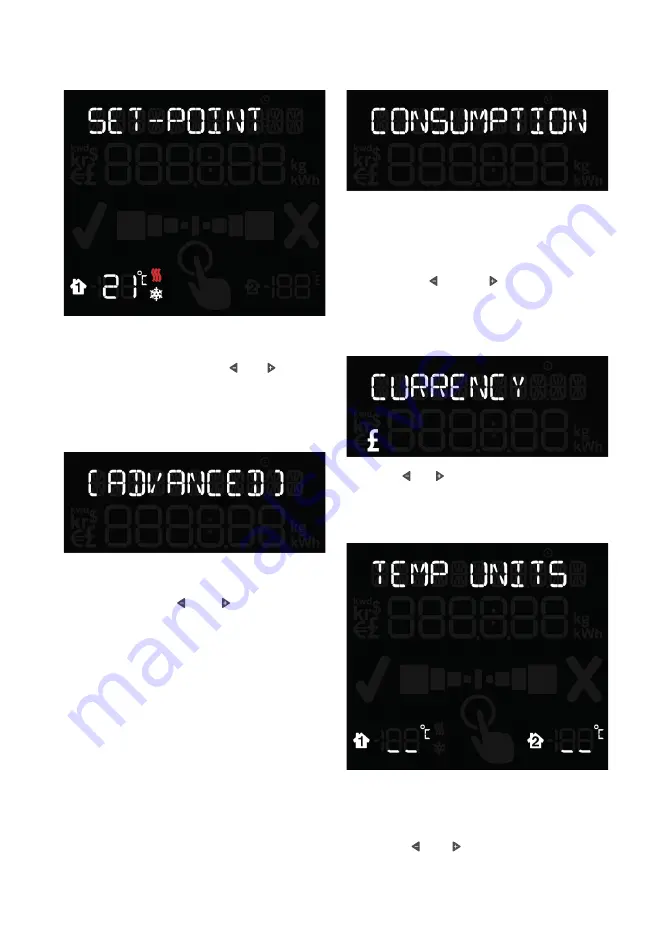
Temperature set-point

The  display  can  tell  you  if  your  home 

is  running  warmer  or  cooler  than  your 


ideal temperature. Use the 

 and 

 buttons 

to set your ideal temperature and press the 

centre button to confirm.    

Advanced configuration

Press  and  hold  the  centre  button  for 

three  seconds  to  enter  the  configuration 

mode.  Using  the 

 and 

  buttons  select 

[ADVANCED]  and  then  press  the  centre 

button to confirm.
Next  you  need  to  tell  the  display  about 

your electricity meter and the rate at which 

your  electricity  flows.  You  can  read  more 

about  this  under  the  Electricity  meter 


section below.
You will be asked to set the following:

• 

[CONSUMPTION] or [MICRO-GEN]

• 

[CURRENCY]

• 

[TEMPERATURE UNITS]

• 

[CALIBRATION]

• 

[DISPLAY OFF]

• 

[DISPLAY ON]

• 

[WEEK START]

Mode and preferences

You  can  use  the  display  to  monitor  your 

energy  use  [CONSUMPTION]  or  generated 

energy  [MICRO-GEN].  The  default  is 

[CONSUMPTION] mode.
Using  the 

 and 

  buttons  select 

[CONSUMPTION]  and  press  the  centre 

button to confirm.

Currency

Using the 

 and 

 buttons select your currency 

and press the centre button to confirm.

Temperature units

Select whether you want the temperature 

to  be  shown  in  centigrade  (°C)  or 


Fahrenheit (°F).
Using the 

 and 

 buttons select °C or °F 

and press the centre button to confirm.

Содержание Solo II CT

Страница 1: ...Solo II CT Consumption 1 Solo II CT Consumption USER MANUAL...

Страница 2: ...d preferences Currency Temperature units Calibration Sleep mode Week start Internet bridge 10 Display overview 11 Reading your display 12 Icons Speedometer Upper numbers Lower numbers Budget bar and p...

Страница 3: ...he other If you do you will lose the data you have been collecting from whichever mode you had previously set up If you choose to switch modes the display will reset to day one SAFETY INFORMATION Keep...

Страница 4: ...ion 4 What s in the box Power supply 2 supplied with optional web pack Transmitter batteries included CT sensor Ethernet cable with optional web pack Internet bridge with optional web pack Solo II dis...

Страница 5: ...ase pack one mains sensor 3 At your electricity meter clip the sensor around the mains live cable Your mains live cable is usually identified by the colour brown red or the letter L You should hear a...

Страница 6: ...ou manage your electricity The display can then tell you whether you re on target to be within your budget and how you ve compared over the past few days weeks or months You can enter your budget as a...

Страница 7: ...then press the centre button to confirm If you don t have a second tariff then leave TARIFF 2 cost as zero If you do have a second tariff for example cheaper electricity overnight then enter the cost...

Страница 8: ...tricity flows You can read more about this under the Electricity meter section below You will be asked to set the following CONSUMPTION or MICRO GEN CURRENCY TEMPERATURE UNITS CALIBRATION DISPLAY OFF...

Страница 9: ...eadings to get your Solo II consumption e g 20 150 1 500 18 600 6 Compare the two readings and work out the calibration or correction factor as follows meter consumption Solo II consumption calibratio...

Страница 10: ...d at the same time for a few seconds to enter pairing mode the display will show PAIRING MODE for a second then show MAIN SENSOR Press three times to get to BRIDGE If the unit is paired it will show C...

Страница 11: ...ength Rewards Speedometer Text Currencies Primary temp Left button Lower digits Heatwave and snowflake Secondary temp Right button Centre button LED indicator Message Upper digits Energy Carbon cloud...

Страница 12: ...to tell you which of your tariffs is currently active and are a handy reminder for when your electricity is costing you the least One tariff only one money bag will light up Two tariffs e g day and ni...

Страница 13: ...over the time period you have asked it to show You can view this in cost currency or carbon Budget bar and prediction If you have set yourself a budget then the display shows if you are predicted to b...

Страница 14: ...the display will show the heatwave icon If the temperature is lower the display will show the snowflake icon You can purchase an additional sensor that you can pair to the second slot on the right Tem...

Страница 15: ...relate to Today Energy stopwatch The energy stopwatch mode is entered by pressing the button on any of the consumption screens The energy stopwatch allows you to measure the energy consumption of a t...

Страница 16: ...slide the cover off Step 2 Remove the battery tab from the temperature sensor Step 3 Press the pairing button on the temperature sensor Pairing The transmitter display and bridge are supplied pre pai...

Страница 17: ...should now read CONN followed by a cloud symbol on the top left hand corner Temperature sensor 1 available separately For when you want two additional temperature sensors The display will show T1 SEN...

Страница 18: ...energy use in lots of different ways so you can choose the one that suits you best View your entire consumption history the display holds up to one month of information but your website keeps a comple...

Страница 19: ...d corner European plug socket UK plug socket Smart Plugs available separately help you track and control appliances Set up through energynote our online energy management service you can schedule Smar...

Страница 20: ...ront for 10 seconds until the button colour changes to amber It will pair with the system after a few seconds Energynote will confirm a successful pairing You can now label the Smart Plug choosing fro...

Страница 21: ...l the paired sensors will disconnect Q Can I export the data from my Solo II into Excel A Yes First upload your data from your display onto energynote You can then export it as a csv file into Excel F...

Страница 22: ...G MODE for a second and then show MAIN SENSOR Press twice to show BRIDGE If the unit is paired it will show CONN and the signal strength will be shown using the signal strength icon at the top left of...

Страница 23: ...ent geo retains the right to make changes to this document including any specifications contained herein at any time without notice Technical information Legal information No part of this document may...

Страница 24: ...Solo II CT Consumption 24...

Отзывы: