background image

26

FR

Contenu

1.  Livré comme suit

A

2.  Alimentation en courant

B

3.  Clavier et écran

C

4.  Opération

D

5.  Consignes de sécurité

E

Cher client,

Nous tenons à vous remercier pour la confiance que vous avez témoignée, par l‘acquisition de votre 

nouvel instrument 

geo-FENNEL.

Les instructions de service vous aideront à vous servir de votre instrument de manière adéquate. Nous 

vous recommandons de lire avec soin tout particulièrement les consignes de sécurité de ladite notice 

avant la mise en service de votre appareil. Un emploi approprié est l‘unique moyen de garantir un fonc-

tionnement efficace et de longue durée.

geo-FENNEL 

Precision by tradition.

LIVRÉ COMME SUIT

A

 · Théodolite électronique FET 220

 · Embase

 · Batterie NiMH

 · Chargeur

 · Bloc de piles en secours

 · Coffret rigide

 · Mode d‘emploi

Hier geht‘s weiter

Содержание FET 220

Страница 1: ...BEDIENUNGSANLEITUNG USER MANUAL MODE D EMPLOI www geo fennel de www geo fennel com www geo fennel fr DE EN FR FET 220...

Страница 2: ...dukt wurde mit gr ter Sorgfalt produziert und qualit tsgepr ft Die beigef gte Anleitung wird Ihnen helfen das Ger t sachgem zu bedienen Bitte lesen Sie ins besondere auch die Sicherheitshinweise vor d...

Страница 3: ...y Beleuchtung 1 x LCD ja Libellen R hrenlibelle 30 2 mm Dosenlibelle 8 2 mm Stromversorgung NiMH Akku Betriebsdauer 18 h alternativ 4 x 1 5V AA Alkaline Batterie Lotlaser Laserdiode 650 nm Laserst rke...

Страница 4: ...RSORGUNG B Ger t ausschalten und Batterie Akkufach abnehmen Der Akku wird au erhalb des Ger tes mit dem Ladeger t aufgeladen und anschlie end wieder an das Geh use angeklickt Nur bei Batteriewechsel H...

Страница 5: ...griff 3 Grobvisier 4 Vertikalklemme und Vertikalfeintrieb 5 Bedientastatur 6 Objektiv 7 R hrenlibelle 8 Display 9 Fernrohrokular 10 Dreifu 11 Fu schraube 12 Fokussierung 13 Batterie Akkufach 14 Horizo...

Страница 6: ...R L Auswahl der Z hlrichtung des Horizontal kreiswinkels V Umschaltung der H henwinkels auf Ein Ausschalten DISPLAYANZEIGE VA Vertikalwinkel HAR Horizontalwinkel Z hlrichtung rechtsl ufig HAL Horizont...

Страница 7: ...auten optischen Lot angezielt werden Dabei stellt man mit dem Okular des optischen Lots kleiner R ndelring die Zielmarke und mit dem gr eren Fokussierring den Bodenpunkt scharf EINSCHALTEN Ein Aus Kno...

Страница 8: ...mit 0 SET best tigen UMSCHALTUNG Z HLRICHTUNG DES HORIZONTALKREISES HAR HAL Im Standardmodus ist die Z hlrichtung des Horizontalwinkels rechtsl ufig Displayanzeige HAR Durch Dr cken des Knopfes R L k...

Страница 9: ...bei Nichtbenutzung nach 20 Minuten automatisch ab DISPLAYBELEUCHTUNG Bei Dunkelheit oder schlechten Lichtverh ltnissen kann das Display beleuchtet werden Beleuchtung Einschalten Knopf SFT ca 2 Sek ged...

Страница 10: ...n Parameter bleiben auch nach Aus Einschalten des Ger tes gespeichert FEHLERMELDUNG Anzeige Bedeutung E01 Vertikalwinkel 0 Position liegt au erhalb des Bereichs E04 Interner Speicherfehler E05 Reservi...

Страница 11: ...sgeschlossen werden dass das Ger t andere Ger te st rt z B Navigationsein richtungen durch andere Ger te gest rt wird z B elektromagnetische Strahlung bei erh hter Feldst r ke z B in der unmittelbaren...

Страница 12: ...am Ger t angebracht HAFTUNGSAUSSCHLUSS 1 Der Benutzer dieses Produktes ist angehalten sich exakt an die Anweisungen der Bedienungsan leitung zu halten Alle Ger te sind vor der Auslieferung genauesten...

Страница 13: ...13 DE...

Страница 14: ...ment This manual will help you to operate the instrument appropriately Please read the manual carefully particularly the safety instructions A proper use only guarantees a longtime and reliable operat...

Страница 15: ...360 Display illumination 1 x LCD yes Vials Circular level 30 2 mm Plate level 8 2 mm Power supply NiMH battery Operating time 18 h alternatively 4 x 1 5V AA Alkaline batteries Laser plummet Wave lengt...

Страница 16: ...again when fully charged Alternatively Insert new alkaline batteries Close the cover and insert the battery box again BATTERY STATUS INDICATION Full power Effective Low power but still effective Very...

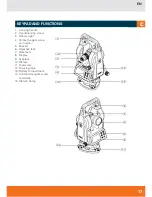
Страница 17: ...dle locking screw 3 Optical sight 4 Vertical tangent screw and clamp 5 Keypad 6 Objective lens 7 Plate level 8 Display 9 Eyepiece 10 Tribrach 11 Footscrew 12 Focusing drive 13 Battery compartment 14 H...

Страница 18: ...ade percentage m Distance unit gon Angle unit Battery status indication KEYPAD FUNCTIONS Button Function 1 Function 2 0SET Horizontal angle 0 Set Laser plummet on off HOLD Hold the horizontal angle Re...

Страница 19: ...nt until the plate level is parallel with the footscrew 1 and 2 Centre the plate level using the same two footscrews Turn the instrument by 90 and centre the bubble using footscrew 3 Repeat this proce...

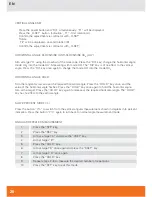
Страница 20: ...SE HAR HAL Aim at target A using the crosshair of the telescope Press the R L key change the horizontal angle mode HAR into the mode HAL Measuring with mode HAL The R L key is of no effect to the vert...

Страница 21: ...f no key is used DISPLAY ILLUMINATION In dark surroundings or at unfavourable light conditions the display can be illuminated Power on the illumination Press the SFT key for 2 sec Power off the illumi...

Страница 22: ...function setting and return to the normal angle measuring mode ERROR DISPLAY Display Error Content E01 The vertical angle 0 position is out of range or set with an incorrect procedure E04 Internal me...

Страница 23: ...LITY EMC It cannot be completely excluded that this instrument will disturb other instruments e g navigation sys tems will be disturbed by other instruments e g intensive electromagnetic radiation nea...

Страница 24: ...roduct is expected to follow the instructions given in the user manual Although all instruments left our warehouse in perfect condition and adjustment the user is expected to carry out periodic checks...

Страница 25: ...25 EN...

Страница 26: ...vous aideront vous servir de votre instrument de mani re ad quate Nous vous recommandons de lire avec soin tout particuli rement les consignes de s curit de ladite notice avant la mise en service de...

Страница 27: ...tro clairage 1 x LCD oui Nivelles Nivelle circulaire 30 2 mm Niveau principale 8 2 mm Alimentation Accu NiMH Autonomie 18 h Alternative d alimentation 4 x 1 5V AA piles alcalines Plomb laser Longueur...

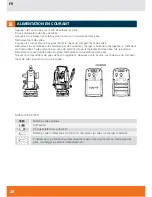
Страница 28: ...alcalines Appuyez sur le bouton vers le bas pour retirer le compartiment des piles Remplacement des piles Poussez le crochet vers le bas pour retirer le capot du compartiment des piles Remplacez les a...

Страница 29: ...trique verticale et de blocage de mouvement 5 Bouton d exploitation 6 Lentille de l objectif 7 Nivelle principale 8 cran 9 Oculaire 10 Embase 11 Vis de r glages 12 R glage du focus 13 Batterie 14 Vis...

Страница 30: ...ce gon Unit d angle Niveau de la batterie CLAVIER Bouton Fonction 1 Fonction 2 0SET R glez l angle horizontal 0 Allumer ou teindre le plomb laser HOLD M morisation de l angle horizontal Mode r p titio...

Страница 31: ...ournez l instrument 90 et centrer la bulle l aide de la vis r glable 3 R p tez les tapes 1 2 chaque fois que vous tournez l appareil de 90 jusqu ce que la nivelle principale soit centr e dans toutes l...

Страница 32: ...ertical Appuyez sur la touche R L de nouveau Modifiez le mode HAL en mode HAR ANGLE HORIZONTAL FERM NON FERM Tournez le bouton de r glage fin de l instrument et placer l instrument l angle horizontal...

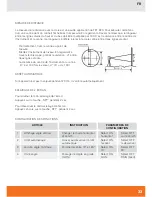
Страница 33: ...centre de l instrument la canne D est 100 fois la valeur d D d x 100 ARR T AUTOMATIQUE Si l appareil n est pas manipul pendant 20 mn il s arr te automatiquement ECLAIRAGE DE L CRAN Pour allumer le ret...

Страница 34: ...et entrer dans le mode de mesure d angle normal AFFICHAGE D ERREUR Affichage Contenu des erreurs E01 La position 0 de l angle vertical est en dehors de la plage de compensation ou a t mal configur E04...

Страница 35: ...LECTROMAGN TIQUE De mani re g n rale il n est pas exclu que le niveau ne d range d autres instruments p ex les dispositifs de navigation ou qu il puisse lui m me tre d rang par d autres appareils p ex...

Страница 36: ...interruption du travail de l entreprise etc savoir les dommages qui d coulent du produit lui m me ou de la non utilisation du produit 5 Le fabricant et son repr sentant d clinent toute responsabilit p...

Страница 37: ...peut tre utilis sans avoir recours d autres mesures de s curit Au cas o l utilisateur a regard un court instant le faisceau laser les yeux sont tout de m me prot g s par le r flexe de fermeture des p...

Страница 38: ...38 FR...

Страница 39: ...39 FR...

Страница 40: ...5 Baunatal Tel 49 561 49 21 45 Fax 49 561 49 72 34 info geo fennel de www geo fennel de Technische nderungen vorbehalten All instruments subject to technical changes Sous r serve de modifications tech...

Отзывы: