background image

 English  

-64-


System Requirement 


Windows 98SE/2000/ME/XP 

Pentium MMX

Celeron or AMD Athlon® CPU 

64MB RAM 

CD ROM 

500MB free HDD space 

Available USB port 

16-bit Color Display 


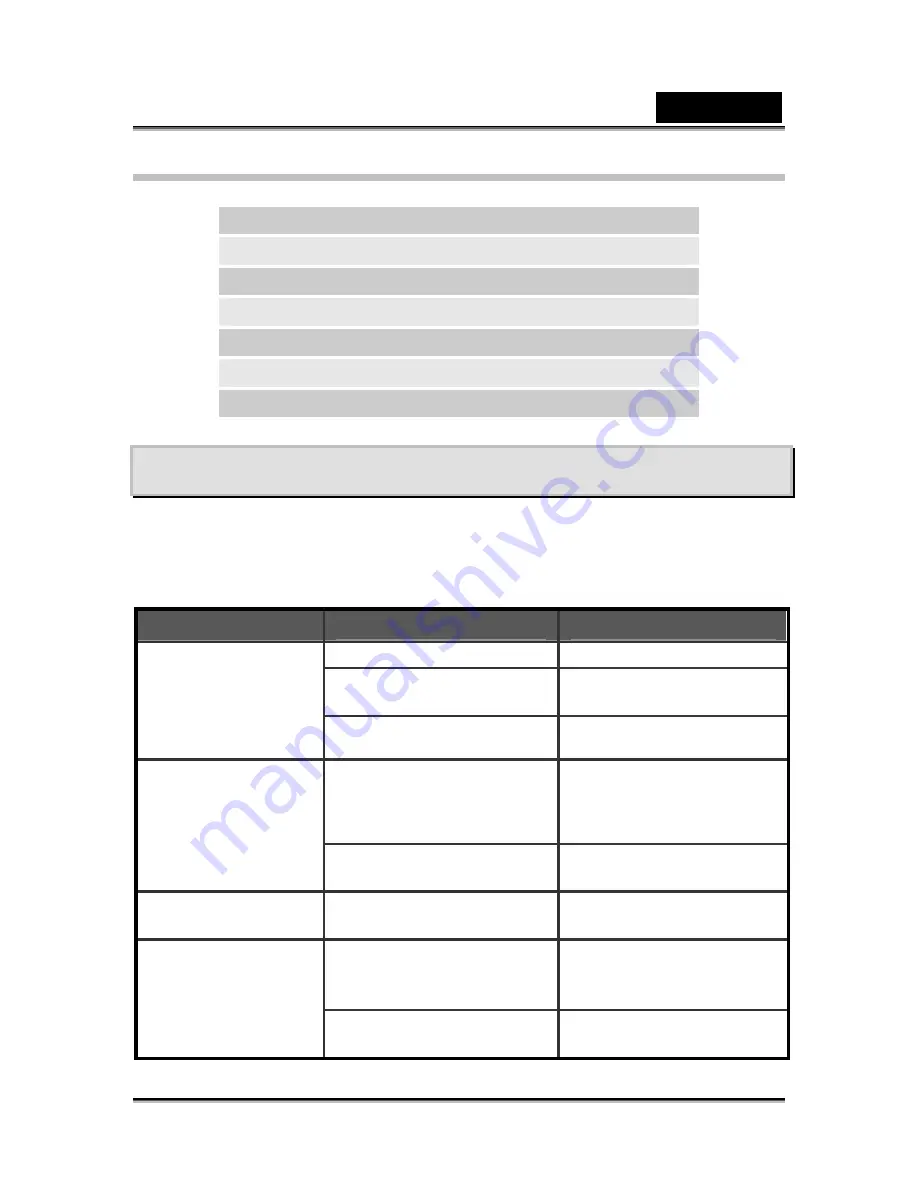
Troubleshooting 

Refer to the symptoms and measures listed below before sending the digital video 
camera for repairs. If the problem persists, contact your local reseller or service 
center. 

Power Supply


Symptom


Cause


Measure


The battery is not loaded.   

Load the battery correctly. 

The battery is exhausted.   

Replace with a new set of 
batteries. 

The power does not 
come on. 

The AC power adaptor is 
not connected correctly. 

Reconnect it properly.   

The digital video camera 
was left unattended and 
unused, so auto power off 
cuts it off. 

Turn the power back on.   

The power cuts out 
during use. 

The battery is exhausted.   

Replace with a new set of 
batteries. 

The power does not 
go off.   

Digital video camera 
malfunction. 

Replace with a new set of 
batteries. 

It is being used in extreme 
low temperature. 

Please don’t use this 
camera under extreme low 
temperature. 

The battery runs out 
quickly. 

Many images are being 
captured in dark places 

Please prepare extra 
batteries if you need take a 

Содержание DV5133

Страница 1: ...and found to comply with the limits for Class B digital devices pursuant to Part 15 of the FCC rules These limits are designed to provide reasonable protection against harmful interference in a resid...

Страница 2: ...ery often vary between retailers especially with accessories such as batteries memory cards cables carrying cases pouches and language support Occasionally a retailer will specify a unique product col...

Страница 3: ...e surrounding areas due to the battery rupturing or leaking Do not fire the flash close to anyone s eyes This might cause damage to the person s eyesight Do not subject the LCD monitor to impact This...

Страница 4: ...erias poder o esquentar durante a utiliza o da c mera por um longo per odo ou do flash de forma cont nua Isso normal e n o caracteriza mau funcionamento A c mera poder esquentar durante a utiliza o co...

Страница 5: ...RECORDING _______________________________ 15 PICTURE RECORDING ____________________________________ 16 VOICE RECORDING ______________________________________ 16 TAKING CLOSE UP PICTURES _____________...

Страница 6: ...________ 34 TV System __________________________________________ 34 Selecting Interface Language ___________________________ 35 Default Setting _______________________________________ 35 PLAYBACK MODE...

Страница 7: ...MPEG4 MOVIE ___________________________________ 53 VIEWING PICTURES AND MOVIES ON A TV ________________ 54 VIDEO FILE CONVERTER _______________________________ 55 BURNING THE RECORDED CLIP INTO DVD _...

Страница 8: ...trol over the movies and pictures you take The camera is also ideally suited for using as a Web camera hooked up to your home computer via high speed USB 2 0 port The built in 64 MB memory allows you...

Страница 9: ...KeyPad illustration Power Button Self Timer LED Flash Lens SD Card Slot Tele Wide Button Direction Buttons Picture Shutter Button TV Out Port Movie Shutter Button Enter Button Mini USB 2 0 port LCD Pa...

Страница 10: ...English 10 Side View Speaker Battery cover Backward Button Macro focus Microphone...

Страница 11: ...movies recorded voice and music You can expand the memory capacity by using an optional SD or MMC memory card up to 2GB To insert a memory card refer to the figure as below 1 Insert the memory card in...

Страница 12: ...tter Button To record the voice press the Upper Button of Direction Buttons and press the Movie Shutter Button to start voice recording To view stored movies pictures or listen to stored MP3 and voice...

Страница 13: ...on or turn off the camera RECORD PLAY Button functions 1 Switch between Record Playback Mode 2 Return to the previous page Tele Wide Button Digital Zoom in and out Movie Shutter Button 1 Start to take...

Страница 14: ...below may display on LCD when movies and pictures are recorded 1 Record Mode Movie Record Mode Picture Record Mode Voice Record Mode Motion Stabilization Two in One Mode Photo Frame Multi Snap Mode Ba...

Страница 15: ...y 8 Auto Flash Flash Off 9 Self timer enabled 10 8X digital zoom Date YYYY MM DD 11 Time HH MM SEC 12 Motion Detection MPEG4 Movie Recording Press Movie Shutter button to start recording When a movie...

Страница 16: ...Taking Close up Pictures The camera has two close up picture modes to allow you to take pictures at close range The Macro Mode should be used for an object at about 20 cm while the Portrait Mode shou...

Страница 17: ...English 17 To zoom in out press the Tele Wide Button The digital zoom can be set from 1x to 8x and the magnification ratio is shown on the LCD monitor...

Страница 18: ...Exit z Normal z B W z Classic z Negative z Exit z Sound z Start up Screen z Time Setting z Format Memory z TV System z Language z Default Setting z Exit Operations for Record Mode Operation Screen 1 P...

Страница 19: ...lti Snap One Time Off Backlight Mode One Time Off Date Printing Always Off Effect One Time Normal Sound Always On Format Card One Time Off TV System Always Depends on shipping area Language Always Dep...

Страница 20: ...33 52 01 07 44 02 15 28 04 31 03 09 00 15 Exposure The camera adjusts image exposure automatically In certain circumstances you may wish to adjust the exposure compensation setting To change Exposure...

Страница 21: ...then press Enter Button to switch to Sharpness submenu 4 Use Up Down Buttons to move between nine levels The change can be previewed immediately 5 Press Enter Button to validate the setting and exit...

Страница 22: ...immediately 5 Press Enter Button to validate the setting and exit Display screen W B Option Motion Stabilization To enable Motion Stabilization 1 In Movie Picture Record Mode press Enter Button to swi...

Страница 23: ...se Right Left Buttons to select Movie Mode Submenu of Movie Mode will pop out on the screen 3 Use Up Down Buttons to select Motion Detect then press Enter Buttons to switch to Motion Detect submenu 4...

Страница 24: ...ree settings 5 Press Enter Button to validate the setting and exit Display screen Picture Resolution Option Possible number of shots still image Quality Resolution 64 MB internal memory 128 MB 256MB 5...

Страница 25: ...screen Exposure Option Two in One Camera Mode Only With camera set to Two in One mode you can combine two snapshots into one picture To enable Two in One 1 In Movie Picture Record Mode press Enter But...

Страница 26: ...a popular electronic photo frame You can take your picture with a preferred electronic photo frame To enable Photo Frame 1 When in Camera Mode use Up Down Buttons to select Photo Frame option then pr...

Страница 27: ...submenu 2 Use Up Down Buttons to move between 2 settings 3 Press Enter Button to validate the setting and exit NOTE z The flash will be disabled automatically when battery power is low Display screen...

Страница 28: ...to switch to Sharpness submenu 3 Use Up Down Buttons to move between nine levels The change can be previewed immediately 4 Press Enter Button to validate the setting and exit Display screen Sharpness...

Страница 29: ...to move between four settings The change can be previewed immediately 5 Press Enter Button to validate the setting and exit Display screen W B Option Multi Snap Camera Mode Only With the camera set to...

Страница 30: ...or Off 3 Press Enter Button to validate the setting and exit Display screen Backlight Option Date Printing Camera Mode Only To enable Date Printing 1 When in Camera Mode use Up Down Buttons to select...

Страница 31: ...s Enter Button to validate the setting and exit Display screen Voice Option Effect Setting There are four modes which are Normal Black White Classic and Negative To change Effect setting 1 In Movie Pi...

Страница 32: ...o Setting option then Setting Submenu will pop out on the screen 3 Use Up Down Buttons to move between settings Display screen Setting Option z Sound operation sound z Start Up Screen z Time Setting z...

Страница 33: ...p If you do not want to customize the start up screen press Left Right Buttons and select No Start Up Screen No Start up screen Time Setting 1 Move between Date Time Set and Exit by using Left Right B...

Страница 34: ...matted Make sure all the data is duplicated to PC before formatting SD card TV System Ensure that the appropriate TV standard of your area is selected either NTSC or PAL Wrong TV system setting may ca...

Страница 35: ...English 35 Selecting Interface Language Display screen Default Setting To restore the default factory setting select this option Display screen Default setting option Enter Button...

Страница 36: ...eBook Direction Buttons can be used to select the specific option Press Enter Button to view movies pictures listen to voice music or read eBook Button Functions The Direction Buttons have the followi...

Страница 37: ...ce LCD Monitor Information Indicators on the LCD screen while in Playback Mode 1 Mode Indicator Movie Playback Mode Picture Playback Mode Voice Playback Mode Music Playback Mode eBook Playback Mode 2...

Страница 38: ...cture voice or MP3 5 Magnification Indicator Movie Playback Operation Display screen 1 Use Direction Buttons to select the Movie option 2 Press Enter Button to go to Movie Playback Mode 3 Use Right Le...

Страница 39: ...ons to select the movie 4 Use Up Button to delete all movies and Down Button to delete single movie 5 Before a movie is deleted a confirmation screen will appear choosing Yes will execute the operatio...

Страница 40: ...thumbnail movies 3 To play a movie use Direction Buttons to select the movie and press Enter Button to view Lock Movies Single or all movies can be locked This function can prevent the movies from be...

Страница 41: ...cked a confirmation screen will appear choosing Yes will execute the operation No will cancel the operation 6 Press Enter Button to exit Repeat Movies This function automatically repeats playing singl...

Страница 42: ...ure Playback Mode 3 Use Right Left Buttons to go to the next or last picture 4 While the picture is selected use Tele Wide Buttons to magnify 5 Use Direction Buttons to navigate the magnified picture...

Страница 43: ...eted a confirmation screen will appear choosing Yes will execute the operation No will cancel the operation 6 Press Enter Button to exit NOTE z If you are using a memory card you can delete only those...

Страница 44: ...prevent the pictures from being deleted accidentally Operation Display screen 1 Use Direction Buttons to select the Lock option 2 Press Enter Button to go to the Lock menu 3 Use Right Left Buttons to...

Страница 45: ...e Slide Show This function automatically repeats all pictures in order Operation Display screen 1 Use Direction Buttons to select the Slide option 2 Press Enter Button to start the slide show Press it...

Страница 46: ...irection Buttons to select the Voice option 2 Press Enter Button to go to Voice Playback Mode 3 Use Right Left Buttons to go to the next or last voice recording 4 Press Movie Shutter Button to start p...

Страница 47: ...ll be different while selecting Repeat One option and Repeat All option 11 To delete a voice use Right Left Buttons to select the voice 12 Use Up Button to delete all voice recordings and Down Button...

Страница 48: ...uter 2 Connect your camera to the computer USB port 3 The red LED will light when the camera is connected to the computer and in Mass Storage Mode 4 Transfer MP3 music to My Computer Removable Disk MP...

Страница 49: ...front for those MP3 files with Lyrics display 3 Press Movie Shutter or Enter Button to play MP3 file 4 Press Movie Shutter Button again to stop playing 5 Press Up Down Buttons to adjust volume 6 Press...

Страница 50: ...tored in the camera can be played either by the built in speaker earphone or TV When the earphone cable is plugged in the camera the option menu of Earphone TV pops out on the LCD Screen Choose earpho...

Страница 51: ...er 2 Connect your camera to the computer USB port 3 The Red LED will light when the camera is connected to the computer and in Mass Storage Mode 4 Transfer eBooks txt file format only to My Computer R...

Страница 52: ...to read the eBook 4 Press Up Down Buttons to scroll up down the text 5 Select to jump to the first page 6 Select to jump to the last page 7 Select to change the color of text and background 8 Select...

Страница 53: ...ovie on PC When playing an MPEG4 movie for the first time MPEG4 Video Codec Xvid should be installed in PC To do this 1 Insert the CD ROM into the computer s CD ROM drive Click Device Driver Install M...

Страница 54: ...t port 2 Connect the other end of the cable to a television 3 The option menu of Earphone TV pops out on the LCD Screen 4 Choose TV option and press Enter Button to validate the setting 5 The steps fo...

Страница 55: ...to MPEG4 Xvid compatible format with your camera In this way you can convert any format of video files and playback your favorite movies on your camera To convert a video file 1 Install Arcsoft Media...

Страница 56: ...h 56 5 Select the video file you want to convert 6 Select Zoran Coach Compatible in Select Device column The Select Conversion Parameter will change to Coach Camera respectively Compatible Device Sele...

Страница 57: ...English 57 7 Click Convert to start video converting...

Страница 58: ...Please note if Clip0001 avi exists in the camera then the converted file has to be renamed to clip0002 avi 10 Connect your camera to PC and transfer the converted video to My Computer Removable Disk...

Страница 59: ...ng the movie clip into a DVD You can preserve your precious movies on a DVD to share with family and friends To create a DVD 1 Install Arcsoft Showbiz DVD 2 Click Start Select Programs Arcsoft Showbiz...

Страница 60: ...English 60 5 Click Create 6 Click Start to start DVD burning...

Страница 61: ...nds or post them on websites To do this you should 1 Install the camera driver on your computer 2 Connect the computer and camera with the supplied mini USB 2 0 cable 3 Default mode is Mass Storage Mo...

Страница 62: ...friendly application that helps you read edit and organize images Arcsoft ShowBiz allows you to edit movies and is equally easy to use Arcsoft Media Converter can convert multiple video formats into M...

Страница 63: ...uilt in 64MB Memory SD MMC Card Slot support up to 2GB Image Resolution High Still image 3840 x 2880 11 0 Mega Pixels Standard 2592 x 1944 5 0 Mega Pixels Low 1600 x 1200 2 0 Mega Pixels Movie Resolut...

Страница 64: ...usted Replace with a new set of batteries The power does not come on The AC power adaptor is not connected correctly Reconnect it properly The digital video camera was left unattended and unused so au...

Страница 65: ...er button all the way The internal memory or memory card does not have any free space Load a new memory card or delete unwanted files End of memory card life Load a new memory card The flash is rechar...

Страница 66: ...om Cause Measure Even though the flash fired the image is dark The distance to the subject is greater than flash effective range Get closer to your subject and capture The image was captured in a dark...

Страница 67: ...ion Cannot format a memory card End of memory card life Load a new memory card The playback image is dark though I used the flash The LCD monitor is too dark Adjust the brightness of LCD monitor in th...

Страница 68: ...ficient Check whether the hard disk drive has enough space for running Windows and if the drive for loading files has a capacity at least that of the memory card inserted in the digital video camera N...

Отзывы: