background image

English  

-20-


2. 

Use Right/Left Buttons to select Movie Mode. Submenu of Movie Mode will pop 
out on the screen. 

3. 

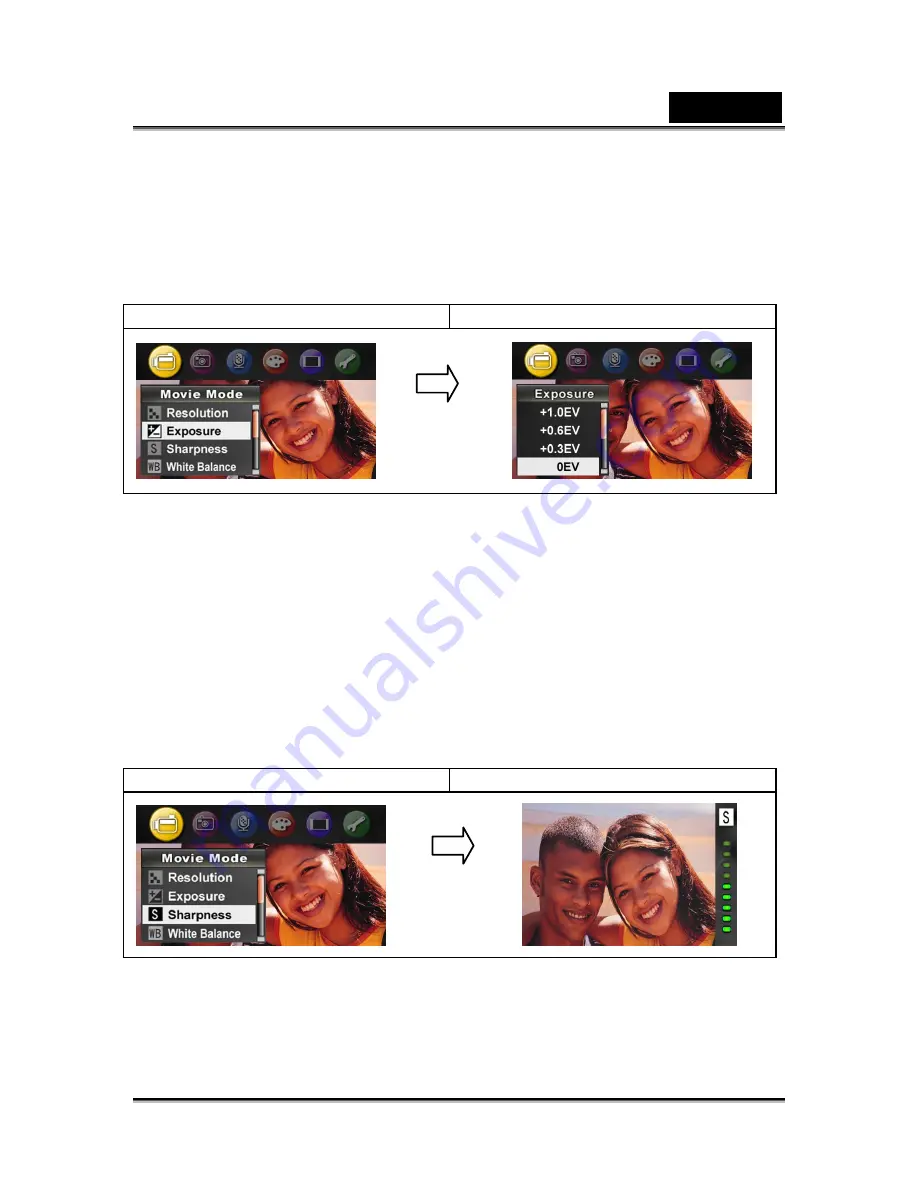
Use Up/Down Buttons to move to Exposure Option. Press the Enter Button and 
then Exposure Submenu will pop out on the screen. 

4. 

Use Up/Down Buttons to choose preferred EV value. The change can be 
previewed immediately. 

5. 

Press Enter Button to validate the setting and exit. 

Display screen 

Exposure Option 


Sharpness 

You can soften and sharpen images to achieve different effects. 

To change Sharpness setting: 

1. 

In Movie/Picture Record Mode, press Enter Button to switch to record menu 
screen.  

2. 

Use Right/Left Buttons to select Movie Mode. Submenu of Movie Mode will pop 
out on the screen. 

3. 

Use Up/Down Buttons to select Sharpness then press Enter Button to switch to 
Sharpness submenu. 

4. 

Use Up/Down Buttons to move between nine levels. The change can be 
previewed immediately. 

5. 

Press Enter Button to validate the setting and exit. 

Display screen 

Sharpness Option 


White Balance 

The camera adjusts the color balance of images automatically. Three manual white 
balance settings are available: 
1. Auto (Default): The camera automatically adjusts white balance. 

Enter Button 

Enter Button 

Содержание DV1112

Страница 1: ...ed to provide reasonable protection against harmful interference in a residential installation This equipment generates uses and can radiate radio frequency energy and if not installed and used in accordance with the instructions may cause harmful interference to radio communications However there is no guarantee that interference will not occur in a particular installation If this equipment does ...

Страница 2: ...ons in this manual are for the purpose of explanation and may differ from the actual design of your camera 4 The manufacturer assumes no liability for any errors or discrepancies in this user manual 5 For driver updates you can check the Download section of our website www geniusnet com SAFETY INSTRUCTIONS Read and understand all Warnings and Cautions before using this product Warnings If foreign ...

Страница 3: ...ternal fluid has entered your eyes consult a physician to receive treatment A camera is a precision instrument Do not drop it strike it or use excessive force when handling the camera This might cause damage to the camera Do not use the camera in humid steamy smoky or dusty places This might cause fire or electric shock Do not remove the battery immediately after long period of continuous use The ...

Страница 4: ...he battery may feel warm after long period of continuous use of the camera or the flash This is normal and not a malfunction The camera may feel warm after long period of continuous use This is normal and not a malfunction If the battery is not to be used for a long period of time remove it from the camera to prevent leakage or corrosion If the battery is not to be used for a long period of time s...

Страница 5: ...E RECORDING _______________________________ 15 PICTURE RECORDING ____________________________________ 15 VOICE RECORDING ______________________________________ 16 TAKING CLOSE UP PICTURES _______________________________ 16 USING DIGITAL ZOOM ____________________________________ 16 OPTIONS FOR RECORD MODE ______________________________ 17 OPERATIONS FOR RECORD MODE____________________________ 17 DE...

Страница 6: ..._______________________________________ 32 TV System __________________________________________ 32 Selecting Interface Language ___________________________ 33 Default Setting _______________________________________ 33 PLAYBACK MODE _____________________________________ 34 BUTTON FUNCTIONS _____________________________________ 34 LCD Monitor Information _______________________________ 35 MOVIE PLAY...

Страница 7: ..._____________________ 49 VIEWING PICTURES AND MOVIES ON A TV ________________ 50 RECORD MOVIE CLIP FROM AV DEVICE ___________________ 51 VIDEO FILE CONVERTER _______________________________ 52 BURNING THE RECORDED CLIP INTO DVD ________________ 56 TRANSFERRING DATA TO A COMPUTER __________________ 58 INSTALLING THE DIGITAL CAMERA DRIVER ______________________ 58 CONNECTING YOUR CAMERA TO A COMPUTE...

Страница 8: ...res you take The camera is also ideally suited for using as a Web camera hooked up to your home computer via high speed USB 2 0 port Biult in 64 MB memory allows you to take pictures and movies without a memory card But you can use a memory card to increase the storage capacity up to 2GB NOTE z Partial memory of the built in 64MB memory is used for Firmware code Standard Accessories Unpack the pac...

Страница 9: ...ection Buttons Tele Wide Button RECORD PLAY Button Picture Shutter Button TV Out Port Movie Shutter Button Enter Button Mini USB 2 0 port AV In Port Flash IR Receiver Self Timer LED Lens SD card slot Power Button Microphone Macro Switch LCD Panel ...

Страница 10: ...English 10 Side View Speaker Forward Button Play Pause Button Backward Button Battery cover ...

Страница 11: ... SD or MMC memory card up to 2GB To insert a memory card refer to the image above Insert the memory card into the right position To remove an installed SD card press the card inwards to release it When the card pops out gently remove it from its slot NOTE z When a memory card is fitted movies and pictures are saved on card rather than on the built in memory Protecting Data on an SD Card SD card is...

Страница 12: ...r Button To record the voice press the Upper Button of Direction Buttons and press the Movie Shutter Button to start voice recording To view stored movies pictures listen to stored MP3 and voice recordings or read eBook press RECORD PLAY Button once to switch to Playback Mode Press a second time to return to Record Mode Turning the Camera Off To turn off the Camera you can either press the Power B...

Страница 13: ...ss down for one second to turn on or turn off the camera RECORD PLAY Button functions 1 Switch between Record Playback Mode 2 Return to the previous page Tele Wide Button Digital Zoom in and out Movie Shutter Button 1 Start to take movie or record voice 2 To stop recording press it again Picture Shutter Button Start to take picture Macro switch Switch between Macro Mode Portrait Mode and Normal Mo...

Страница 14: ...splay on LCD when movies and pictures are recorded 1 Record Mode Movie Record Mode Picture Record Mode Voice Record Mode Motion Stabilization Two in One Mode Photo Frame Multi Snap Mode Backlight Mode 2 Resolution Movie High Standard Low Picture High Standard Low ...

Страница 15: ... 10 8X digital zoom Date YYYY MM DD 11 Time HH MM SEC 12 Motion Detection MPEG4 Movie Recording Press Movie Shutter button to start recording When a movie is recording a time indicator will display on LCD monitor To stop recording press Movie Shutter Button again Press RECORD PLAY Button to view the recorded movie Three resolution settings are available Quality High Quality Standard Quality Low Qu...

Страница 16: ...ange The Macro Mode should be used for object located at about 20 cm while the Portrait Mode should be used for object located from 70 cm to 130 cm To take close up pictures 1 Rotate the lens ring to switch to Macro or Portrait positions In Macro Mode the macro icon will appear on the LCD monitor 2 Press Picture Shutter Button to take the picture NOTE Remember to turn the macro switch back to Norm...

Страница 17: ...z Exit z Normal z B W z Classic z Negative z Exit z 16 9 z 4 3 z Exit z Sound z Start up Screen z Time Setting z Format Memory z TV System z Language z Default Setting z Exit Operations for Record Mode Operation Screen Press Enter Button when in Movie Picture Record Mode Use Right Left Buttons to move between main menu options which are Movie Mode Camera Mode Voice Mode Effect and Set Submenu will...

Страница 18: ...h Always Off Self Timer One Time Off Multi Snap One Time Off Backlight Mode One Time Off Date Printing Always Off Effect One Time Normal Wide Screen Setting One Time 16 9 Sound Always On Format Card One Time Off TV System Always Depends on shipping area Language Always Depends on shipping area Volume Always Level 6 Movie Mode Setting Record main menu includes camera setting and other advanced sett...

Страница 19: ...14 00 04 38 00 09 06 00 18 12 00 36 42 01 13 55 02 27 50 4 3 320x240 500 Kbps 30 fps Low 00 09 10 00 08 28 00 16 56 00 33 52 01 07 44 02 15 28 04 31 03 09 02 06 640 480 1 8Mbps 30 fps High 00 01 20 00 01 03 00 02 20 00 04 40 00 09 20 00 18 40 00 39 15 01 18 30 640 480 1Mbps 30 fps Standard 00 02 40 00 02 13 00 04 21 00 08 52 00 18 24 00 38 56 01 18 43 02 37 26 16 9 320x240 500 Kbps 30 fps Low 00 0...

Страница 20: ...hange Sharpness setting 1 In Movie Picture Record Mode press Enter Button to switch to record menu screen 2 Use Right Left Buttons to select Movie Mode Submenu of Movie Mode will pop out on the screen 3 Use Up Down Buttons to select Sharpness then press Enter Button to switch to Sharpness submenu 4 Use Up Down Buttons to move between nine levels The change can be previewed immediately 5 Press Ente...

Страница 21: ... to move between four settings The change can be previewed immediately 5 Press Enter Button to validate the setting and exit Display screen W B Option Motion Stabilization To enable Motion Stabilization 1 In Movie Picture Record Mode press Enter Button to switch to record menu screen 2 Use Right Left Buttons to select Movie Mode Submenu of Movie Mode will pop out on the screen 3 Use Up Down Button...

Страница 22: ...oose ON or OFF 5 Press Enter Button to validate the setting and exit 6 Camera will start to record video once if there is a movement for 3 consecutive seconds Stop recording if there is no movement for 3 seconds Display screen Motion Detect Option Camera Mode Setting Picture Resolution To change Picture Resolution 1 In Movie Picture Record Mode press Enter Button to switch to record menu screen 2 ...

Страница 23: ... Exposure The camera adjusts image exposure automatically In certain circumstances you may wish to adjust the exposure compensation setting To change Exposure setting 1 In Movie Picture Record Mode press Enter Button to switch to record menu screen 2 Use Right Left Buttons to select Camera Mode Submenu of Camera Mode will pop out on the screen 3 Use Up Down Buttons to move to Exposure Option Press...

Страница 24: ...ht Left Buttons to select Camera Mode Submenu of Camera Mode will pop out on the screen 3 Use Up Down Buttons to select Two in One then press Enter Button to switch to Two in One submenu 4 Use Up Down Buttons to choose ON or OFF 5 Press Enter Button to validate the setting and exit Display screen Two in One Option 1 Press Picture Shutter Button to take first picture 2 Press Picture Shutter Button ...

Страница 25: ...Only This camera has two flash settings To change flash setting by either hot key Right Button or Option Setting 1 Auto flash the flash fires automatically according to light conditions Use this mode for general photography 2 Flash Off the flash will not fire under any circumstances Use this mode when taking images in a place where flash photography is prohibited or when the subject is distant bey...

Страница 26: ...er Button to switch to Self timer submenu 2 Use Up Down Buttons to choose On or Off 3 Press Enter Button to validate the setting and exit Display screen Self timer Option Sharpness You can soften and sharpen images to achieve different effects To change Sharpness setting 1 When in Camera Mode use Up Down Buttons to select Sharpness Option then press Enter Button to switch to Sharpness submenu 2 Us...

Страница 27: ...u screen 2 Use Right Left Buttons to select Camera Mode Submenu of Camera Mode will pop out on the screen 3 Use Up Down Buttons to select White Balance then press Enter Button to switch to White Balance submenu 4 Use Up Down Buttons to move between four settings The change can be previewed immediately 5 Press Enter Button to validate the setting and exit Display screen W B Option Multi Snap Camera...

Страница 28: ...light then press Enter Buttons to switch to Backlight submenu 2 Use Up Down Buttons to choose On or Off 3 Press Enter Button to validate the setting and exit Display screen Backlight Option Date Printing Camera Mode Only To enable Date Printing 1 When in Camera Mode use Up Down Buttons to select Date Printing then press Enter Buttons to switch to Date Printing submenu 2 Use Up Down Buttons to choo...

Страница 29: ...ption to enable voice recording and press Enter Button to validate the setting and exit Display screen Voice Option Effect Setting There are four modes which are Normal Black White Classic and Negative To change Effect setting 1 In Movie Picture Record Mode press Enter Button to switch to record menu screen 2 Use Right Left Buttons to move to Effect Option Then Effect Submenu will pop out on the s...

Страница 30: ...ve between 16 9 and 4 3 Option 4 Press Enter Button to validate the setting and exit Display screen Setting Menu The Setting submenu contains options for configuring your camera set up To change advanced setting 1 In Movie Picture Record Mode press Enter Button to switch to record menu screen 2 Use Right Left Buttons to move to Setting option then Setting Submenu will pop out on the screen 3 Use U...

Страница 31: ...t the picture you want and press Enter Button to validate the setting and exit Display screen Start up If you do not want to customize the start up screen press Left Right Buttons and select No Start Up Screen No Start up screen Time Setting 1 Move between Date Time Set and Exit by using Left Right Buttons 2 Adjust date and time by using Up Down Buttons then select Set to validate each change 3 Se...

Страница 32: ...rd is formatted Make sure all the data is duplicated to PC before formatting SD card TV System Ensure that the appropriate TV standard of your area is selected either NTSC or PAL Wrong TV system setting may cause image flicker NTSC standard USA Canada Japan South Korea and Taiwan etc PAL standard UK Europe China Australia Singapore and Hong Kong etc Display screen TV System option Enter Button Ent...

Страница 33: ...English 33 Selecting Interface Language Display screen Default Setting To restore the default factory setting select this option Display screen Default setting option Enter Button ...

Страница 34: ... movie picture voice music and eBook Direction Buttons can be used to select the specific option Press Enter Button to view movies pictures listen to voice music or read eBook Button Functions The Direction Buttons have the following functions in Movie and Picture Playback Modes Right Button Go to the next movie picture Left Button Go to the previous movie picture Up Button Invalid Down Button Inf...

Страница 35: ...ice LCD Monitor Information Indicators on the LCD screen while in Playback Mode 1 Mode Indicator Movie Playback Mode Picture Playback Mode Voice Playback Mode Music Playback Mode eBook Playback Mode 2 Resolution Indicator High Resolution Standard Resolution Low Resolution ...

Страница 36: ...icture voice or MP3 5 Magnification Indicator Movie Playback Operation Display screen 1 Use Direction Buttons to select the Movie option 2 Press Enter Button to go to Movie Playback Mode 3 Use Right Left Buttons to go to the next or last movie 4 Press Movie Shutter Button to play and press it again to pause 5 While playing movie press Right Left Buttons to fast forward backward then release the bu...

Страница 37: ...y screen 1 Use Direction Buttons to select the Delete option 2 Press Enter Button to go to the Delete menu 3 Use Right Left Buttons to select the movie 4 Use Up Button to delete all movies and Down Button to delete single movie 5 Before a movie is deleted a confirmation screen will appear choosing Yes will execute the operation and No to cancel the operation 6 Press Enter Button to exit ...

Страница 38: ...card cannot be deleted z The delete function will only erase unlocked movies Locked movies must be unlocked before being deleted Thumbnail Function Operation Display screen 1 Use Direction Buttons to select the Thumbnail option 2 Press Enter Button to view nine thumbnail movies 3 To play a movie use Direction Buttons to select the movie and press Enter Button to view Lock Movies Single or all movi...

Страница 39: ...n to lock unlock single movie 5 Before a movie is locked unlocked a confirmation screen will appear choosing Yes will execute the operation No will cancel the operation 6 Press Enter Button to exit Repeat Movies This function automatically repeats playing single movie or all movies in order Operation Display screen 1 Use Direction Buttons to select the Repeat One option or Repeat All option 2 Pres...

Страница 40: ... go to the next or last picture 4 While the picture is selected use Tele Wide Buttons to magnify 5 Use Direction Buttons to navigate the magnified picture 6 Press Enter Button to go to the picture option menu 7 Use Direction Buttons to select five options Delete Thumbnail Lock Slideshow or Exit Delete Picture Operation Display screen 1 Use Direction Buttons to select the Delete option ...

Страница 41: ...res stored on the card z Pictures on a written protected memory card cannot be deleted z The delete function will only erase unlocked pictures Locked pictures must be unlocked before being deleted Thumbnail Function Operation Display screen 1 Use Direction Buttons to select the Thumbnail option 2 While selecting Thumbnail option press Enter Button to view nine thumbnail pictures 3 To view a pictur...

Страница 42: ...own Button to lock unlock single picture 5 Before a picture is locked unlocked a confirmation screen will appear choosing Yes will execute the operation No will cancel the operation 6 Press Enter Button to exit Make Slide Show This function automatically repeats all pictures in order Operation Display screen 1 Use Direction Buttons to select the Slide option 2 Press Enter Button to start the slide...

Страница 43: ...peration Display screen 1 Use Direction Buttons to select the Voice option 2 Press Enter Button to go to Voice Playback Mode 3 Use Right Left Buttons to go to the next or last voice recording 4 Press Movie Shutter Button to start playing back the selected voice Press it again to stop 5 Use Up Down Buttons to adjust the volume 6 Press Enter Button to go to the voice playback option menu 7 Use Up Bu...

Страница 44: ...ill be different while selecting Repeat One option and Repeat All option 11 To delete a voice use Right Left Buttons to select the voice 12 Use Up Button to delete all voice recordings and Down Button to delete single voice recording 13 Before a voice is deleted a confirmation screen will appear choosing Yes will execute the operation No will cancel the operation 14 Press Enter Button to exit ...

Страница 45: ...era is connected to the computer and in Mass Storage Mode 4 Transfer MP3 music to My Computer Removable Disk MP3 5 Transfer lrc file to My Computer Removable Disk MP3 if you have lrc file 6 Once all the music is transferred disconnect the USB cable from the PC NOTE z The file names of MP3 and lrc must be the same for the correct lyrics display while MP3 is playing Listen to MP3 Music Operation Dis...

Страница 46: ...own Button once to repeat current MP3 8 Press Down Button twice to repeat all MP3 9 Press Enter Button to exit Listen to MP3 Music with earphone MP3 stored in the camera can be played either by the built in speaker earphone or TV When the earphone cable is plugged in the camera the option menu of Earphone TV pops out on the LCD Screen Choose earphone or TV and press Enter Button to validate the se...

Страница 47: ...ter 2 Connect your camera to the computer USB port 3 The Red LED will light when the camera is connected to the computer and in Mass Storage Mode 4 Transfer eBooks txt file format only to My Computer Removable Disk eBook 5 Once all the files are transferred disconnect the USB cable from the PC Read eBooks Operation Display screen 1 In Playback Mode use Direction Buttons to select the eBook option ...

Страница 48: ...n to read the eBook 4 Press Up Down Buttons to scroll up down the text 5 Select to jump to the first page 6 Select to jump to the last page 7 Select to change the color of text and background 8 Select to auto scroll down the text 9 Select to add a bookmark ...

Страница 49: ...Movie on PC When playing an MPEG4 movie for the first time MPEG4 Video Codec Xvid should be installed in PC To do this 1 Insert the CD ROM into the computer s CD ROM drive Click Device Driver Install MPEG4 Video Codec Xivd and follow the on screen instructions to complete the installation 2 Start video player such as Widows Media Player to view MPEG4 AVI Movies Share MPEG4 Movie You can share the ...

Страница 50: ...ut port 2 Connect the other end of the cable to a television 3 The option menu of Earphone TV pops out on the LCD Screen 4 Choose TV option and press Enter Button to validate the setting 5 The steps for viewing stored pictures and movie on a TV are exactly the same as for viewing them on the LCD monitor NOTE z The LCD monitor does not work when the camera is connected to a television ...

Страница 51: ...e second 3 Stereo Mono AV in menu will pop out on the screen Use Up Down Button to select Stereo or Mono and press Enter Button to validate the setting 4 The movie or TV program from your video source will show up on the screen 5 Press Movie Shutter Button to start recording and press again to stop 6 To change recording resolution enter the Movie Mode menu and select the desired Resolution in the ...

Страница 52: ...with your camera In this way you can convert any format of video files and playback your favorite movies on your camera To convert a video file 1 Install Arcsoft Media Converter 2 Click StartÆ Select ProgramsÆ Acrsoft Media ConverterÆ Media Converter 3 Media Converter main Screen will appear on your desktop 4 Follow Step 1 and click Select Media 5 Select the video file you want to convert ...

Страница 53: ...English 53 6 Follow Step 2 and click Select Destination to choose the location you want to store the converted video file ...

Страница 54: ...English 54 7 Click Convert to start video converting ...

Страница 55: ...i Please note if Clip0001 avi exists in the camera then the converted file has to be renamed to clip0002 avi 10 Connect your camera to PC and transfer the converted video to My Computer Removable Disk DCIM 200Movie in your camera 11 Transferring Data to a Computer After transferring the converted video to the camera press RECORD Play Button to enjoy your favorite movie ...

Страница 56: ...ng the movie clip into a DVD You can preserve your precious movies on a DVD to share with family and friends To create a DVD 1 Install Arcsoft Showbiz DVD 2 Click StartÆ Select ProgramsÆ Acrsoft Showbiz DVDÆ Showbiz DVD 3 Showbiz DVD main Screen will appear on your desktop 4 Drag Video File to Drag Video Here ...

Страница 57: ...English 57 5 Click Create 6 Click Start to start DVD burning ...

Страница 58: ...ends or post them on websites To do this you should 1 Install the camera driver on your computer 2 Connect the computer and camera with the supplied mini USB 2 0 cable 3 Default mode is Mass Storage Mode when the camera connects to PC 4 Transfer pictures or movies or MP3 or voice recordings Mass Storage Device Mode The RED LED will light up when the camera is connected to the computer Movies pictu...

Страница 59: ... friendly application that helps you read edit and organize images Acrsoft ShowBiz allows you to edit movies and is equally easy to use Arcsoft Media Converter can convert multiple video formats into MPEG4 Xvid compatible format with your camera To install the bundled software 1 Insert the CD ROM into your computer s CD ROM drive The autorun screen appears 2 Select the software you want to install...

Страница 60: ...ia Built in 64MB Memory SD MMC Card Slot support up to 2GB Image Resolution High Still image 3840 x 2880 11 0 Mega Pixels Standard 2592 x 1944 5 0 Mega Pixels Low 1600 x 1200 2 0 Mega Pixels Movie Resolution VGA 640 x 480 pixels 30 fps QVGA 320 x 240 pixels 30 fps White Balance Auto Manual Daylight Fluorescent Tungsten Exposure Auto Manual Self Timer 10 second delay Flash Auto Off File Format Pict...

Страница 61: ...onnected correctly Reconnect it properly Symptom Cause Measure The digital video camera was left unattended and unused so the auto powers off cuts it off Turn the power back on The power cuts out during use The battery is exhausted Recharge or use the AC power adapter The power does not go off Digital video camera malfunction Reload the battery If using the AC power adapter reconnect it It is bein...

Страница 62: ...ch to shooting mode The shutter button is not pressed all the way Press the shutter button all the way The internal memory or memory card does not have any free space Load a new memory card or delete unwanted files End of memory card life Load a new memory card The flash is recharging Wait until the system LED off The memory card is unrecognized by the digital video camera Format the memory card i...

Страница 63: ...tom Cause Measure Even though the flash fired the image is dark The distance to the subject is greater than flash effective range Get closer to your subject and capture The image was captured in a dark place while set to flash off Set the flash to something other than flash off mode The image is too dark It is under exposed Set the exposure compensation to a larger value The image is too bright It...

Страница 64: ...ion Cannot format a memory card End of memory card life Load a new memory card The playback image is dark though I used the flash The LCD monitor is too dark Adjust the brightness of LCD monitor in the SYSTEM MENU Other Problems Symptom Cause Measure Cannot load the memory card The card is facing the wrong way Load correctly The battery is running low Recharge or use the AC power adapter Even when...

Страница 65: ...ether the hard disk drive has enough space for running Windows and if the drive for loading files has a capacity at least that of the memory card inserted in the digital video camera No power supply Recharge the battery or use the AC power adapter or turn the power on Cannot download files The USB driver is not installed for Windows 98 98SE Install USB driver ...

Отзывы: