background image

English

8V Lithium-ion Cordless Soldering Iron
Operator’s Manual           GLSI08B

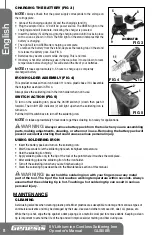
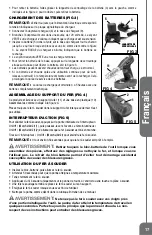
CHARGING THE BATTERY (FIG 3)

NOTE:


Always Check that the power supply corresponds to the voltage on 

the ratings plate.
•  Connect the charging adaptor (8) and the charging stand (9). 
•  Plug the adaptor into a 120 Volt AC power source. The GReeN light on the 

charging stand will illuminate, indicating the charger is powered. 

•   Insert the battery (5) all the way into the charging stand until it locks in place 

with a click, as shown in FIG 3. The ReD light on the stand indicates that the 
battery is charging.

•  The light will turn GReeN after charging is complete. 
•  To remove the battery from the stand, depress the locking tab on the stand 

to release the battery pack. See FIG 3.

•  Batteries may become warm while charging. This is normal.
•  If battery is hot after continuous use in the tool, allow it to cool down to room 

temperature before charging. This will extend the life of your batteries.

NOTE

:


It takes approximately 3-5 hours to charge up a completely 

discharged battery.  

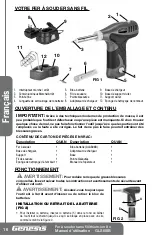
IRON HOLDER ASSEMBLY (FIG 4)

This product comes with an iron holder (11) and a plastic base (10). Assemble 
them together as shown in FIG 4.
Always place the soldering iron in the iron holder when not in use.  

SWITCH ACTION (FIG 5) 

To turn on the soldering iron, press the On/Off switch (1) down then push it 
forward. The On/Off LeD indicator (2) will light up when the soldering iron is 
turned on. 
Pull the On/Off switch back to turn off the soldering iron.

NOTE:

 It takes approximately 50 seconds to get the soldering iron ready for applications. 


WArNING:

 Always remove battery pack from the tool when you are assembling 

parts, making adjustments, cleaning, or when not in use. removing the battery pack will 
prevent accidental starting that could cause serious personal injury.

USING SOLDERING IRON

•   Insert the battery pack and turn on the soldering iron. 
•   Wait 50 seconds to let the soldering tip reach its highest temperature. 
•   Hold the soldering iron firmly. 
•   Apply soldering wire only to the tip of the tool at the point where it touches the workpiece. 
•   After soldering, place the soldering iron to the iron holder.
•   Turn off the soldering iron when you are finished using it.
•   Clean the soldering tip as described in the Maintenance section of this manual.   


WArNING:

 Do not hold the soldering iron with your fingers near any metal 

part of the tool. The tip of the tool reaches working temperature within seconds. Always 
assume that the soldering tip is hot. Touching a hot soldering tip can result in serious 
personal injury.

MAINTENANCE

CLEANING

Avoid using solvents when cleaning plastic parts. Most plastics are susceptible to damage from various types of 
commercial solvents and may be damaged by their use. use clean cloths to remove dirt, dust, oil, grease, etc.
While the tip is hot, wipe the tip against a damp sponge or a metallic wool pad to remove debris. Keeping a clean 
tip is important to extend the life of the tip and will improve solder melting and flow during use.

8

FIG 3

5

8

9

LOCKING TAB

FIG 5

2

1

FIG 4

11

10

Содержание GLSI08B

Страница 1: ...tilisation Manual del operario 8V Lithium ion Cordless Soldering Iron Fer à souder sans fil lithium ion 8 v soldadora inalámbrica de iones de litio de 8 v GLSI08B 888 552 8665 TOLL FREE HELP LINE WEBSITE www genesispowertools com ...

Страница 2: ...ns It means attention Your safety is involved GENERAL SAFETY RULES Warning Some dust created by power sanding sawing grinding drilling and other construction activities contains chemicals known to cause cancer birth defects or other reproductive harm Some examples of these chemicals are Lead from lead based paints Crystalline silica from bricks and cement and other masonry products Arsenic and chr...

Страница 3: ...uch as dust mask non skid safety shoes hard hat or hearing protection for appropriate conditions will reduce personal injuries Dress properly Do not wear loose clothing or jewelry Keep your hair clothing and gloves away from the moving parts Loose clothes jewelry or long hair can be caught in moving parts Air vents may cover moving parts and should be avoided Avoid accidental starting Ensure the s...

Страница 4: ...ected from the battery Avoid contact If contact accidentally occurs flush with water If liquid contacts eyes additionally seek medical help Liquid ejected from the battery may cause irritation or burns Battery tools do not need to be plugged into an electrical outlet therefore they are always in operation condition Be aware of possible hazards when not using your battery tool or when changing acce...

Страница 5: ...n equipment marked to comply with ANSI z87 1 standards Use the soldering iron in a well ventilated area to avoid breathing fumes Do not solder live circuits The soldering iron tip is sharp Do not touch the tip or allow it to come in contact with anything other than soldering wire and the workpiece material Hold the soldering iron by the insulated gripping surfaces when performing an operation wher...

Страница 6: ...risk of overheating possible burns and even an explosion Battery leakage may occur under extreme usage or temperature conditions Avoid contact with skin and eyes If liquid comes in contact with your skin wash immediately with soap and water If liquid gets into your eyes wash them out with clear water for at least 10 minutes and then seek medical attention right away Do not attempt to use a step up...

Страница 7: ...k of serious personal injuries read and follow all important safety warning and instructions before using this tool Warning Always be sure that the tool is switched off before insertion or removal of the battery pack INSTALLING OR REMOVING THE BATTERY PACK FIG 2 To install the battery pack insert the battery pack 5 from the bottom of the tool all the way until it locks in place with a click as sho...

Страница 8: ...ull the On Off switch back to turn off the soldering iron NOTE It takes approximately 50 seconds to get the soldering iron ready for applications Warning Always remove battery pack from the tool when you are assembling parts making adjustments cleaning or when not in use Removing the battery pack will prevent accidental starting that could cause serious personal injury USING SOLDERING IRON Insert ...

Страница 9: ...08B CT chisel tip as the replacement tips Remove the battery pack from the tool Turn the soldering tip counter clockwise to remove the old tip Use a pair of pliers if needed Install a new tip by screwing it on clockwise Do not over tighten TWO YEAR WARRANTY This product is warranted free from defects in material and workmanship for 2 years after date of purchase This limited warranty does not cove...

Страница 10: ...tection oculaire qui est marquée comme en conformité avec ANSI Z87 1 Repérez ce symbole qui signale d importantes précautions de sécurité Cela veut dire faites attention Votre sécurité est en jeu RÈGLES GÉNÉRALES DE SÉCURITÉ Avertissement Certaines poussières produites par des appareils électriques de ponçage sciage meulage perçage et autres travaux de construction contiennent des produits chimiqu...

Страница 11: ...s pièces en mouvement Remplacer immédiatement tout cordon endommagé Un cordon endommagé accroît le risque d électrocution Lorsque l exploitation d un pouvoir en dehors des outils l utilisation d une rallonge électrique pour une utilisation extérieure Ces cordons sont prévus pour une utilisation à l extérieur et de réduire le risque de choc électrique NE PAS utiliser l AC notées les outils d une al...

Страница 12: ...n adéquate Entre les mains de personnes n ayant pas reçu de formation adéquate les outils sont dangereux Entretenir soigneusement les outils Vérifier qu aucune pièce mobile n est mal alignée grippée ou brisée et s assurer qu aucun autre problème ne risqué d affecter le bon fonctionnement de l outil En cas de dommages faire réparer l outil avant de l utiliser de nouveau De nombreux d accidents sont...

Страница 13: ...trée d où une perte de puissance et de possibles dommages pour l outil Reportez vous au tableau pour déterminer la taille minimum requise pour les fils Plus le numéro de calibre de fil est faible plus importante est la capacité en courant du cordon Par exemple un calibre 14 peut transporter un courant plus fort qu un fil de calibre 16 Quand vous utilisez plus d un cordon d extension pour obtenir l...

Страница 14: ...eut entrer en contact avec un câblage caché Une panne touchant un fil sous tension pourrait mettre les parties métalliques exposées de l outil électrique sous tension et donner une décharge électrique à l opérateur Ne pointez pas la panne du fer à souder vers une autre personne Ne laissez jamais le fer à souder sans surveillance lorsqu il est en position de marche N utilisez ou ne rangez jamais le...

Страница 15: ...as toucher les bornes avec un matériau conducteur Éviter de stocker la bloc de batterie dans un conteneur comprenant d autres objets métalliques tels que clous pièces de monnaie etc Toujours protéger les bornes de le batterie lorsque la bloc de batterie n est pas utilisée Ne pas chargez la bloc de batterie dans une boîte ou un contenant de tout genre La batterie doit être placé dans un endroit bie...

Страница 16: ...onge de nettoyage de l embout 1 Manuel de l opérateur 1 FONCTIONNEMENT Avertissement Pour réduire le risque de graves blessures corporelles lisez et suivez toutes les instructions et avertissements de sécurité avant d utiliser cet outil Avertissement Assurez vous toujours que l outil est à l arrêt avant d insérer ou de retirer le bloc de batteries INSTALLATION OU RETRAIT DE LA BATTERIE FIG 2 Pour ...

Страница 17: ...me indiqué à la figure 4 Placez toujours le fer à souder dans le support du fer lorsque ce dernier n est pas utilisé INTERRUPTEUR D ACTION FIG 5 Pour allumer le fer à souder appuyez sur la partie inférieure de l interrupteur On Off Marche Arrêt 1 puis poussez le vers l avant Le témoin lumineux On Off Marche Arrêt 2 s allume lorsque le fer à souder est mis en marche Tirez sur l interrupteur On Off ...

Страница 18: ... sur l un de ces matériaux il est extrêmement important de le nettoyer à l air comprimé REMPLACEMENT DE LA PANNE AVERTISSEMENT Laissez toujours refroidir la panne pendant au moins 30 minutes avant de la retirer Le non respect de ces instructions peut entraîner des blessures graves REMARQUE Utilisez uniquement une panne de type ZGLSI08B PT ou une panne à ciseler ZGLSI08B CT comme pannes de remplace...

Страница 19: ...ma ANSI Z87 1 Busque este símbolo que indica precauciones de seguridad importantes Éste significa atención Su seguridad está involucrada REGLAS GENERALES DE SEGURIDAD Advertencia Algunos polvos producidos por actividades como lijar aserrar pulir taladrar y otras actividades relacionadas con la construcción contienen productos químicos que se sabe causan cáncer defectos de nacimiento u otros daños ...

Страница 20: ...lavija de una toma de corriente Mantenga el cordón lejos del calor aceite bordes afilados y piezas móviles Cambie de inmediato todo cable eléctrico dañado Los cordones eléctricos dañados aumentan el riesgo de descargas eléctricas Al utilizar una herramienta eléctrica en el exterior utilice un cordón eléctrico de extensión que lleve las marcas W A o W Estos cordones eléctricos están aprobados para ...

Страница 21: ...fuera del alcance de los niños y de toda persona no capacitada en el uso de las mismas Las herramientas son peligrosas en manos de personas no capacitadas en el uso de las mismas Proporcione mantenimiento con cuidado a las herramientas Revise para ver si hay desalineación o atoramiento de piezasmóviles ruptura de piezas o toda otra condición que pueda afectar el funcionamiento de la herramienta Si...

Страница 22: ...dida de energía y posible daño a la herramienta Consulte la tabla mostrada enseguida para determinar el tamaño de alambre mínimo requerido Entre más pequeño sea el número de calibre del alambre mayor es la capacidad del cable Por ejemplo un cable de calibre 14 puede transportar más corriente que un cable de calibre 16 Cuando se utiliza más de un cable de extensión para conformar la longitud total ...

Страница 23: ...tas de la soldadora se electrifiquen y podrían darle al operador una descarga eléctrica No apunte la punta de la soldadora hacia otra persona Nunca deje la soldadora desatendida mientras está encendida No use ni guarde la soldadora cerca de materiales o líquidos inflamables o combustibles Estos materiales pueden prenderse cuando se exponen a las altas temperaturas creadas por la punta No coloque l...

Страница 24: ...erador de motor o un receptáculo de CC No cortocircuite el paquete de baterías No toque los terminales con ningún material conductor No guarde el paquete de batería en un recipiente con otros objetos de metal como clavos monedas etc Proteja siempre los terminales de las pilas cuando no se use el paquete de batería No cargue dentro de una caja o recipiente de ninguna clase La batería debe colocarse...

Страница 25: ...de seguridad importantes y las instrucciones antes de usar esta herramienta ADVERTENCIA Asegúrese siempre de que la herramienta esté apagada antes de introducir o sacar el paquete de batería INSTALACIÓN O RETIRADA DEL PAQUETE DE BATERÍA FIG 2 Para instalar el paquete de baterías insert la batería 5 en la parte inferior de la caja de la herramienta hasta el final hasta que encaje en su lugar con un...

Страница 26: ...omo se muestra en la FIG 4 Coloque siempre la soldadora en el soporte de punta cuando no la utilice ACCIONAMIENTO DEL INTERRUPTOR FIG 5 Para encender la soldadora presione el interruptor de encendido apagado 1 y aváncelo El indicador LED de encendido apagado 2 se encenderá cuando se encienda la soldadora Retroceda el interruptor de encendido y apagado para apagar la soldadora NOTA Lleva aproximada...

Страница 27: ... con cualquiera de estos materiales es sumamente importante limpiar la herramienta con aire comprimido REEMPLAZO DE LA PUNTA DE LA SOLDADORA ADVERTENCIA Deje siempre que la punta de soldadora se enfríe durante un mínimo de 30 minutos antes de retirarla Tocar la punta de la soldadora caliente puede causar graves lesiones NOTA Solo use la punta fina ZGLSI08B PT o la punta gruesa ZGLSI08B CT como pun...

Страница 28: ...Richpower Industries Inc 736 Hampton Road Williamston SC USA www richpowerinc com 2020 03 V01 ...

Отзывы: