background image


5

High speed card at least Class 4 is recommended; When using time delay 

function or recording video in professional mode, the card of Class 10 is 

required. 

Turn off the DV before inserting or removing the card.   

2. Use the battery 

2.1 Install the battery. 

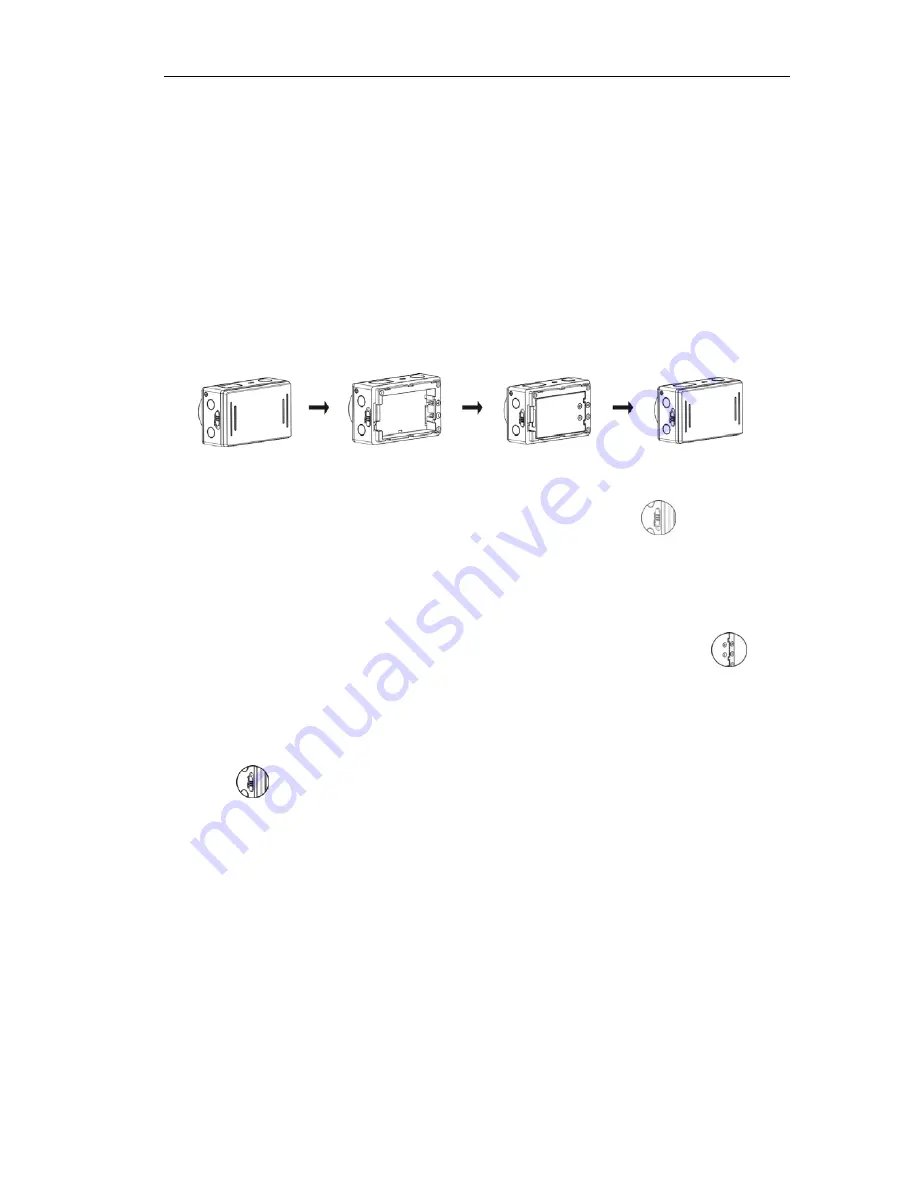
Please install the lithium battery correctly as shown in the following graphic. 


  Figure 1        Figure 2         Figure 3         Figure 4 

Step 1. Push the battery cover switch to the lock position(

), and remove 

the battery cover. As shown in figure 1. 

Step 2. Put the lithium battery into the battery slot. Make sure the electrodes 

of the battery are corresponding to the symbols of the DV shell(

). As 

shown in figure 2 and figure 3. 

Step 3. Install the battery cover back in place, and lock the switch to the lock 

position(

)to fix the battery. As shown in figure 4.


2.2 Charging the battery.   

The DV uses removable rechargeable lithium battery. When the DV is off, 

connect it to the PC via USB cable to charge the battery. 

During charging, 

the status indicator (blue) will light on,and the indicator off when 

charging completes. 

Note: When the DV is on, connecting it to the PC will not charge. 

Содержание WDV5000

Страница 1: ...1 WDV5000 User Manual...

Страница 2: ...ce and extend the life of the product Appearance and Buttons 1 Shutter button 8 Micro USB port 2 Microphone 9 Mini HDMI port 3 LCD display 10 Micro SD card slot 4 Lens 11 External microphone 5 Wi Fi s...

Страница 3: ...ds for 8 Mega Pixels 3264x2448 and in video recording mode it stands for FHD 1920x1080 30fps In camera mode LO stands for 5 Mega Pixels 2592x1944 and in video recording mode it stands for 720P 1280x72...

Страница 4: ...deo mode press the Shutter button to start recording LED flash and press it again to stop In camera mode press the Shutter button to take photo Use your Wi Fi DV When you use the DV for the first time...

Страница 5: ...over As shown in figure 1 Step 2 Put the lithium battery into the battery slot Make sure the electrodes of the battery are corresponding to the symbols of the DV shell As shown in figure 2 and figure...

Страница 6: ...beep can be heard from buzzer 2 Turn off press and hold the button for about 3 seconds LCD displays OFF and a beep can be heard from buzzer Note The DV will turn off automatically if it is idle for 5...

Страница 7: ...des Press the button repeatedly the following first two modes will show on the DV screen and other models display on the APP operation HI stands for FHD 1920x1080 30 fps video Lo stands for 720P 1280x...

Страница 8: ...a photo please check whether the DV is under Camera mode If the icon is not displayed on the screen press the button repeatedly until it appears Press and release the button a beep will be heard and...

Страница 9: ...ain to exit Mute mode 5 Connecting to HDTV 5 1 Connect the DV to HDTV via HDMI cable optional If you need to transfer the image and audio to an HDTV for playback insert the Com end of the HDMI cable t...

Страница 10: ...ideos When there are several photos or videos press the Wi Fi button to select the photo or video When a video file is selected press the Shutter button to play it and press the Shutter button again t...

Страница 11: ...ou can view the photos or videos taken by DV on PC Note After the DV connecting to PC to enter U disk mode you will see two removable disks displayed in My computer of Windows one is the TF card stori...

Страница 12: ...on Buttons Instruction You can use the remote controller to record videos take photos and shut down the DV When using the remote controller aim the signal emission port to the infrared signal receptio...

Страница 13: ...pletes the LCD will display icon 2 2 Insert the TF card and turn on the DV then press the Wi Fi button to enable it Now you can see the Wi Fi icon on the LCD 2 3 Enable Wi Fi on smartphone or tablet a...

Страница 14: ...the Wi Fi icon on the LCD 3 3 Enable Wi Fi on iOS phone or tablet and search for wireless AP signal SY5000_WIFI then connect it to DV until the system displays Connected successfully Note The first t...

Страница 15: ...esigned to provide reasonable protection against harmful interference in a residential installation This equipment generates uses and can radiate radio frequency energy and if not installed and used i...

Отзывы: