General Pipe Cleaners Gen-Eye Micro-Scope2 Скачать руководство пользователя страница 6

Gen-Eye Micro-Scope2

®

 Video Pipe Inspection/Location System  
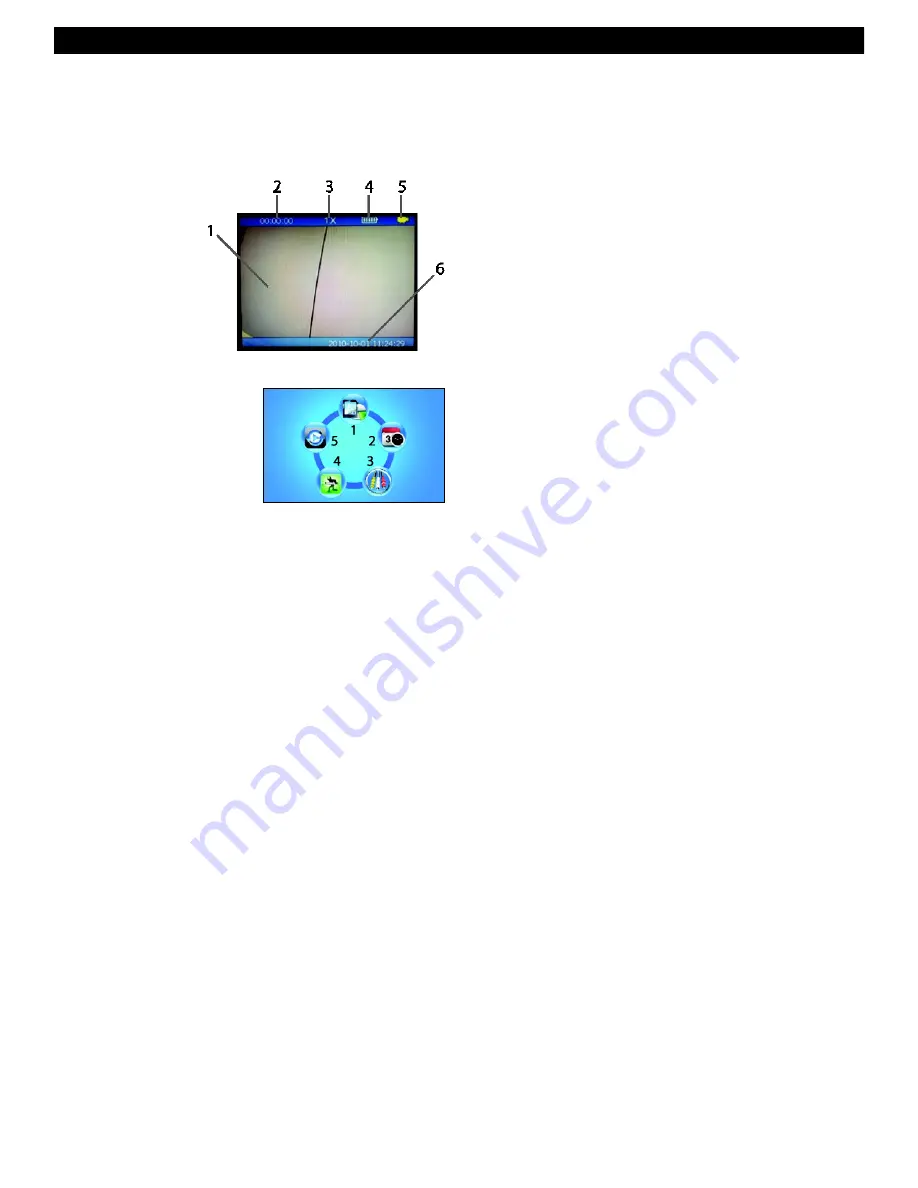
Main Display  

The main display appears as shown. 
1.  Camera image area 
2.  Video recording elapsed timer 
3.  Magnification level (zoom) 
4.  Battery power status 
5.  Mode icon (video or photo) 
6.  Date and Time 

 

Press the OK button to open 
the main function menu. 

 

Use the up and down arrow 
buttons to scroll to one of the 5 menu options. 

 

Press OK to open a highlighted selection. 
1.  Storage Device management (USB Flash) 
2.  Date and Time setting 
3.  AV HDMI output selection (PAL or NTSC) 
4.  Factory default reset and Firmware version 

Stored Image/Video folders/files navigation 

Function  

Programming Menu 

Storage Device (USB Flash Drive) 

From the main menu, use the arrow buttons to scroll to the Storage 

Device icon and press OK to open it. There are three rows to select 
from in this menu. 
1.  (Row 1) Select a storage device (USB Flash Drive) with the OK 

button. You may also view the remaining storage capacity of the 
selected device. 

2.  (Row 2) Formatting utility. Use the OK button to format the  se-

lected  device.  The  Check  icon  will  appear  when  formatting  is 

complete.  The  duration  of  formatting  depends  on  the  memory 
size of the storage device. 

3.  (Row 3) Press the OK button to return to main menu. 

Set Date/Time and Auto Power Off 

From the main menu, use the arrows to scroll to the Date/Time icon 

and press OK to open it. There are three rows to select from in this 
menu. 
1.  (Row 1) Set the year, month, and day. Use the UP and DOWN 

arrow buttons to select the year, month, or day field (digits high-

light when selected) and use the VIDEO (increase) and PHOTO 
(decrease) buttons to set the date. 

AV Output Selection 

1.  From the main menu, use the arrow buttons to scroll to the AV 

Output icon and press OK to open it. 

2.  Use  the  arrow  buttons  to  highlight  the  desired  output  signal 

(NTSC or PAL) and press OK. The display will exit the program-
ming mode and return to the main operating menu. 

3.  Use  the  ESC  button  to  cancel  the  output  selection  process,  if 

desired, and return to the programming main menu.  

Factory Default Reset and Firmware Version 

1.  From the main menu, use the arrow buttons to scroll to the Fac-

tory Default icon and press OK to open it. 

2.  There are three rows of options in this menu: The top row is the 

Factory Default reset icon. To revert to factory settings, highlight 
this icon with the arrow buttons and pres the OK button. 

3.  The middle row is the abort function. Press OK with the RETURN 

symbol highlighted to return to the main function menu. 

4.  The bottom row shows the firmware version number.  

Image and Video Files 

Use  this  menu  to  view  stored  images  and  videos  on  the  main  unit 
display. 
1.  From the main menu, use the arrow buttons to scroll through the 

File Management icon and press OK. 

2.   Use  the  UP  and  DOWN  arrows  to  scroll  through  the  available 

image  and  video  storage  folders  and  files.  Folder  names  are 
derived from the Date (i.e. 20181231). Files names are derived 
from the Date and Time of the recording (i.e. 20181231123845). 

3.  Press the OK button to open the folder or file. 
4.  Use the arrow buttons to highlight an image or video and press 

OK to view it. 

5.  For  video,  use  the  arrow  buttons  (short  press)  to  restart  video. 

Press and hold the arrow buttons to Fast-Forward (UP arrow) or 

fast-rewind (DOWN arrow). Use the OK button to Pause or Re-
sume the video. 

6.  Use  the  VIDEO  button  to  open  the  trash  utility.  Use  an  arrow 

button to highlight the check mark (delete) or the ‘X’ (keep video). 

Press OK to complete function. 

Tip: You may enter the image or video review mode directly from the 

main  opening  display  by  pressing  the  UP  arrow  button  without 

having  to  access  the  function  menu.  Use  the  arrow  buttons  to 
scroll  the  folders  and  files,  and  use  the  OK  button  to  open  an 
image  or  video.  Restart,  fast-forward/rewind,  trash,  and  pause/

resume functions operate in the same way as described in this 
section.  

2.  (Row 2) Set the clock (hours, minutes, seconds). Use the UP and 

DOWN arrow buttons to select the hours, minutes, and seconds 
field and use the VIDEO (increase) and PHOTO (decrease) but-
tons to set the time. 

3.  (Row 3) Auto Power Off can be set for 30, 25, 20, 15, 10, 5, and 

0  minutes  (center  digits).    Selecting  the  yellow  Return  icon  will 
change the icon to red which disables the Auto Power Off utility. 

Содержание Gen-Eye Micro-Scope2

Страница 1: ...ars of trouble free profitable service However no machine is better than its op erator Read understand and follow all safety warnings and instructions provided with the product Failure to follow the warnings and instructions may result in electric shock and or serious injury Save all warnings and instructions for future reference SAVE THESE INSTRUCTIONS ...

Страница 2: ...situation Use a UL approved tester to determine if the outlet is safe Do not operate power tools in explosive atmospheres such as in the presence of flamma ble liquids gases or dust Power tools create sparks which may ignite the dust or fumes Always wear safety glasses and rubber soled non slip shoes Use of this safety equip ment may prevent serious injury These instructions are intended to famili...

Страница 3: ...ituations 5 Always wear safety glasses and rubber soled non slip shoes Dust mask non skid safety shoes hard hat or hearing protection must be used for appropriate conditions 6 Rubber glove inserts should be worn for health and safety reasons Sewer lines are unsanitary and may contain harmful bacteria 7 Check to make sure pipes are not electrically hot In some cases ground circuits may be returned ...

Страница 4: ...od condition Using lighter cords can result in severe power loss and motor overheat ing 12 Be careful when inspecting drains where cleaning chemicals have been used Avoid direct contact with corrosive drain clean ers Drain cleaning chemicals can cause serious burns as well as damage the cable Neutralize or remove corrosive drain cleaners in the drain before starting the job 13 Do not operate machi...

Страница 5: ...amming value Press to start stop video recording Increment a programming value Open the video trash utility from the video viewer Rotate the record image 90 degree While in live image mode press this bottom to set Brightness Contrast and Grey scale GEN EYE MICRO SCOPE2 COMMAND MODULE The Command Module should not be used in wet locations or in the rain as moisture may cause damage to the unit THE ...

Страница 6: ...in menu Factory Default Reset and Firmware Version 1 From the main menu use the arrow buttons to scroll to the Fac tory Default icon and press OK to open it 2 There are three rows of options in this menu The top row is the Factory Default reset icon To revert to factory settings highlight this icon with the arrow buttons and pres the OK button 3 The middle row is the abort function Press OK with t...

Страница 7: ...internal 4 hr battery will power the Micro Scope2 when AC power is not available Recharging time varies depending upon air tempera tures and the condition of the battery The battery does not have to be deep cycled but the battery may have to be replaced over time de pending on usage and conditions The battery can be recharged from either an AC outlet or from an AC inverter outlet in your car or tr...

Страница 8: ...pe conditions In some cases white or lighter colored objects may cause the picture to flare or wash out If this happens simply adjust the light level until a good picture is achieved 8 Push the camera slowly and carefully during the inspection taking note of the pipe condition for possible hazards that may entangle or damage the camera on entry or retrieval 9 When negotiating a corner care should ...

Страница 9: ...dule is turned up Check cable for possible breaks or intermittent open circuits by flexing the cable Disconnect main power and contact the factory service depart ment No Picture Lights OK Check Monitor power switch is ON Check to make sure the power source is live for 120 volt AC or that the battery is charged Check the interface cord for possible damage or intermittent problem by flexing the cabl...

Страница 10: ... to fully recharge battery Cold weather can reduce battery life Keep unit warm in cold weather Do not charge the battery in extreme weather temperatures below 30 F or above 104 F When charging via DC you must use the AC inverter Battery is worn out and need to be replaced Disconnect the main power source and contact the factory ser vice department NOTE Command Module is shipped without a charge Ch...

Отзывы: