background image

Advanced Features 


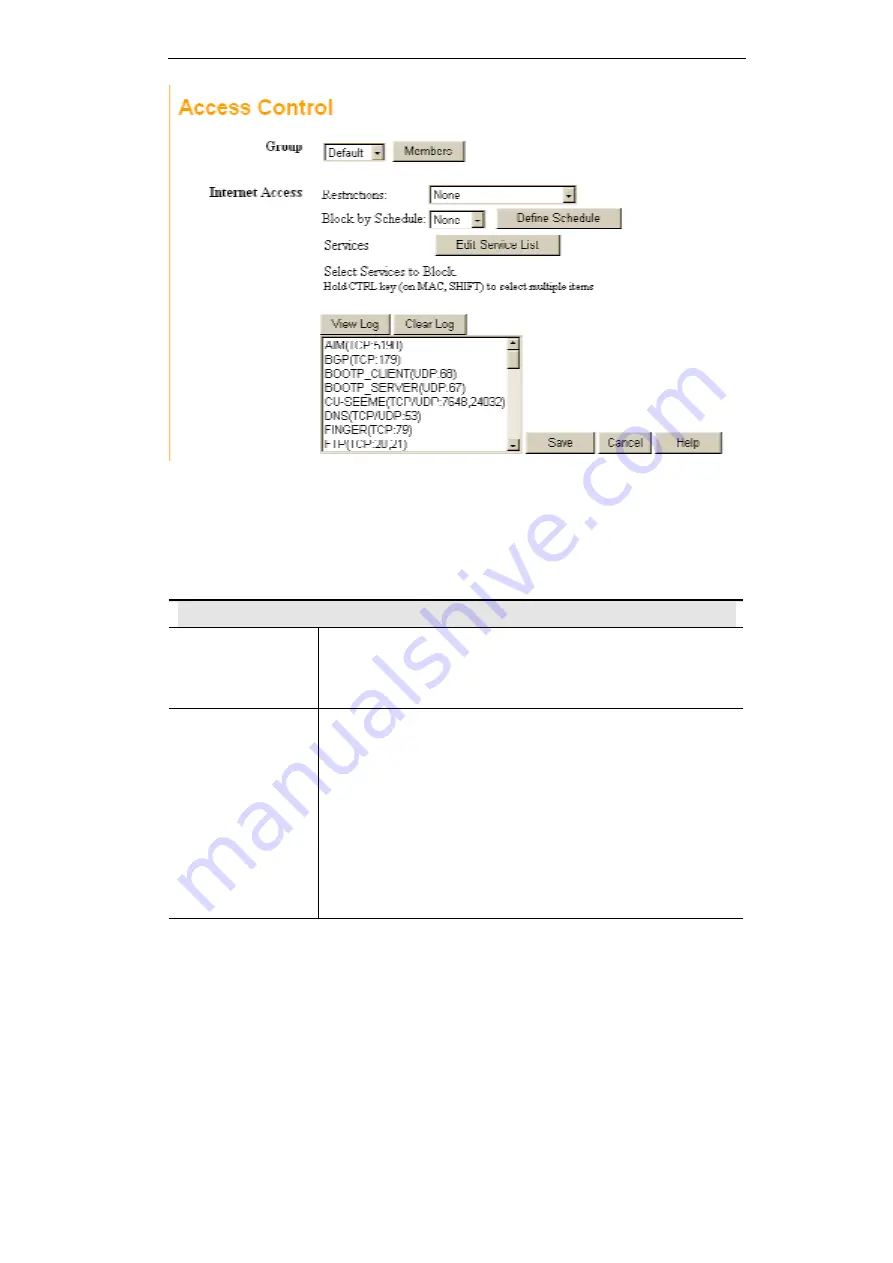
Figure 33: Access Control Screen 


Data - Access Control Screen 

Group 

Group


Select the desired Group. The screen will update to display the 
settings for the selected Group. Groups are named "Default", 
"Group 1", "Group 2", "Group 3" and "Group 4", and cannot be re-
named. 

"Members" Button 

Click this button to add or remove members from the current 
Group. 

• 

If the current group is "Default", then members can not be 

added or deleted. This group contains PCs not allocated to 
any other group. 

• 

To remove PCs from the Default Group, assign them to 

another Group.  

• 

To assign PCs to the Default Group, delete them from the 

Group they are currently in. 

See the following section for details of the 

Group Members

 screen. 


55

Содержание WRTM-106B

Страница 1: ...WRTM 106B Wireless 11b Router User s Manual Aug 8 2003 Draft 1 0 Gemtek Technology Co Ltd...

Страница 2: ...ms 35 4 6 Wireless Station Configuration 36 5 OPERATION AND STATUS 37 5 1 Operation 37 5 2 Status Screen 37 5 3 Connection Status PPPoE 39 5 4 Connection Status PPTP 42 5 5 Connection Status Telstra B...

Страница 3: ...PENDIX B ABOUT WIRELESS LANS 87 B1 Modes 87 B2 BSS ESS 87 B3 Channels 87 B 4 WEP 88 B 5 Wireless LAN Configuration 88 APPENDIX C SPECIFICATIONS 89 C1 Multi Function Wireless Router 89 C2 Wireless Inte...

Страница 4: ...r WLAN can access the Internet through the Wireless Router using only a single external IP Address The local invalid IP Addresses are hidden from external sources This process is called NAT Network Ad...

Страница 5: ...to 22Mbps All speeds up to the 802 11b maximum of 11Mbps are supported as well as the TI B enhancement which allows 22Mbps between compatible devices WEP support Support for WEP Wired Equivalent Priv...

Страница 6: ...network only a single device the Wireless Router Stateful Inspection Firewall All incoming data packets are monitored and all incom ing server requests are filtered thus protecting your network from...

Страница 7: ...shing Data is being transmitted or received via the corre sponding LAN hub port 100 On Corresponding LAN hub port is using 100BaseT Off Corresponding LAN hub port connection is using 10BaseT or no act...

Страница 8: ...wer Off 2 Hold the Reset Button down while you Power On 3 Keep holding the Reset Button for a few seconds until the RED LED has flashed TWICE 4 Release the Reset Button The Wireless Router is now usin...

Страница 9: ...Access Point all Wireless devices must be compliant with the IEEE802 11b specifications 2 2 Procedure Figure 4 Installation Diagram 1 Choose an Installation Site Select a suitable place on the network...

Страница 10: ...se a standard cable 4 Power Up Power on the Cable or DSL modem Connect the supplied power adapter to the Wireless Router and power up Use only the power adapter provided Using a different one may caus...

Страница 11: ...to locate detailed instructions for the required functions To Do this Refer to Configure PCs on your LAN Chapter 4 PC Configuration Check Wireless Router operation and Status Chapter 5 Operation and S...

Страница 12: ...r Windows system supports UPnP an icon for the Wireless Router will appear in the system tray notifying you that a new network device has been found and offering to create a new desktop shortcut to th...

Страница 13: ...is not working or your PC s IP address is not compatible with the Wireless Router s IP Address See next item If your PC is using a fixed IP Address its IP Address must be within the range 192 168 2 2...

Страница 14: ...and on the Cable Modem screen use the Clone MAC ad dress button to copy the MAC address from your PC to the Wireless Router Common Connection Types Cable Modems Type Details ISP Data required Dynamic...

Страница 15: ...Wireless Type Details ISP Data required Dynamic IP Address Your IP Address is allocated automatically when you con nect to you ISP None Static Fixed IP Address Your ISP allocates a permanent IP Addres...

Страница 16: ...on Data Input Use the menu bar on the top of the screen and the Back button on your Browser for navigation Changing to another screen without clicking Save does NOT save any changes you may have made...

Страница 17: ...as the PCs on that LAN segment DHCP Server If Enabled the Wireless Router will allocate IP Addresses to PCs DHCP clients on your LAN when they start up The default and recommended value is Enabled If...

Страница 18: ...N Using the Wireless Router s DHCP Server This is the default setting The DHCP Server settings are on the LAN screen On this screen you can Enable or Disable the Wireless Router s DHCP Server function...

Страница 19: ...Device Name for the Wireless Router On your PC some Wireless status screens may display this name as the name of the Access Point in use SSID ESSID If using an ESS Extended Service Set with multiple a...

Страница 20: ...d wireless stations click the Select Stations button Allow Internet access by All Wireless Stations All wireless stations can use the access point to access the Internet Selected Wireless stations onl...

Страница 21: ...e default key For 128 Bit Encryption the key size is 13 chars ASCII or 26 chars in HEX 0 9 and A F 256 Bit data is encrypted using the default key before being transmitted You must enter at least the...

Страница 22: ...s are for decryption only Key Value Enter the key value you wish to use Other stations must have the same key Passphrase If desired you can generate a key from a phrase instead of entering the key val...

Страница 23: ...ed a password to the Wireless Router on the Password screen above you will be prompted for the password when you connect as shown below If no password has been set this dialog will not appear Figure 1...

Страница 24: ...d configured on each PC TCP IP Settings Overview If using the default Wireless Router settings and the default Windows TCP IP settings no changes need to be made By default the Wireless Router will ac...

Страница 25: ...llowing Figure 12 IP Address Win 95 Ensure your TCP IP settings are correct as follows Using DHCP To use DHCP select the radio button Obtain an IP Address automatically This is the default Windows set...

Страница 26: ...inistrator can advise you of the IP Address they assigned to the Wireless Router Figure 13 Gateway Tab Win 95 98 On the DNS Configuration tab ensure Enable DNS is selected If the DNS Server Search Ord...

Страница 27: ...hecking TCP IP Settings Windows NT4 0 1 Select Control Panel Network and on the Protocols tab select the TCP IP protocol as shown below Figure 15 Windows NT4 0 TCP IP 2 Click the Properties button to...

Страница 28: ...estart your PC to ensure it obtains an IP Address from the Wireless Router Specify an IP Address If your PC is already configured check with your network administrator before making the following chan...

Страница 29: ...indows NT4 0 Add Gateway 2 The DNS should be set to the address provided by your ISP as follows Click the DNS tab On the DNS screen shown below click the Add button under DNS Service Search Order and...

Страница 30: ...PC Configuration Figure 18 Windows NT4 0 DNS 29...

Страница 31: ...Dial up Connection 2 Right click the Local Area Connection icon and select Properties You should see a screen like the following Figure 19 Network Configuration Win 2000 3 Select the TCP IP protocol...

Страница 32: ...it obtains an IP Address from the Wireless Router Using a fixed IP Address Use the following IP Address If your PC is already configured check with your network administrator before making the followi...

Страница 33: ...rk Connection 2 Right click the Local Area Connection and choose Properties You should see a screen like the following Figure 21 Network Configuration Windows XP 3 Select the TCP IP protocol for your...

Страница 34: ...s an IP Address from the Wireless Router Using a fixed IP Address Use the following IP Address If your PC is already configured check with your network administrator before making the following change...

Страница 35: ...and Internet Connections 2 Select Set up or change your Internet Connection 3 Select the Connection tab and click the Setup button 4 Cancel the pop up Location Information screen 5 Click Next on the...

Страница 36: ...changes Fixed IP Address By default most Unix installations use a fixed IP Address If you wish to continue using a fixed IP Address make the following changes to your configuration Set your Default Ga...

Страница 37: ...er each Wireless Station must have compatible settings as follows Mode The mode must be set to Infrastructure SSID ESSID This must match the value used on the Wireless Router The default value is wire...

Страница 38: ...eives an incoming connection Refer to Chapter 6 Advanced Features for further details Applications which use non standard connections or port numbers may be blocked by the Wireless Router s built in f...

Страница 39: ...Wireless Router Network Mask The Network Mask Subnet Mask for the IP Address above DHCP Server This shows the status of the DHCP Server function either Enabled or Disabled For additional information a...

Страница 40: ...ddress The hardware address of this device as seen by remote devices on the Internet This is different to the hardware address seen by devices on the local LAN IP Address The IP Address of this device...

Страница 41: ...d by the Connect automatically as required setting Manual connection Connection attempt started by the Connect button Reset physical connection Preparing line for connection attempt Connecting to remo...

Страница 42: ...is could be caused by a power failure a link failure or Server failure Error Invalid or unknown packet type The data received from the ISP s Server could not be proc essed This could be caused by data...

Страница 43: ...his device as seen by remote devices on the Internet This is different to the hardware address seen by devices on the local LAN IP Address The IP Address of this device as seen by Internet users This...

Страница 44: ...button will update the messages shown on screen Buttons Connect If not connected establish a connection to your ISP Disconnect If connected to your ISP hang up the connection Clear Log Delete all data...

Страница 45: ...ection Normally it is not necessary to use the Connect and Discon nect buttons unless the setting Connect automatically as required is disabled Connection Log Connection Log The Connection Log shows s...

Страница 46: ...Default Gateway The IP Address of the remote Gateway or Router associated with the IP Address above DNS IP Address The IP Address of the Domain Name Server which is currently used DHCP Client This wil...

Страница 47: ...ess Router this button will say Renew Clicking the Renew button will attempt to re establish the connection and obtain an IP Address from the ISP s DHCP Server If an IP Address has been allocated to t...

Страница 48: ...ress The IP Address of this device as seen by Internet users This address is allocated by your ISP Internet Service Provider Network Mask The Network Mask associated with the IP Address above Default...

Страница 49: ...this button has no effect If the ISP s DHCP Server has NOT allocated an IP Address for the Wireless Router this button will say Renew Clicking the Renew button will attempt to re establish the connec...

Страница 50: ...advanced features are provided Advanced Internet Communication Applications Special Applications DMZ URL filter Access Control Remote Management Virtual Servers Dynamic DNS Firmware Upgrade 6 2 Advan...

Страница 51: ...ations are supported transparently by the Wireless Router But sometimes it is not clear which PC should receive an incoming connection This problem could arise with the Communication Applications list...

Страница 52: ...port numbers you may find that they do not function correctly because they are blocked by the Wireless Router s firewall In this case you can define the application as a Special Application Special A...

Страница 53: ...umbers used by the applica tion server for data you send to it If the application uses a single port number enter it in both the Start and Finish fields Using a Special Application Configure the Speci...

Страница 54: ...an be Enabled or Disabled on the Advanced Internet screen URL Filter Screen Click the Configure URL Filter button on the Internet screen to access the URL Filter screen An example screen is shown belo...

Страница 55: ...s to restrict the level of Internet Access avail able to PCs on your LAN With the default settings everyone has unrestricted Internet access To use this feature 1 Set the desired restrictions on the D...

Страница 56: ...cannot be re named Members Button Click this button to add or remove members from the current Group If the current group is Default then members can not be added or deleted This group contains PCs not...

Страница 57: ...CTRL Edit Service List Button If you wish to define additional Services or manage the Service list click this button to open the Services screen Buttons Members Click this button to add or remove mem...

Страница 58: ...group The Del button will remove the selected PC in the Members list from the current group The Add button will add the selected PC in the Other PCs list to the current group 57 PCs not assigned to an...

Страница 59: ...times Two 2 separate sessions or periods can be defined Times must be entered using a 24 hr clock If the time for a particular day is blank no action will be performed Figure 35 Default Schedule Scre...

Страница 60: ...lable services Delete button Use this to delete any Service you have added Pre defined Services can not be deleted Add New Service Name Enter a descriptive name to identify this service Type Select th...

Страница 61: ...new Service Access Control Log To check the operation of the Access Control feature an Access Control Log is provided Click the View Log button on the Access Control screen to view this log This log...

Страница 62: ...the use of a Web Virtual Server on your LAN See Advanced Internet Virtual Servers Current IP Ad dress You must use this IP Address to connect see below This IP Address is allocated by your ISP But if...

Страница 63: ...Remote PC Remote PC Using Web Server Using FTP Server http 203 70 212 52 ftp 203 70 212 52 203 70 212 52 192 168 0 1 192 168 0 10 192 168 0 20 LAN IP Address Internet IP Address Figure 38 Virtual Serv...

Страница 64: ...ata Virtual Servers Screen Servers Servers This lists a number of pre defined Servers plus any Servers you have defined Details of the selected Server are shown in the Properties area Properties Enabl...

Страница 65: ...ies area on screen The entry selected in the list is ignored and has no effect Delete Delete the current Virtual Server entry Note that the pre defined Servers can not be deleted Only Servers you have...

Страница 66: ...the Virtual Server feature It allows Internet users to connect to your Virtual Servers using a URL rather than an IP Address This also solves the problem of having a dynamic IP address With a dynamic...

Страница 67: ...se the Create New Host link on the www dyndns org Web site to request a domain name DDNS Data User Name Enter the User name specified at the www dyndns org Web site when you registered Password Enter...

Страница 68: ...You will see a screen like the following Figure 41 Upgrade Firmware Screen To perform the Firmware Upgrade 1 Click the Browse button and navigate to the location of the upgrade file 2 Select the upgra...

Страница 69: ...Cs shown when you select the DMZ PC or a Vir tual Server This database is maintained automatically but you can add and delete entries for PCs which use a Fixed Static IP Address Options Various option...

Страница 70: ...nts are automatically added to the database and updated as required By default non Server versions of Windows act as DHCP Clients this setting is called Obtain an IP Address automatically The Wireless...

Страница 71: ...onnected or not powered On you will not be able to add it Buttons Add This will add the new PC to the list The PC will be sent a ping to determine its hardware address If the PC is not available not c...

Страница 72: ...ontrol than the standard PC Database screen Figure 43 PC Database Admin Data PC Database Admin Screen Known PCs This lists all current entries Data displayed is name IP Address type The type indicates...

Страница 73: ...this to have the Wireless Router contact the PC and find its MAC address This is only possible if the PC is connected to the LAN and powered On MAC is Enter the MAC address on the PC The MAC address i...

Страница 74: ...s unavailable TFTP Enable Firm ware Upgrade using TFTP If enabled TFTP Trivial FTP can be used to upgrade the firm ware in this device This is normally not required a Windows utility is available for...

Страница 75: ...a this device If Disabled UPnP users can NOT disable Internet access via this device But currently this restriction only applies to users running Windows XP who access the Properties via UPnP e g Righ...

Страница 76: ...e it the service is unavailable This device uses Stateful Inspection technology This system can detect situations where individual TCP IP packets are valid but collectively they become a DoS attack Th...

Страница 77: ...low IPsec The IPSec protocol is used to establish a secure connection and is widely used by VPN Virtual Private Networking programs If checked IPSec connections are allowed If not checked IPSec connec...

Страница 78: ...to your PC Figure 46 Logs Screen Data Logs Screen Enable Logs Outgoing Connec tions If selected Outgoing Internet connections are logged Normally the Internet Destination will be shown as an IP addre...

Страница 79: ...The log will be sent when the log is full which will depend on the volume of traf fic Every day Every Monday The log is sent on the interval specified If Every day is selected the log is sent at the...

Страница 80: ...the address recorded by your ISP MAC Address Screen Select MAC Address from the Advanced menu to reach a screen like the example below Figure 47 MAC address Screen Data MAC address Screen MAC hardware...

Страница 81: ...Router enable RIP on the Wire less Router and ensure the following Windows 2000 settings are correct Open Routing and Remote Access In the console tree select Routing and Remote Access server name IP...

Страница 82: ...eature of the Wireless Router The Wireless Router supports RIP 1 only Static Routing Static Routing Table Entries This list shows all entries in the Routing Table The Properties area shows details of...

Страница 83: ...rent Static Routing Table entry using the data shown in the Properties area on screen Delete Delete the current Static Routing Table entry Clear Form Clear all data from the Properties area ready for...

Страница 84: ...xample Router B 192 168 1 90 192 168 2 70 Router A Segment 0 Segment 2 Segment 1 Wireless 192 168 0 xx 192 168 1 xx 192 168 0 100 192 168 2 xx 192 168 1 80 Gateway 192 168 0 1 Figure 49 Routing Exampl...

Страница 85: ...Wireless Router User Guide 84 For Router B s Default Route Destination IP Address 0 0 0 0 Network Mask 0 0 0 0 Gateway IP Address 192 168 1 80 Wireless Router s local router...

Страница 86: ...etwork Mask should be set to 255 255 255 0 to match the Wireless Router In Windows you can check these settings by using Control Panel Network to check the Properties for the TCP IP protocol A3 Intern...

Страница 87: ...o selected Wireless Stations only then each of your Wireless stations must have been selected or access will be blocked To see if radio interference is causing a problem see if connection is possible...

Страница 88: ...set to Infrastructure mode B2 BSS ESS BSS A group of Wireless Stations and a single Access Point all using the same ID SSID form a Basic Service Set BSS Using the same SSID is essential Devices with...

Страница 89: ...encrypted then it is meaningless unless the receiver can decrypt it If WEP is used the Wireless Stations and the Access Point must have the same settings for each of the following WEP Off 64 Bit 128...

Страница 90: ...n wireless module LEDs 12 Power Adapter 12 V DC External Relative humidity 10 to 90 C2 Wireless Interface Standards IEEE802 11b WLAN PCMCIA 2 1 JEIDA 4 2 roaming support TI B 22Mbps support Frequency...

Страница 91: ...to an outlet on a circuit different from that to which the receiver is connected Consult the dealer or an experienced radio TV technician for help To assure continued compliance any changes or modific...

Отзывы: