background image

MM-1000

INTRODUCTION

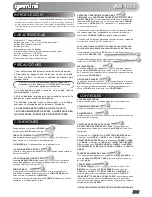
Congratulations on your purchase of  Gemini MM-1000 19” 3 channel

stereo mixer. This-state-of-the-art mixer features the latest technological

advances and is backed by a 1 year warranty, excluding the cross fader.

The cross fader is backed by a separate 90 day warranty.

Prior to use we suggest that you carefully read all the instructions.

FEATURES

- 19” 3 Stereo channel mixer

- 6 line, 2 convertible phono/line, RCA inputs

- Master & record RCA outputs

- Microphone Input

- 5 band graphic equalizer.

- Cue button switches for easy channel cue

- Rotary cue volume, CUE/PGM

- Dual VU display with mode switch

- Master fader with Mono/Stereo selector

PRECAUTIONS

1. All instructions should be read before using this equipment.
2. To reduce the risk of electrical shock, do not open the unit.

Please refer all servicing needs to a 

Gemini

-qualified service

technician.

3.  Do  not  expose  this  unit  to  direct  sunlight  or  a  heat  source

such as a radiator or stove.
4. This unit should be cleaned only with a damp cloth. Avoid sol-

vents or other cleaning detergents.
5. When moving this equipment it should be placed in its origi-

nal carton and packaging. This will reduce the risk of damage

during transit.
6.

DO NOT EXPOSE THIS UNIT TO RAIN OR MOISTURE

.

7. 

DO NOT USE SPRAY CLEANERS OR LUBRICANTS ON

CONTROLS, SURFACES OR SWITCHES

.

I

N THE

USA ~ 

IF YOU EXPERIENCE PROBLEMS WITH THIS UNIT CALL

G

EMINI

C

USTOMER

S

ERVICE AT

: 1 (732) 346-0061. D

O NOT ATTEMPT TO

RETURN THIS EQUIPMENT TO YOUR DEALER

.

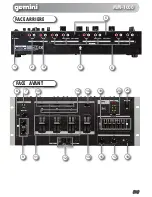
CONNECTIONS

Ensure that the 

POWER SWITCH

is in the 

OFF

position prior to making any connections. 

POWER CORD

This unit comes with a 

POWER CORD

. Plug in to the rear panel

POWER CORD

socket before plugging it in to a proper power source.

The

MM-1000

has 2 stereo outputs located on the rear panel:

The 

MASTER RCA OUTPUT

connects the mixer to your main amplifier using standard audio cables

with RCA-type connectors.

The 

RECORD RCA OUTPUT

The 

RECORD

output jacks can be used to connect the mixer to the

record input of your recording unit, thus enabling you to record your

mix with 

RCA

cables.

GROUNDING SCREW

When using (a) turntable(s), you will need to ground the 

RCA

cable(s)

by screwing in the grounding fork(s) to the 

GROUNDING SCREW

located on the rear panel of the 

MM-1000

mixer.

Attach a 

PHONO

(Turntable) ground line to the silver 

GROUND

THUMB SCREW

that is situated at the bottom middle of the rear

panel.

21

1

2

3

4

CONVERTIBLE PHONO/LINE INPUTS

The 

MM-1000

has 

2 CONVERTIBLE PHONO/LINE (PH/LN) RCA

INPUTS

These small switches which are located to the right of the

RCA

inputs for channels 2 and 3 allow you to choose between a

PHONO

(Turntable) input or a 

LINE

level (Mp3, CD, Tape player

etc..).and require the proper switching.

When switched to the 

PH

position you may use any Turntable with

a magnetic cartridge, remember to connect your ground wire (see

GROUNDING SCREW

) or there may be a system hum

And when the switch is in the 

LN

position you may connect any

line level device as described before (Mp3, CD, Tape etc).

NOTE: CONNECTING A LINE LEVEL DEVICE TO A PH INPUT MAY

CAUSE THAT MIXER CHANNEL TO OVERLOAD AND OR DISTORT.

Now you may plug the 

RCA

’s from your playable medium into each

input to be connected to thier respective 

CHANNELS (CH)

.

Then when all of your connections have been made turn on the

mixer by pressing the POWER SWITCH.

MIC (MICROPHONE) INPUT

The 

MIC

or Microphone input is located at the top left hand corner

of the front of the 

MM-1000

and will accept any standard balanced

and unbalanced 1/4” connector. You can control the gain and even

set the low’s and the high’s for the mic (See 

CONTROLS

) below.

HEADPHONE OUTPUT

The 

HEADPHONE OUTPUT

located at the bottom right hand cor-

ner of the 

MM-1000

will accept any headphone with a standard

1/4” connector and or adaptor and will allow you to 

CUE

your

music program before you play it, you can adjust the volume and

PGM

mix of the 

HEADPHONE

(see 

CONTROLS

) below.

MICROPHONE CONTROL

Under the microphone input jack are the microphone controls,

which consist of:

MICROPHONE VOLUME

Which allows you to adjust the volume of the microphone signal.

MICROPHONE EQ

Which allows you to control the low frequency and the high fre-

quency of the microphone signal.

CHANNEL INPUT SELECTOR

The 

CHANNEL INPUT SELECTOR

switches allow you to choose

which input will be controlled by that channels corresponding 

volume 

FADER

.

For example on 

CHANNEL (1)

the 

INPUT SELECTOR

allows you

to choose between 

LINE 1

in or 

LINE 2

in, and on 

CHANNEL (2)

The 

INPUT SELECTOR

allows you to choose between 

PHONO

1/LINE 3

and 

LINE 4

, and also on 

CHANNEL (3)

the 

INPUT

SELECTOR SWITCH

will let you choose between 

PHONO 2/LINE

5

and 

LINE 6

. (see 

CONVERTIBLE LINE INPUT

) for 

PHONO 1/

LINE 3

and 

PHONO 2/ LINE 5

switching.

CHANNEL VOLUME FADER

After you have chosen which input you will use with the 

INPUT

SELECTOR

the corresponding 

CHANNEL FADER

will allow you to

adjust the volume for that particular 

CHANNEL

.

CROSS FADER

The 

CROSS FADER

allows you to mix evenly from one source to

another. On the 

MM-1000

The 

CROSS FADER

controls the mix

between 

CHANNEL 2

and 

CHANNEL 3

. The 

CROSS FADER

on

the 

MM-1000

is removable and if the need arises can be

replaced.The 

RG-45

(

RAILGLIDE

)

DUAL-RAIL CROSS

FADER

, which has internal dual stainless steel rails that allow the

slider to ride smoothly and accurately from end to end can be pur-

chased from your local 

GEMINI

dealer.

SEE REPLACEMENT INSTRUCTION ON THE NEXT PAGE.

5

21

CONTROLS

6

7

18

8

9

10

11

12

Содержание MM-1000 Mixer

Страница 1: ...OPERATIONS MANUAL BEDIENUNGSHANDBUCH MANUAL DEL OPERADOR MANUEL D INSTRUCTIONS PROFESSIONELLER 3 KANAL STEREO MIXER MEZCLADORESTEREODE3CANALESPROFESIONAL MIXER STEREO 3 VOIES PROFESSIONNEL MM 1000 Mixer ...

Страница 2: ...re If you are unable to insert the plug into the outlet contact your elec trician to replace your obsolete outlet Do not defeat the safety purpose of the grounding type plug POWER CORD PROTECTION Power supply cords should be routed so that they are not likely to be walked on or pinched by items placed upon or against them paying particular attention to cords at plugs convenience receptacles and th...

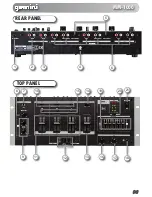
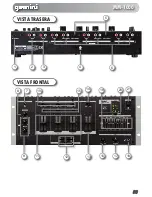
Страница 3: ...REAR PANEL TOP PANEL 8 15 14 19 20 21 9 11 12 13 16 17 18 1 2 3 4 5 6 MM 1000 7 10 ...

Страница 4: ... input or a LINE level Mp3 CD Tape player etc and require the proper switching When switched to the PH position you may use any Turntable with a magnetic cartridge remember to connect your ground wire see GROUNDING SCREW or there may be a system hum And when the switch is in the LN position you may connect any line level device as described before Mp3 CD Tape etc NOTE CONNECTING A LINE LEVEL DEVIC...

Страница 5: ... the MAIN OUTPUT mix CUE VOLUME ROTARY KNOB The CUE VOLUME ROTARY KNOB adjusts your HEADPHONE MONI TOR OUTPUT S volume HEADPHONE MONITOR OUTPUT The HEADPHONE MONITOR OUTPUT will accept any standard 1 4 connector and can be used for CUE MONITORING as described above 5 BAND GRAPHIC EQUALIZER The 5 BAND GRAPHIC EQUALIZER adjust the tone of the MAIN OUT PUTS by giving you a choice 5 frequencies BANDS ...

Страница 6: ...nden oder gegen sie stoßenden Gegenständen gequetscht werden Achten Sie besonders auf Kanten Sicherung Stecker und Buchsen AUSSENANTENNENERDUNG Wenn Sie eine Außenantenne oder ein Radio Fernsehkabelsignal an das Produkt anschließen achten Sie darauf dass die Antenne oder das Kabel geerdet sind um dafür zu sorgen dass Überspannungen und elektrostatische Aufladungen nicht auftreten können Im Artikel...

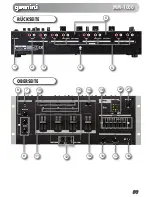
Страница 7: ...RÜCKSEITE OBERSEITE 1 2 3 4 5 6 MM 1000 7 8 15 14 19 20 21 9 11 12 13 16 17 18 10 ...

Страница 8: ...äte an die gewünschten Eingänge an Haben Sie alle Verbindungen vorgenommen schalten Sie den Mixer mit dem NETZSCHALTER ein MIC MIKROFON EINGANG An den MIKROFON Eingang mit 6 3 mm Klinke der sich oben links in der Ecke der Frontplatte befindet können Sie ein Mikrofon anschließen Sie können neben der Lautstärke auch die Höhen und Bässe regeln siehe REGLER unten KOPFHÖRER AUSGANG An den KOPFHÖRER AUS...

Страница 9: ...GLER Mit dem CUE VOLUME Regler stellen Sie die Lautstärke des Kopfhörerausgangs ein KOPFHÖRERAUSGANG An den KOPFHÖRERAUSGANG können Sie einen Kopfhörer mit 6 3 mm Klinkenstecker anschließen Er kann zum Abhören des CUE genutzt wer den siehe oben 5 BAND GRAFIK EQUALIZER Mit dem 5 BAND GRAFIK EQUALIZER können Sie die Klangfarbe des Masterausgangs in fünf verschiedenen Frequenzbereichen BÄNDER von tie...

Страница 10: ... electricista deberá cambiar el enchufe En ningún caso deberá forzarse PROTECCIÓN DEL CABLE DE CORRIENTE Los cables de corriente deben pro tegerse para que nadie los pise ni corran el riesgo de pinzarse por elementos colo cados encima o que los aprisionen Debe prestarse especial atención al cable al enchufe a los extensores de cable y al punto por donde el cable sale de la unidad TIERRA DE LA ANTE...

Страница 11: ...VISTA TRASERA VISTA FRONTAL 1 2 3 4 5 6 MM 1000 7 8 15 14 19 20 21 9 11 12 13 16 17 18 10 ...

Страница 12: ...uptores emplazados a la derecha de las entradas RCA de canales 2 y 3 permiten elegir entre PHONO Giradiscos o LINEA Mp3 CD cassette etc y deben situarse en su correcta posición Cuando están en posición PH puede conectar cualquier giradiscos con cápsula magnética acordandose de conectar la masa ver conexión de TOMA DE TIERRA o podría haber zumbidos Y cuando está en posición LN puede conectar cualqu...

Страница 13: ...ara cue y la salida principal VOLUMEN CUE ROTATIVO El VOLUMEN CUE ROTATIVO ajusta el volumen de salida del AURICU LAR MONITOR AURICULAR MONITOR El AURICULAR MONITOR acepta cualquier conexión de jack 1 4 y se utiliza como CUE MONITOR tal como se describe arriba EQ GRAFICO DE 5 BANDAS El ECUALIZADOR GRAFICO DE 5 BANDAS ajusta el tono de la salida con elección de 5 frecuencias BANDAS desde graves 60H...

Страница 14: ... déroulés et rangés proprement afin d éviter de se prendre les pieds dedans en particulier les cordons reliés aux prises électriques ANTENNE EXTERIEURE Si vous reliez votre appareil à une antenne ou un câble extérieur assurez vous de la présence d une connexion à la terre afin d éviter les surtensions et les décharges d électricité statique L article 810 du National Electrical Code ANSI NFPAS 70 p...

Страница 15: ...7 8 15 14 19 20 21 9 11 12 13 16 17 18 10 1 2 3 4 5 6 MM 1000 FACE ARRIERE FACE AVANT ...

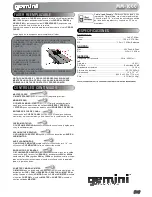
Страница 16: ... sonores entre elles Sur la MM 1000 le CROSS FADER agit sur les voies CHANNEL 2 3 Le CROSS FADER de la MM 1000 est amovible et remplaçable Le CROSS FADER RG 45 RAILGLIDE DUAL RAIL équipé de rails en acier inoxydable permet au potentiomètre de glisser facilement est disponible auprès de votre revendeur Gemini PAGE SUIVANTE REMPLACEMENT DU CROSSFADER Assurez vous que le commutateur POWERSWITCH est s...

Страница 17: ...permet d indiquer soit les niveaux STEREO GAUCHE DROITE de la sortie MASTER soit les niveaux d entrée respectifs des différents canaux Vous pouvez choisir l option d affichage que vous désirez en appuyant sur le bouton VU MODE SWITCH 1 DEVISSEZ LES VISSES DE LA FACE AVANT SUR LA PARTIE EXTERNE GAUCHE ET DROITE DU MIXEUR ET ENLEVEZ LE CAPUCHON DU CROSS FADER 2 DEVISSEZ LES VISSES EXTERNES DE LA PLA...

Страница 18: ...g charges to Gemini UK and Gemini UK will pay to return the unit to you if it is considered under warranty IN GERMANY Die allgemeinen gesetzlichen Gewährleistungen bleiben von den Herstellergarantien unberührt Der Garantieanspruch erlischt bei Eingriffen durch den Käufer oder durch Dritte sowie bei unsachgemässer Behandlung Gewährleistungsansprüche sind auss chließlich gegenüber Ihrem Fachhändler ...

Страница 19: ...ssion of GCI Technologies Corp It is recommended that all maintenance and service on this product is performed by GCI Technologies Corp or its authorized agents GCI Technologies Corp will not accept liability for loss or damage caused by maintenance or repair performed by unauthorized personnel Worldwide Headquarters 1 Mayfield Ave Edison NJ 08837 USA Tel 732 346 0061 Fax 732 346 0065 France GCI t...

Отзывы: