background image

Gemini 4:4:4 User Manual


021313


www.Gemini444.com


30 | 

P a g e


TRANSFER


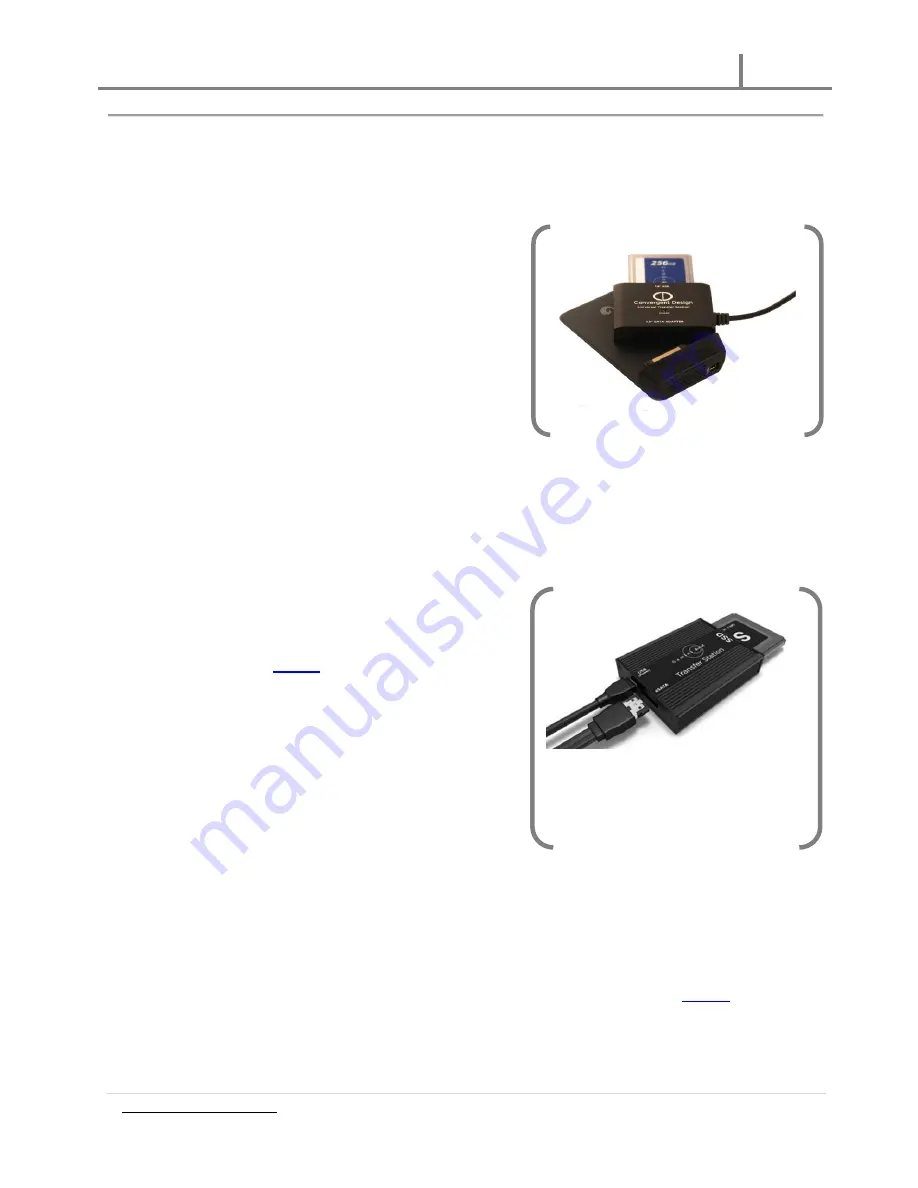
Transfer Station


Second Generation Universal Transfer Station 

Use only the Convergent Design Universal 
Transfer Station, in combination with a Seagate 
GoFlex Adapter (available in Thunderbolt, 
Firewire, or USB) for transferring data to a 
computer from a SSD. 
 
Form factor designed to contour the Seagate 
GoFlex Adapter Series, however, could be used 
with other 2.5” SATA hard drive docks. Power’s 
provided by AC.  
 
For Thunderbolt adapters, disconnect and reinsert the external cable to the GoFlex each time an 
SSD is inserted so that the computer will recognize the SSD. 
 
AC-Powered eSATA transfer station is also available. 

First Generation Transfer Station (eSATA) - DISCONTINUED


As this is discontinued, you will need to use the 
Universal Transfer Station (above). If you prefer 
eSATA transfer, you can request a second 
generation AC Powered eSATA transfer station. 
You may 

request

 one free; additional may be 

purchased if required.  
 
Also, do not use any other 3

rd

 party transfer 

station, as this may compromise the SSD’s.


Convergent Design Universal Transfer Station Instructions 

Setup  

Connect the Convergent Design Universal Transfer station to any of the following Seagate GoFlex 
Adaptors: Thunderbolt Adaptor, USB3.0, Firewire 800 Adapter. More on our 

website


Do not use the USB-powered eSATA 

transfer station for offloading data. USB 

power sources do not provide sufficient 

power which may damage the SSD’s.


Содержание 4:4:4

Страница 1: ...rtual Manual As new firmware and features are released this manual will be updated Please check back regularly or bookmark this link for reference Last Updated 13 Feb 2013 http www convergent design c...

Страница 2: ...S 13 OUTPUT 14 Enable Disable Options 15 MENU QUICK KEYS 16 PREPARATIONS 18 TIPS TECHNIQUES RECOMMENDATIONS 18 POWER 20 AC Power Supply 20 Camera 20 REGISTRATION 21 ARRIRAW Stereo 3D Options Paid Upgr...

Страница 3: ...sfer Station 30 First Generation Transfer Station eSATA DISCONTINUED 30 Convergent Design Universal Transfer Station Instructions 30 Setup 30 Performance 31 File Support 33 File Structure 34 Transfer...

Страница 4: ...Previous Firmware Releases 73 Firmware Version 1 3 105 23 October 2012 73 Firmware Version 1 3 100 22 October 2012 75 The following Features for Firmware 1 2 100 still apply 77 Firmware Version 1 2 10...

Страница 5: ...STRUCTIVE PROCESS all existing data will be lost during format 6 Ensure that the camera s viewfinder data is not being recorded IF YOU SEE VIEW FINDER DATA ON THE GEMINI 4 4 4 monitor then it will be...

Страница 6: ...y Power D Tap 4 Pin XLR Power Cable 4 Pin Hot Shoe Mount Seagate GoFlex USB 3 0 Adapter Stylus Microfiber Cloth DC DC Converter incl w ARRIRAW Option AC Powered eSATA Transfer Station also available s...

Страница 7: ...ver This is especially important when recording Log video such as Sony S Log or LogC The precise values for each bit are recorded No bit values are changed in any way thus preserving the full integrit...

Страница 8: ...y or Camera 1 on the Gemini and Camera 2 out to a monitor Cameras MUST be gen locked 4 2 2 to 4 4 4 UP CONVERSION The Gemini 4 4 4 records in DPX file format an industry standard for high end post pro...

Страница 9: ...Sony S Log ARRI C Log and will support Canon Log C SINGLE LINK 3G DUAL LINK 1 5G 3G The Gemini supports both single link 3G and dual link 1 5Ghz HD SDI Input for 4 4 4 and ARRIRAW recording as well as...

Страница 10: ...21313 www Gemini444 com 9 P a g e GEMINI 4 4 4 ANATOMY kfjaslkdjflk sdlkfjaslkdjf lkdjflksdjf SSD Drive 1 SSD Drive 2 HD Touch Screen Monitor Power SDI A IN SDI B IN Audio IN HDMI OUT Audio OUT SDI A...

Страница 11: ...m 2 and so on may appear and subsequently provide you with an Option related to that Sub Menu 1 Sub Menu 2 Sub Menu 3 Options Main Menu Available Sub Menu Selection Setting Saved On WARNING DO NOT ENC...

Страница 12: ...Set the appropriate date Reset Menu Restore all default settings Metadata Resets metadata fields Keys Unit OK Indicates your product was successfully registered Requires nothing further after initial...

Страница 13: ...below Frame Rate from Camera 3D DPX Gemini records and plays 4 4 4 DPX files requiring dual gen locked video input of 1080p 4 2 2 or 4 4 4 up to 30p See Release Notes at end of this document for more...

Страница 14: ...Gemini ARRIRAW Canon Raw CAMERA TRIGGER Clip Name Clip AAAAAAAA 000 The file name is provided by the camera It is best to simultaneous record in camera Information is received via SDI from the camera...

Страница 15: ...aid on the SDI or HDMI output of the Gemini MODE 4 2 2 SDI output as 4 2 2 works in both Rec and Play Mode This setting only affects the output video 4 2 2 Input will always be converted to 4 4 4 for...

Страница 16: ...Rate must be less than or equal to Rec Out Enable Disable Options Enable ARRIRAW 3D Canon 4K Cinema Raw In order to enable the ARRIRAW feature not in Demo Mode you must purchase the ARRIRAW Upgrade t...

Страница 17: ...for more information on Metatdata See Playback page 24 for more information on Playlist Set metadata prior to record ARRI Rec Mode Replaces Metadata Key ONLY IN RAW MODE Click to reveal metadata sent...

Страница 18: ...maining Record Time Remaining record time per card shown as SSD1 SSD2 Quick Key Click the caret to display options then click to apply Apply LUT Viewing LUTs are not applied to recorded material for i...

Страница 19: ...amera in advance of the shoot Setup your camera exactly as you will for the shoot setup the Gemini 4 4 4 create some test footage and run this test footage through your Post workflow Ensure that your...

Страница 20: ...r cooling 23 Never leave the Gemini 4 4 4 in hot sun without protection for an extended period of time If it has been in a hot car please allow time for it to cool 24 Protect it from rain splashes and...

Страница 21: ...le 4 Pin XLR connector on the AC Power Supply and plug into a suitable AC power source Gently turn to fit and click the Hirose connector into the Power 6 19V connector on the left of the Gemini 4 4 4...

Страница 22: ...d Upgrade All Options can be purchased through your local dealer Convergent Design will then provide you an Activation Key To input key and activate unit go to Gemini Set Keys Raw Upgrade Instructions...

Страница 23: ...n the header of every DPX file This data is viewable in some software on a computer Additionally the metadata is stored in a separate XML file alongside the DPX files for a given record File Field Val...

Страница 24: ...ted there is no way to recover the data Un format Utilities will not be able to recover the data Go to GEMINI SSD s FORMAT SSD1 or GEMINI SSD s FORMAT SSD2 or FORMAT BOTH from the Menu to format the S...

Страница 25: ...Test Drive has old clips which can be played back but to record new SSD s must be formatted System Status Indicators The LED lights located in between each SSD drive in the middle of the unit will dis...

Страница 26: ...94 60p require two 512GB SSD s Media ARRIRAW ari 1080p 23 97 24 1080p25 1080p 29 97 30 1080p48 1080p50 1080p 59 94 60 256GB SSD x1 25 24 20 na na na 256GB SSD x2 50 48 40 25 24 na 512GB SSD x2 100 96...

Страница 27: ...e System Status Indicator is red b One of the SSD Status Indicators is Red If you have two cards in the other light should be green c The Status Bar will turn red and your time code should be incremen...

Страница 28: ...rate recordings that require two SSD s the data files are recorded in alternating fashion onto between SSD s Before editing combine the two sets of files into a single folder to obtain the entire cli...

Страница 29: ...tton will change to a Pause Button 4 When you have completed your review tap the Mode again to toggle back to REC Mode 5 For proper playback all recorded video should be the same video format Also ass...

Страница 30: ...oggle is in PLAY Mode 2 Click the Playlist Quick Key in the left upper third of the monitor 3 Select deselect by tapping the box next to a clip X a You may choose multiple clips b Use the page arrows...

Страница 31: ...D AC Powered eSATA transfer station is also available First Generation Transfer Station eSATA DISCONTINUED As this is discontinued you will need to use the Universal Transfer Station above If you pref...

Страница 32: ...Firewire cable from the GoFlex adaptor 7 Remove the SSD from the CD Transfer Station 8 Insert your Second SSD and repeat Steps 2 through 7 NOTE ALWAYS use the Eject Command Mac Finder and Safely Remo...

Страница 33: ...back Edit ARRI 2K 1080p24 4 4 4 10 Bit DPX 186 6 300 1080p25 4 4 4 10 Bit 194 4 300 1080p30 4 4 4 10 Bit 233 3 400 P50 10 Bit 400 600 P60 10 Bit 500 600 It s recommended to not exceed 250 clips per ca...

Страница 34: ...and wav audio file for each take Thus each time you start and stop a recording it will create a new file folder which takes the name of the Clip as setup via a menu item in the Gemini 4 4 4 All clips...

Страница 35: ...ng that the RECORD CLIP is set to CLIP001 001 CLIP0001001 0000000 DPX CLIP0001001 0000001 DPX Etc CLIP0001002 Assuming that the RECORD CLIP is set to CLIP001 002 CLIP0001002 0000000 DPX CLIP0001002 00...

Страница 36: ...mise RAID shown configured as a RAID 0 This can be used for live playback creating LOOK files or applying LUTs as well as confidence monitoring of footage We suggest having a secondary drive Western D...

Страница 37: ...the Pc via the SATA port and the USB port which provides power 2 Within Windows Explorer find the Drive Letter associated with the just inserted SSD 256 or 512 GB SSD with 250 MB available 3 Right cl...

Страница 38: ...d Disk Drive or Raid System giving it a name meaningful to you such as Project Name Camera A 2012 09 12 2 Open the CLIPS __________GEMINI__444 folder on your first SSD and copy all of the folders to t...

Страница 39: ...tep 4 above Yes HD 3D 23 976 1 2 No No Yes HD 3D 23 98 1 2 No No Yes HD 3D 24 1 2 No No Yes HD 3D 25 1 2 No No Yes HD 3D 29 97 1 2 512 GB Yes Yes Yes HD 3D 30 1 2 512 GB Yes Yes 1 3D RAW or HD Frame R...

Страница 40: ...w 23 976 1 2 No No No Canon 4K Cinema Raw 23 98 1 2 No No No Canon 4K Cinema Raw 24 1 2 No No No Canon 4K Cinema Raw 25 1 2 No No No Canon 4K Cinema Raw 29 97 1 2 No No No Canon 4K Cinema Raw 30 1 2 N...

Страница 41: ...This will be dependent of any Codec installed on your machine Export Uncompressed QuickTime Movie Codec of Choice DNxHD XDCAM ProRes Photoshop CS4 CS5 CS5 5 CS6 Import Native Support for DPX Viewer in...

Страница 42: ...Encode Media Encoder Apple Color 1 5 3 FCP7 Import Native Support for DPX Check Playback real time playback Apply Color Correction Apply LUT Create Proxy Export Final Cut Pro Project Sequence Export...

Страница 43: ...port for DPX Encode Create Proxy Export Codec of Choice DNxHD XDCAM ProRes Media Composer 5 5 6 Import DPX Plug In Metafuse Cineform Studio Cineform Professional Check Playback Edit Plug In allows you...

Страница 44: ...tive Support for DPX Check playback Edit Apply LUT Color Correction Create Proxy Export NLE Final Production Maxon Cinema 4D Import Native Support for DPX Check Playback Edit Export NLE Final Producti...

Страница 45: ...Movie AJA DPX Translator Import Native Support Check Playback Encode Export Uncompressed Quicktime Movie DPX Viewers DJViewer Import Native Support Check Playback Color Correct Export Jpeg DPX etc XNV...

Страница 46: ...importing exporting and general workflow questions please visit the AE forum DVinfo forum and DVXuser forum Export After Effects Project Premier Pro Sequence Uncompressed QuickTime Movie Final Produc...

Страница 47: ...pply Color Correction Apply LUT Edit Export DPX Plug In FCP 7 FCP X QT Pro NLE Final Production ASSIMILATE Scratch Scratch Lab Import Native Support for ARRIRAW Check Real time Playback Apply LUT Appl...

Страница 48: ...Edit Apply Look LUTs Color Correction Export NLE Final Production MTI FILM Control Dailies Import Native Support for ARRIRAW 16 9 4 3 Check playback Edit Apply Look LUTs Color Correction Export NLE Fi...

Страница 49: ...his will allow you to debayhor change the white balance and ASA of your files then Export the files as a 10 Bit or 16 Bit DPX The Exported dpx files then be used with the following editors Color Corre...

Страница 50: ...Media Encoder Data Management Concatenate Files DIT Visual Field Checks Generate Looks LUTs Create Batches Batch Renaming Straight to Encode Media Encoder Apple Color 1 5 3 FCP7 Import Native Support...

Страница 51: ...Edit Export Final Production Export to Final Cut Pro MetaFuze Import Native Support for DPX Encode Create Proxy Export Codec of Choice DNxHD XDCAM ProRes Media Composer 5 5 6 Import DPX Plug In Metafu...

Страница 52: ...Wav Audio Support Create a new bin Import File Select File As Sequence Check Playback Apply Color Correction Apply LUT Edit Create Proxy Export Final Production Black Magic DaVinci Resolve Resolve Lit...

Страница 53: ...Files Metadata The Gemini 4 4 4 records meta data information for every file frame Inside each clip directory there is a XML Metadata file which can also be used when importing metadata in a NLE Colo...

Страница 54: ...ransfer station to your computer For Universal Transfer Station Connect with Seagate GoFlex Adapter appropriate cabling a We recommend creating a folder named something like the following Gemini 444 F...

Страница 55: ...ur SSD Drive Listed under Computer on the left hand side of your screen Note The SSD may be No Name and it can be any Drive Letter but it will have a CLIPS folder on the drive Do not copy the firmware...

Страница 56: ...4 4 4 either battery or AC Power The firmware update takes approximately 5 minutes but please ensure that you have at least 30 minutes of battery time remaining to ensure safety 12 Power up the Gemin...

Страница 57: ...en Gemini then SSD s then Format SSD1 or Format SSD2 This step is very important Then power off the Gemini 4 4 4 then Power it back on If you fail to perform this step to power cycle the unit then all...

Страница 58: ...r S Log Log C with user programmable 1D LUTs Playback Control Play Rewind Fast Forward Pause and Step Control Metadata Reel Number Scene Number Take Number and Project Name Media Two Slots for 1 8 Sol...

Страница 59: ...echanical Drawings Useful for your mounting needs and designs please find below mechanical drawings of the Gemini 4 4 4 Remote Connector Pinout POWER PINOUT REMOTE PINOUT 1 Power 6 5 19V 1 232 RX 2 Po...

Страница 60: ...o 10 Watts Add the power requirements for the LCD and other control circuit and total Gemini power can reach 16 watts SSD drives are very sensitive to power glitches especially during write operations...

Страница 61: ...and Gemini 4 4 4 then record on the same SSD s the footage recorded after the power failure will be inaccessible NEVER remove an SSD while recording or playing video This can cause catastrophic failu...

Страница 62: ...nsfer rates to a fast RAID drive depending on your configuration USB 2 0 3 0 Seagate GoFlex Model STAE104 or Calvary USB 3 0 Adapter Model CAUSM2001 An ExpressCard 34 to USB 3 0 adapter may be require...

Страница 63: ...critical for proper operation of the Gemini particularly during record So here s a short list of recommended practices regarding power Always double check the polarity of the incoming power connectio...

Страница 64: ...4 will not power up check your cables for proper voltage and polarity If you assume that the power protection module is defective and connect your power cable directly to the Gemini 4 4 4 or the nano...

Страница 65: ...s does occur one just needs to insert the SSD or SSD s into any Gemini 4 4 4 and then press the SSD Safe Eject icon 1 SSD Safe Eject Starting with this firmware release prior to removing an SSD from t...

Страница 66: ...status message indicating that the last clip was recovered If an SSD Recovery fails the files are not recognized by a computer or you receive an ERROR 25 7 6 or 5 Please power off the Gemini repower...

Страница 67: ...pdate Ideally perform the SSD update before doing any more recordings to that SSD If an SSD Recovery fails the files are not recognized by a computer or you receive an ERROR 25 7 6 or 5 Please power o...

Страница 68: ...Fast Canon Raw partially supported only supported when the Slow Fast Rate is set to the Maximum Rate and complies with the supported listings above which includes 4K Half Raw 50 fps cranked to 100 and...

Страница 69: ...4 Clip names will more closely match the internal clip names as recorded in the C500 With this option enabled the Gemini 4 4 4 Clip names will not match the internal clip names but will have a Date a...

Страница 70: ...not import Known Bugs Version 1 5 146 On rare occasions when playing back recorded footage within the Gemini Recorder the display will roll or shift the video and play in an odd fashion The recorded...

Страница 71: ...e requires two SSD s recorded as DPX files YCC 4 2 2 1080P 23 98 24 25 29 97 50 59 94 fps Recorded as 4 4 4 RGB for compatibility with industry standard software 29 97 and above requires two SSD s rec...

Страница 72: ...et by the Camera For Canon DPX the Playback Project can be set in the Gemini Recorder menu Setup Project Frame Rate 3 Display of Activated Features in About menu The Activated paid upgrade features fo...

Страница 73: ...iversal Transfer Station is available free of charge from Convergent Design The USB 3 0 adapter is included but the Thunderbolt or Firewire 800 adapters if needed must be purchased separately Many pro...

Страница 74: ...w recordings the Gemini Recorder will attempt to retrieve the base Clipname from the C500 The C500 must be simultaneously recording internally in order for the Clipname to be passed to the recorder Wi...

Страница 75: ...firmware upgrade the Sony F3 camera now has 2 options for it s SDI Rec Control which activates Camera Trigger to the Gemini Recorder Please note that only the HD SDI Remote I F option works properly w...

Страница 76: ...llowing clip naming convention is used provided that simultaneous in camera recording is taking place AA000101_121031_0001_0000001 RMF in which the 1st 8 characters are provided by the C500 to match t...

Страница 77: ...using Vari Frame with the ARRI ALEXA please note the following o If Sensor Rate on the ALEXA is set to 30 or less set the Record Out to 30 or less as well o Do not set the Sensor Rate to less than 1 o...

Страница 78: ...local dealer allowing 3D Recording without the watermark The 3D Option supports 1080p23 976 23 98 24 25 29 97 and 30 4 2 2 or 4 4 4 inputs The Gemini must be in 3D DPX mode to support 3D Setup Mode 3D...

Страница 79: ...ode I taken from SDI A left Input only and recorded to both SSD s ARRI ALEXA ARRIRAW 4 3 Support Our ARRIRAW Option originally only supported 16 9 Mode in the ARRI ALEXA Cameras This firmware version...

Страница 80: ...emini 4 4 4 Remote cables can be purchased from your dealer or you can build your own Remote Control Connector Pin Out o 232 RX o Remote Do not use this pin reserved this is not for the Remote Control...

Страница 81: ...frame every 5 seconds as specified by a menu option When Time Lapse is desired you will need to set the interval between frames to be recorded in seconds from 001 to 255 in the Time Lapse menu and al...

Страница 82: ...a faulty cable the user will be notified via a message displayed on the LCD screen Power Source Validation If the Gemini 4 4 4 does not start recording due to an inadequate power source the Gemini 4 4...

Страница 83: ...ded to one SSD originally Optional Feature Protection Optional features such as ARRIRAW or 3D are enabled via a menu item where an Authorization Code for each specific optional feature is entered o On...

Страница 84: ...d Fixed a bug in which on occasion with Striped Raided Recordings of ARRIRAW the timecode would repeat across the two SSD s LED dimming now displays more accurate colors You may set the LCD and LED Br...

Страница 85: ...computer to obtain the entire clip in a single folder For 1080p59 94 60 two 512 GB SSD s required Due to the high data rate of 1080p59 94 60 DPX files the DPX data is stored as packed To un pack the d...

Страница 86: ...nt Design will contact you to obtain necessary contact information and the Unit ID File This information is used to process your unique Activation Key o The ARRIRAW Activation Key will be sent to be e...

Страница 87: ...rded on the Gemini or for transferring firmware updates or other essential files to the Gemini from a computer Known Issues Limitations During playback of clips from the Gemini Recorder the only funct...

Страница 88: ...gnized appropriately from these cameras Added Metadata functionality o Metadata may be entered and edited through the Metadata tab along the left side of LCD screen in Live Rec Mode o The Scene and Ta...

Страница 89: ...ware will first require a fresh formatting within the Gemini Recorder with the new firmware installed Additionally for any SSD s containing clips recorded on previous firmware the Gemini Recorder will...

Страница 90: ...Gemini 4 4 4 User Manual 021313 www Gemini444 com 89 P a g e Canon 4K Cinema Raw Support...

Страница 91: ...upport from the Convergent Design community http www dvinfo net forum convergent design nanoflash 3 REFER TO DOCUMENTATION Please read all of this User Manual as well as our Gemini 4 4 4 FAQs which do...

Страница 92: ...freight charges prepaid to Convergent Design Parts and components used in the repair process may be recycled or repaired at Convergent Design s sole discretion This warranty service will be performed...

Страница 93: ...ecurely packaged and must have the RMA number clearly marked on the outside of the package RMA numbers and return address may be obtained from Technical Support Convergent Design RMA _______________ 4...

Страница 94: ...S If you purchased the unit from a dealer outside of your normal trading zone then you may be charged for return shipping to your location For insurance reasons Convergent Design cannot accept any pro...

Отзывы: