Gefen TOOLBOX GTB-HD4K2K-444-BLK Скачать руководство пользователя страница 22

page | 12

Determining the Current Routing State

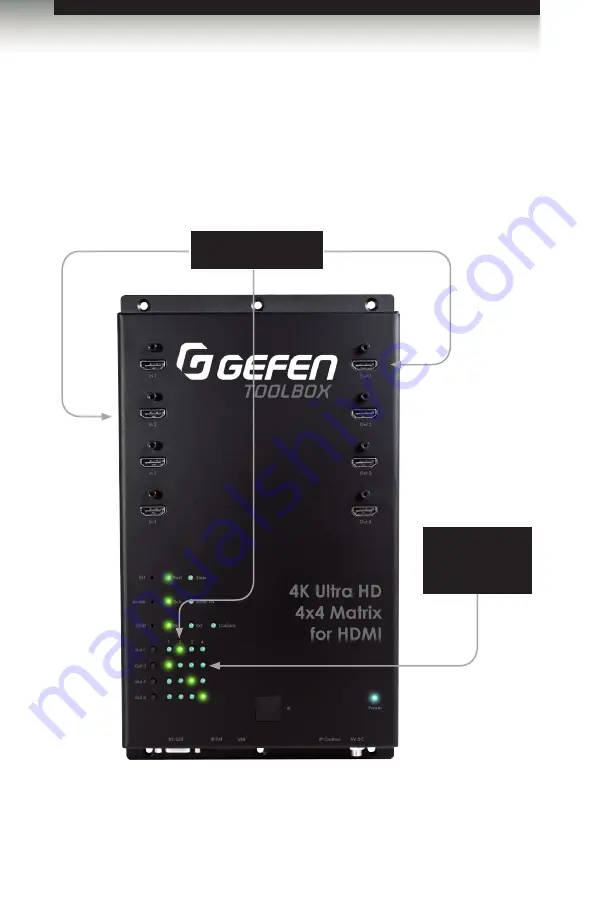
On the bottom-left portion of the matrix, there are four rows of four LED indicators. 

The top row of LED indicators displays the routing state of 

Out 1

.  The next row displays 

the routing state of Out 2, and so on.  A row of numbers (1 - 4) is printed above the four 

rows of LED indicators.  Each LED indicator represents an input (

In 1

 -  

In 4

) on the matrix.  

The LED indicator for the currently selected input will glow solid green. 


Operating the 4K Ultra HD 4x4 Matrix for HDMI

Routing Basics

LED indicates 

that 

In 1

 is 

routed to 

Out 2

LED indicates that 

In 2

 is routed to 

Out 1

Содержание GTB-HD4K2K-444-BLK

Страница 1: ...Release A6 User Manual GTB HD4K2K 444 BLK 60Hz 4 2 0 4x4 Matrix for HDMI...

Страница 2: ...replacement of the obsolete outlet 10 Protect the power cord from being walked on or pinched particularly at plugs convenience receptacles and the point where they exit from the apparatus 11 Only use...

Страница 3: ...ressly disclaimed 1 Proof of sale may be required in order to claim warranty 2 Customers outside the US are responsible for shipping charges to and from Gefen 3 Copper cables are limited to a 30 day w...

Страница 4: ...Ultra HD 4x4 Matrix for HDMI is a trademark of Gefen LLC Important Notice Gefen LLC reserves the right to make changes in the hardware packaging and any accompanying documentation without prior writt...

Страница 5: ...s all other outputs if any connected device or display is not capable of processing Deep Color This automatic behavior ensures compatibility among all output devices in a mixed device environment This...

Страница 6: ...nd binary forms with or without modification are permitted provided that the following conditions are met 1 Redistributions of source code must retain the above copyright notice this list of condition...

Страница 7: ...ers not included RS 232 Serial interface for remote control using a computer or automation control system IP control via Telnet UDP and the built in web server interface IR remote control Field upgrad...

Страница 8: ...tputs 13 Using the IR Remote Control Unit 14 Using the IR Extender 15 Switching Modes 16 What is Fast Switching Technology 16 Fast Mode vs Slow Mode 16 Selecting the FST Mode 16 Audio Modes 17 Selecti...

Страница 9: ...EDID Bank Names 86 Manage EDID Upload Download 87 Configuration Change IP Settings 89 Configuration Telnet Login Settings 90 Configuration UDP Connection Settings 91 Configuration Web Login Settings 9...

Страница 10: ......

Страница 11: ...for HDMI 01 Getting Started Panel Layout 2 IR Remote Control Unit 5 Front 5 Back 6 Installing the Battery 7 Setting the IR Channel 7 Installation 8 Connecting the 4K Ultra HD 4x4 Matrix for HDMI 8 Sa...

Страница 12: ...page 2 Getting Started Panel Layout 11 12 13 1 2 7 5 6 4 3 8 9 10...

Страница 13: ...ode for more information on using this feature 5 EDID Int Ext Custom Use this recessed button to switch between internal Int external Ext and custom EDID modes The LED indicators will display the curr...

Страница 14: ...nformation 11 IR This IR sensor receives signals from the included IR remote control unit 12 IP Control Connect an Ethernet cable between this jack and a LAN to use IP control See RS 232 and IP Config...

Страница 15: ...6 Press these button to switch to the desired input source Buttons 1 4 are used to select the input for Out 1 buttons 5 8 are used to select the input for Out 2 and so on IR Remote Control Unit NOTE I...

Страница 16: ...the IR Channel for more information 2 Primary battery slot shown without battery Holds the battery for operating the remote Use only 3V CR2032 type batteries Make sure that the positive side of the b...

Страница 17: ...cover Setting the IR Channel In order for the included IR remote control to communicate with the 4x4 Matrix for HDMI 4K x 2K the IR remote control must be set to the same channel as the matrix Use th...

Страница 18: ...Ethernet cable from the IP Control port on the matrix to a Local Area Network LAN 5 OPTIONAL Connect an IR extender to the IR Ext port on the matrix 6 Connect the included 5V DC locking power supply t...

Страница 19: ......

Страница 20: ......

Страница 21: ...ing State 12 Routing Inputs to Outputs 13 Using the IR Remote Control Unit 14 Using the IR Extender 15 Switching Modes 16 What is Fast Switching Technology 16 Fast Mode vs Slow Mode 16 Selecting the F...

Страница 22: ...row displays the routing state of Out 2 and so on A row of numbers 1 4 is printed above the four rows of LED indicators Each LED indicator represents an input In 1 In 4 on the matrix The LED indicato...

Страница 23: ...connected to In 1 is currently routed to Out 2 To change the routing state and route In 2 to Out 2 press and release the Out 2 button To route the another source to Out 2 consecutively press and relea...

Страница 24: ...s routed to Out 1 In this example we will route In 4 to Out 1 1 Point the IR remote at the IR sensor on the top panel of the matrix 2 Since we want to control the routing state of Out 1 we need to use...

Страница 25: ...s case an IR extender Gefen part no EXT RMT EXTIRN can be connected to the IR port on the matrix The sensor on the IR extender behaves exactly like the sensor on the top panel of the matrix Always poi...

Страница 26: ...ted to any other HDTV display in the same system Fast Mode vs Slow Mode Use fast switching mode to improve performance when connecting disconnecting Hi Def sources and powering ON OFF HDTV displays Us...

Страница 27: ...dio formats Audio Format Audio Format LPCM 2CH LPCM 8 channel Dolby Digital Dolby Digital Plus Dolby TrueHD DTS DTS HD Master Audio MLP PPCM Press the Audio button to switch the audio mode Operating t...

Страница 28: ...vides control of the audio output format External EDID When set to Ext mode EDID data will be fetched from each display or other sink device that is connected to the outputs of the matrix Once this in...

Страница 29: ...p 59 60 16 9 1280 x 720p 59 60 16 9 1920 x 1080i 59 60 16 9 1440 x 480i 59 60 4 3 1920 x 1080p 59 60 16 9 720 x 576p 50 4 3 720 x 576p 50 16 9 1280 x 720p 50 16 9 1920 x 1080i 50 16 9 1440 x 576i 50 4...

Страница 30: ......

Страница 31: ...e 71 Using the built in Web Server 71 Main Routing 72 Main I O Status 75 Main Display Info 77 I O Setup Preset Names 78 I O Setup I O Names 79 I O Setup HPD Control 80 I O Setup FST 81 I O Setup HDCP...

Страница 32: ...Hardware flow control None IMPORTANT When sending Telnet or RS 232 commands a carriage return 0d and a line feed 0a must be included at the end of the command DA 15 DE 9 DB 25 DC 37 DD 50 5 6 4 7 3 8...

Страница 33: ...n program e g HyperTerminal and use the RS 232 settings listed on the previous page 3 Set the IP address for the matrix using the sipadd command 4 Set the subnet mask using the snetmask command 5 Set...

Страница 34: ...dp_remote_ip Sets the remote UDP IP address set_udp_remote_port Sets the remote UDP listening port show_hdcp Displays the HDCP status of the specified input show_ir Displays the current IR channel of...

Страница 35: ...dvanced Operation echo The echo command enables disables toggles the RS 232 feedback Syntax echo param1 Parameters param1 Value 0 1 Value Description 0 Disable feedback 1 Enable feedback Example echo...

Страница 36: ...settings are reset to default settings Syntax fadefault Parameters None Example fadefault MATRIX WAS RESET TO FACTORY DEFAULTS RESET MATRIX ROUTING RESET USER DEFINE NAME RESET IP CONFIGURATIONS RESE...

Страница 37: ...Value Description 0 Disable 1 Enable Example hdcp 2 0 HDCP ON INPUT 2 IS DISABLED hdcp 2 1 HDCP ON INPUT 2 IS ENABLED NOTE Some computers will enable HDCP if an HDCP compliant display is detected Set...

Страница 38: ...sically disconnecting and reconnecting the cable between the source and the matrix If param1 0 then all inputs will receive the HPD pulse Syntax hpd_pulse param1 Parameters param1 Input 1 4 Examples h...

Страница 39: ...ocal EDID by disabling the automatic loading of the downstream EDID when the matrix is powered Syntax lock_edid param1 Parameters param1 Value 0 1 Value Description 0 Disable 1 Enable Examples lock_ed...

Страница 40: ...power The power command toggles power on the matrix Syntax power param1 Parameters param1 Value 0 1 Value Description 0 Off 1 On Examples power 0 MATRIX IS OFF power 1 MATRIX IS ON Commands Advanced O...

Страница 41: ...his command is the equivalent of disconnecting and reconnecting the AC power cord on the back of the matrix The matrix must be rebooted after changing any of the IP settings Syntax reboot Parameters N...

Страница 42: ...ource Description default Uses default Internal EDID dynamic Uses dynamic EDID bank Uses EDID bank output Uses EDID on Output sink param2 Source 0 8 Source Description 0 Default EDID Dynamic 1 8 EDID...

Страница 43: ...param1 dynamic then set param2 0 Examples set_edid default 0 input 4 COPY DEFAULT EDID TO INPUT 4 set_edid output 2 input 3 COPY OUTPUT 2 EDID TO INPUT 3 set_edid dynamic 0 input 2 COPY DYNAMIC EDID...

Страница 44: ...nnel for the switch can also be set under the Configuration tab within the Web interface See Configuration System Configuration for more information Syntax set_ir param1 Parameters param1 Channel 0 3...

Страница 45: ...port The default port setting is 21 The matrix must be rebooted after executing this command Use the show_udp_port command to display the current local UDP listening port Syntax set_udp_port param1 P...

Страница 46: ...nd Syntax set_udp_remote_ip param1 Parameters param1 UDP address Example set_udp_remote_ip 192 168 1 227 REMOTE UDP IP ADDRESS 192 168 1 227 IS SET set_udp_remote_port The set_udp_remote_port command...

Страница 47: ...the HDCP status on the specified input Syntax show_hdcp param1 Parameters param1 Input 1 4 Example show_hdcp 1 HDCP ON INPUT 1 IS ENABLED show_ir The show_ir command displays the IR channel of the ma...

Страница 48: ...param1 Parameters param1 Output 1 4 Example show_out_colordpt 1 OUTPUT 1 HIGHEST COLOR DEPTH IS 8 BITS show_out_res The show_out_res command displays the highest resolution supported by the specified...

Страница 49: ...ning port Syntax show_udp_port Parameters None Example show_udp_port UDP COMMUNICATION PORT IS 56 show_udp_remote_ip The show_udp_remote_ip command displays the remote UDP IP address Use the set_udp_r...

Страница 50: ...ax show_udp_remote_port param1 Parameters None Example show_udp_remote_port REMOTE UDP COMMUNICATION PORT IS 50008 use_udp_enable The use_udp_enable command enables or disables UDP access mode Syntax...

Страница 51: ...command works we have already routed Input 3 to Output 1 Now we ll use the n command to query the routing state of Output 1 n 4 D3 The feedback is abbreviated as D3 This indicates that Input 3 is rou...

Страница 52: ...s command routes the specified input to all outputs Do not precede this command with the symbol Syntax s param1 Parameters param1 Input 1 4 Example s 2 INPUT 2 IS ROUTED TO ALL OUTPUTS Advanced Opera...

Страница 53: ...I sgateway Sets the IP address of the router gateway show_gateway Displays the current gateway address of the matrix show_http_port Displays the current HTTP listening port of the matrix show_ip Displ...

Страница 54: ...x display_telnet_welcome param1 Parameters param1 Value 0 1 Value Description 0 Disable welcome message 1 Enable welcome message Example display_telnet_welcome 1 TELNET WELCOME SCREEN IS ENABLED When...

Страница 55: ...P 192 168 2 190 NETMASK 255 255 255 0 GATEWAY 192 168 1 254 resetip The resetip command resets the IP configuration to factory default settings The matrix must be rebooted after executing this command...

Страница 56: ...istening port Syntax set_http_port param1 Parameters param1 Port 1 1024 Example set_http_port 82 HTTP COMMUNICATION PORT 82 IS SET PLEASE REBOOT THE UNIT set_telnet_pass The set_telnet_pass command se...

Страница 57: ...set_telnet_port param1 Parameters param1 Port 1 1024 Example set_telnet_port 24 TELNET COMMUNCATION PORT 24 IS SET PLEASE REBOOT THE UNIT set_webui_ad_pass The set_webui_ad_pass command sets the Admin...

Страница 58: ...xample set_webui_op_pass minion WEB UI OPERATOR PASSWORD IS SET sgateway The sgateway command sets the gateway address The gateway must be typed using dot decimal notation The matrix must be rebooted...

Страница 59: ...ay address Syntax show_gateway Parameters None Example show_gateway GATEWAY ADDRESS IS 192 168 1 5 show_http_port The show_http_port command displays the current HTTP listening port of the matrix Use...

Страница 60: ...Use the sipadd command to set the IP address Syntax show_ip Parameters None Example show_ip IP ADDRESS IS 192 168 1 239 show_mac_addr The show_mac_addr command displays the MAC address of the matrix...

Страница 61: ...show_netmask NETMASK ADDRESS IS 255 255 255 0 show_telnet_port The show_telnet_port command displays the current Telnet port of the matrix Use the set_telnet_port command to set the Telnet listening...

Страница 62: ...show_telnet_username Parameters None Example show_telnet_username USER NAME FOR TELNET IS Admin show_ver_data The show_ver_data command displays the current software and hardware version Syntax show_...

Страница 63: ...rs param1 IP address Example sipadd 192 168 2 190 IP ADDRESS 192 168 2 190 IS SET snetmask The snetmask command sets the subnet mask The net mask must be entered using dot decimal notation The matrix...

Страница 64: ...for each Telnet session The default setting is 0 disabled Use the set_telnet_pass command to set the Telnet password Syntax use_telnet_pass param1 Parameters param1 Value 0 1 Value Description 0 Disa...

Страница 65: ...rent switching mode for the specified input fst_fast The fst_fast command sets the specified inputs to fast switching mode By default all inputs are set to fast switching mode If param1 0 then all inp...

Страница 66: ...o slow switching mode By default all inputs are set to fast switching mode If param1 0 then all inputs are set to slow switching mode Syntax fst_slow param1 Parameters param1 Input 0 4 Examples fst_sl...

Страница 67: ...ed input If param1 0 then the switching mode for all inputs are displayed Syntax show_fst param1 Parameters param1 Input 0 4 Examples show_fst 2 INPUT 2 FST STATUS IS SLOW show_fst 0 INPUT 1 FST STATU...

Страница 68: ...he current masking status of each output unmask Unmasks the specified outputs mask The mask command masks the video on the specified output s Use the unmask command to disable output masking If param1...

Страница 69: ...tput s If param1 0 then all outputs are unmasked Syntax unmask param1 Parameters param1 Output 0 4 Example unmask 2 OUTPUT 2 IS UNMASKED show_mask The show_mask command displays the mask status of the...

Страница 70: ...t_name Displays the name for the specified EDID bank show_input_name Displays the name of the specified input show_output_name Displays the name of the output show_preset_name Displays the name of the...

Страница 71: ...1 Parameters param1 Preset 1 8 Example recall_preset 2 RECALLED THE ROUTING STATE SAVED TO PRESET 2 save_preset The save_preset command saves the current routing state to a specified preset Syntax sav...

Страница 72: ...ram1 Bank 1 8 param2 Name Example set_bank_name 5 Dell_24 Dell_24 NAME IS ASSIGNED TO BANK 5 set_input_name The set_input_name command assigns a name to the specified input on the matrix Syntax set_in...

Страница 73: ...ram2 Name Example set_output_name 3 Sony_XBR Sony_XBR NAME IS ASSIGNED TO OUTPUT 2 set_preset_name The set_preset_name command assigns a name to the specified preset The name of the preset is limited...

Страница 74: ...e param1 Parameters param1 Bank 1 8 Example show_bank_name 5 THE NAME FOR BANK 5 IS Dell24 show_input_name The show_input_name command displays the name of the specified input To name an input use the...

Страница 75: ...param1 Parameters param1 Output 1 4 Example show_output_name 2 THE NAME FOR OUTPUT 2 IS Sony_XBR show_preset_name The show_preset_name command displays the name for the specified preset To assign a na...

Страница 76: ...he r command routes the specified input to the output Do not precede this command with the symbol Also see the s command If param2 0 then the specified input param1 will be routed to all outputs param...

Страница 77: ...input show_rsense Displays the RSENSE status of the output m Displays the current routing status of the matrix help The help command displays the list of available RS 232 Telnet commands Help on a spe...

Страница 78: ...ax show_fw Parameters None Example show_fw FIRMWARE VERSION GTB HD4K2K 444 v0 7U show_hpd The show_hpd command displays the HPD status of the specified output The name of the output is included Syntax...

Страница 79: ...peration show_rsense The show_rsense command displays the RSENSE status of the specified output Syntax show_rsense param1 Parameters param1 Output 1 4 Example show_rsense 2 RSENSE OF OUTPUT 2 Sony_XBR...

Страница 80: ...nd locking status of the matrix is also provided Do not precede the m command with the symbol Syntax m Parameters None Example m Out 1 2 3 4 In 1 3 1 3 OUTPUT 1 IS UNMASKED OUTPUT 2 IS UNMASKED OUTPUT...

Страница 81: ...sername Select the username from the drop down list Options Operator Administrator Administrator login provides unrestricted access to all features and settings Operator login limits access to matrix...

Страница 82: ...desired tab sub tab to open the desired page Main Routing Advanced Operation Web Interface NOTE In order to view all four tabs at the top of the screen the user must be logged in as Administrator If...

Страница 83: ...lect the currently active output Input Inputs Click the radio button next to the desired input to be routed Name Inputs Displays the current name of the input This name can be changed using the set_in...

Страница 84: ...ocked settings cannot be changed using the front panel buttons or through the Web GUI When the matrix is locked the button text will read Unlock Matrix and a red bar will appear across the top portion...

Страница 85: ...e output The name of the output can be changed using the set_output_name command or through the I O Setup I O Names page of the Web interface RSENSE Displays the current Rsense state Mask Displays the...

Страница 86: ...eb Interface Input Displays the state of each input for each of the following Input name Color Depth Color Space HDCP 3D Active Signal Vertical Resolution Horizontal Resolution Progressive Interlaced...

Страница 87: ...EDID from the drop down list The selected EDID will be copied from the Output or selected EDID Bank to the desired input s and used by the source Options Bank 1 Bank 8 Output 1 Output 4 Feature Audio...

Страница 88: ...etup Preset Names Preset The number of each preset Name Type the desired name of each preset in these fields Save Changes Saves the current changes to the name of the preset s Cancel Restores the prev...

Страница 89: ...the desired name of each output in these fields Input The number of each input Name Input Type the desired name of each the input in these fields Save Changes Saves the current changes to the name of...

Страница 90: ...using the set_input_name command or through the I O Setup I O Names page of the Web interface Pulse Click the Pulse button to cycle the HPD line on the desired input This is the equivalent of physica...

Страница 91: ...hing state of each input Input The name of the input Name The name of the input The name of each input can be changed using the set_input_name command or through the I O Setup I O Names page of the We...

Страница 92: ...Web interface Check All Places a check mark in all boxes under the Disable column Clear All Clears all check marks from the Disable column Set Click this button to save changes for all input s Cancel...

Страница 93: ...abled the EDID locked on power cycle message will be displayed in red The local EDID information will now be locked once the matrix is rebooted Click the Unlock EDID button to disable the Lock EDID fe...

Страница 94: ...set to Custom User EDID Modes Select the EDID mode from the drop down list Options Internal 1080p 2 ch audio Internal 1080p Multi ch External Output1 Custom Last Output Custom User When the EDID is se...

Страница 95: ...nput can be changed using the set_input_name command or through the I O Setup I O Names page of the Web interface EDID Source The current EDID source being used EDID Name The name of the EDID Clear Al...

Страница 96: ...EDID Bank Names Bank Indicates the EDID bank number Name Type the desired name of the EDID bank in this field Save Changes Saves the current name change to the EDID bank s Cancel Restores the previou...

Страница 97: ...wnload Browse Click this button to select the EDID file to be uploaded Select Bank Location Click this drop down list to select the bank to where the EDID will be uploaded Options 1 Bank1 8 Bank8 Uplo...

Страница 98: ...e to Download Click this box to select the EDID that is to be saved to a file The EDID file will be saved in binary bin format Options 1 BANK1 8 BANK8 1 OUTPUT1 4 OUTPUT4 1 INPUT1 4 INPUT4 Download Cl...

Страница 99: ...Settings Saves the current settings for the Change IP Settings After clicking this button the Web interface will display a dialog indicating that the matrix must be rebooted for changes to take effec...

Страница 100: ...to have the matrix prompt for a password each time a Telnet session is started This box must be checked in order to change the Telnet Login credentials Show Login Message on Connect Click this check...

Страница 101: ...ion Web Interface Remote UDP IP Address Type the remote UDP IP address in this text box Remote UDP Port Enter the remote UDP port in this text box Enable UDP Access Check this box to enable UDP access...

Страница 102: ...select the user name The credentials for the selected user name can now be changed Old Password Type the current old password in this field New Password Type the new password in this field Confirm Pa...

Страница 103: ...page 93 Configuration System Configuration continued on next page Advanced Operation Web Interface Download Click this button to download the current matrix configuration to a file...

Страница 104: ...matrix Update Updates the matrix with the selected firmware file Browse Click this button to select the saved configuration file to be loaded into memory Browse Click this button to select the firmwar...

Страница 105: ...fault settings The IP settings are preserved Reboot Click this button to reboot the matrix IR Channel Click this drop down list to set the desired IR channel for the matrix Note that the matrix and th...

Страница 106: ......

Страница 107: ...60Hz 4 2 0 4x4 Matrix for HDMI 04 Appendix Wall Mounting Instructions 98 Firmware Upgrade Procedure 99 Upgrading using the Web interface 99 Upgrading using USB 100 Specifications 101...

Страница 108: ...s of the unit and any walls or vertical surfaces to allow for enough clearance for insertion and retraction of cables at the HDMI connectors For installation on a drywall surface use a 6 drywall screw...

Страница 109: ...ck the Browse button under the System Configuration section 6 Select the firmware file and click the Update button 7 The matrix will display a prompt to verify that the current firmware will be overwr...

Страница 110: ...computer is able to connect to the 4K Ultra HD 4x4 Matrix for HDMI a removable disk icon will be displayed under My Computer 5 Extract the firmware file from the ZIP file and drag the bin file to the...

Страница 111: ...EDID Selector 1 x Tact type recessed push button Power Indicator 1 x LED blue FST Indicators 2 x LED green Audio Indicators 2 x LED green EDID Indicators 3 x LED green Routing Indicators 16 x LED gre...

Страница 112: ...Appendix page 102 Appendix Physical Dimensions W x H x D 6 9 x 11 9 x 1 0 175mm x 302mm x 26mm Unit Weight 1 4 lbs 0 6 kg Specifications...

Страница 113: ......

Страница 114: ...t uses UL listed or CE compliant power supplies 20600 Nordhoff St Chatsworth CA 91311 1 800 545 6900 818 772 9100 fax 818 772 9120 www gefen com support gefen com Pb Stretch it Switch it Split it Gefe...

Отзывы: