


7
6
3
Install, cont.
3
Install, cont.
STEP 4
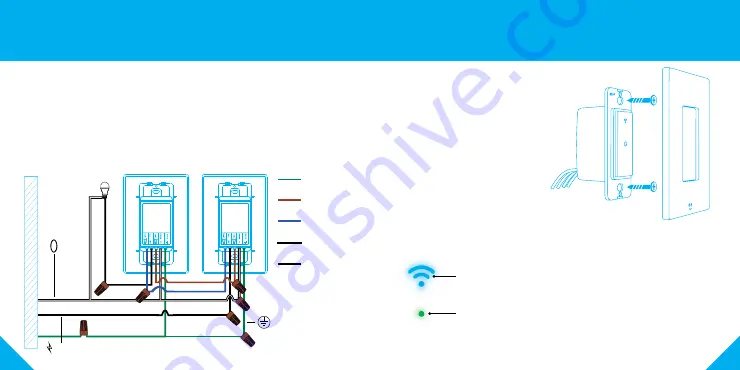
Use screws to secure TAP into your
wall. Snap on the included faceplate.
STEP 5
Restore power by reversing step 1.
STEP 6
Once power is connected, the
blue indicator light will blink to
indicate that TAP is ready to
connect to Wi-Fi.
Faceplate
Screw
Screw
Solid: Connected
Fast Blink: Easy Mode
Slow blink: AP Mode
On: Switched On
Off: Switch Off
STEP 3
1. Connect Switch 1 & Switch 2’s neutral wire (white) & load’s neutral wire to your
home’s neutral wire.
2. Connect Switch 1’s live wire (black) with load’s live wire.
3. Connect Switch 2’s live wire (black) to your home’s live wire.
4. Connect Switch 1 & Switch 2’s SW1 wires (brown) together.
5. Connect Switch 1 & Switch 2’s SW2 wires (blue) together.
6. Connect Switch 1 & Switch 2’s ground wire (green) to your home’s ground wire.
7. Check that all wire nuts are secured.
Neutral
(Required)
Ground
(Optional, we suggest
you connect, if present)
Live (Required)
Load
(Required)
Ground wire (Green)
Load wire SW1 (Brown)
Neutral wire (White)
Live wire (Black)
Load wire SW2 (Blue)
Switch 1
Switch 2