background image

14

USING THE TELEPHONE

Making a Call – Hands Free

Dial the number on the keypad in the on-hook position 

Use 

DELETE

 if necessary to cancel and correct a wrong digit

Press   and the number will be dialled automatically.  The handsfree 

function (speaker) is now activated and the LED indicator next to the 

button will be illuminated.

When the third party answers the call, you may speak with the 

telephone in the hands free mode ( handset in the cradle). Speak 

towards the microphone located on the front edge of the telephone.

To end the call, press      

Note:

 To deactivate the Hands Free function during a call, lift the 

handset. To activate the Hands Free function during the call, press  


and replace the handset on the cradle at the same time.

Also, when in hands free mode, only one person may talk at a time. 
The switch-over between speaker and microphone is automatic.  This is 
dependent on the sound level of the incoming call and the microphone 
respectively.  It is therefore essential that there are no loud noises, e.g. 
music, in the immediate vicinity of the telephone, as this will disrupt the 
hands free function.

Содержание AMPLIVOICE50

Страница 1: ......

Страница 2: ... Handset Volume Setting 16 Speaker Volume Setting 16 Tone Control Setting 16 Call Timer 17 Hearing Aid Use 17 CALLER DISPLAY 18 View Caller Display List 19 Dial a Number from the Caller Display List 19 Delete an Entry from the Caller Display List 20 Delete all Entries from the Caller Display List 20 Copying a Number to the Phone Book 20 PHONE BOOK 21 Create a Phone Book Entry 21 Store Change a Nam...

Страница 3: ...eries in a fire They may explode Check with local codes for possible special disposal instructions SAVE THESE INSTRUCTIONS Congratulations on purchasing your Geemarc AmpliVOICE50 telephone This is a multifunction telephone which offers features such as hands free use phone book caller display and voice announcing Its is important that you read the instructions below in order to use your Geemarc te...

Страница 4: ...4 DESCRIPTION 1 2 3 4 5 6 8 9 10 11 12 13 14 15 16 17 18 7 General Description ...

Страница 5: ...Scroll downwards 8 LED flashes when a new call has been received 9 Menu button 10 Phonebook Exit Caller ID 11 Recall 12 Mute 13 Redial Insert a pause 14 Handsfree 15 LED telephone is ringing 16 Earpiece amplifier button 17 LED receiver volume 18 Control knob for receiver volume hidden 19 Ringer volume slide control 20 Tone slide control 21 Speakerphone volume slide control 21 20 19 ...
Страница 6: ...tal of 4 calls which includes two new calls Menu Navigation To access settings press MENU To exit the menu press CID To skip back a level within the menu press DELETE The telephone will automatically return to standby mode from any menu if no button is pressed for 20 seconds Time and Date Battery Icon New Calls Received Calls Received Caller s Number Caller s Name ...

Страница 7: ...phone line socket and or mains power connection when the bat teries are being inserted or replaced Note Do not use rechargeable batteries Do not put batteries into the household rubbish pay attention to battery regulations regarding battery disposal Connect the line cord to the socket located at rear of telephone then con nect the plug into the wall socket Connect the power supply to the socket lo...
Страница 8: ...o save and use stored numbers in case of mains power failure Without mains or battery power the telephone can still be used to answer calls or to manually dial out calls but all the multifunction features will not be available If no batteries are inserted the battery icon will be displayed on the LCD display INSTALLATION ...

Страница 9: ... Drill a hole and insert a screw leav ing about 5 mm of the screw projecting from the wall Guide the mounting hole 4 in the mounting bracket 2 over the screw and slide the telephone downwards Caution Ensure there are no electrical lines water pipes etc in the wall where the hole is drilled 2 3 3 Turn the hook 5 in the receiver cradle so that the receiver can be placed on hook 5 5 5 5 INSTALLATION ...

Страница 10: ...elect the desired language Press DIAL to select Press CID to exit Screen Contrast Setting Your screen has a backlight which automatically switches off after 15 seconds of inactivity The contrast of the backlight against the text can be increased or decreased Press MENU Use or to select CONTRAST Press DIAL to select Use or to select the desired contrast setting 3 normal Press DIAL to select Press C...

Страница 11: ...ress MENU Use or to select TIME DATE Press DIAL to select The HOUR digit will flash Use or to select the correct hour Press DIAL to confirm The MINUTE digits will flash Use or to select the correct minute Press DIAL to confirm The MONTH digit will flash Use or to select the correct month Press DIAL to confirm The DAY digit will flash Use or to select the correct day Press DIAL to confirm Press CID...

Страница 12: ...all Waiting require a switch hook signal For example if you have Call Waiting you can put a call on hold and take a second incoming call on the same line by pressing CALL WAITING button Press CALL WAITING again to alternate the between the two call Note If you do not have any special phone services requiring a switch hook signal pressing CALL WAITING might disconnect the current call Dialling Mode...

Страница 13: ...he dialling tone dial the number on the keypad The number will be displayed on the LCD display To end the call simply replace the handset in the cradle Pre dialling If VOICE is activated once you press the number keys 0 9 you will hear the number being dialled Key in the required number without lifting the handset Use DELETE if necessary to cancel and correct a wrong digit Lift the handset OR pres...

Страница 14: ...k towards the microphone located on the front edge of the telephone To end the call press Note To deactivate the Hands Free function during a call lift the handset To activate the Hands Free function during the call press and replace the handset on the cradle at the same time Also when in hands free mode only one person may talk at a time The switch over between speaker and microphone is automatic...

Страница 15: ...ok If the VOICE setting is ON and the caller can be identified and a voice recording is associated with the incoming call the voice recording will be heard three times followed by the ringer as standard Refer to Phonebook chapter Create a Phonebook Entry to find out more about voice recording Lift the handset and speak To end the call simply replace the handset in the cradle Last Number Redial Lif...

Страница 16: ...he 40dB button should be pressed to allow extra amplification when pressed the handset volume LED will light up Note Setting the receiver volume to maximum may under certain circumstances cause ear damage Therefore it is recommend that you reset the volume to 0 after each call Speaker Volume Setting During a call in handsfree mode you can adjust the speaker volume to a desirable level Simply use t...

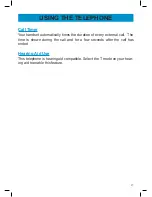
Страница 17: ... duration of every external call The time is shown during the call and for a few seconds after the call has ended Hearing Aid Use This telephone is hearing aid compatible Select the T mode on your hear ing aid to enable this feature USING THE TELEPHONE ...

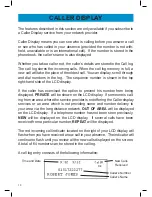
Страница 18: ...xercised the option to prevent his number from being displayed PRIVATE will be shown on the LCD display If someone is call ing from an area where the service provider is not offering the Caller display services or an area which is not providing name and number delivery to your area via the long distance network OUT OF AREA will be displayed on the LCD display If a telephone number has not been see...

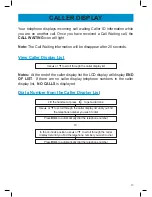
Страница 19: ... display will display END OF LIST If there are no caller display telephone numbers in the caller display list NO CALLS is displayed Dial a Number from the Caller Display List Lift the handset or press to get a dial tone Use or to scroll through the caller display list until you find the telephone number you wish to dial Press DIAL to automatically dial the telephone number Or In the on hook positi...

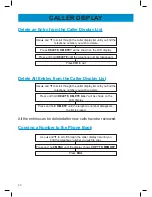
Страница 20: ... Display List Use and to scroll through the caller display list until you find the telephone number you wish to delete Press and hold DELETE DELETE ALL will be shown on the LCD display Press and hold DELETE until the telephone number disappears the list is erased All the entries can be deleted after new calls have be reviewed Copying a Number to the Phone Book Use and to scroll through the caller ...

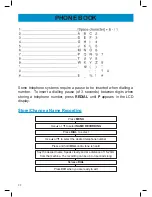
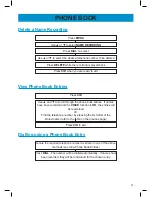
Страница 21: ...rrect a wrong digit When the number is correct press DIAL to confirm Enter the name select the desired letter by pressing the corresponding key one or more times see table below When the name is correct press DIAL to store the new entry in the phone book SAVED will be displayed folllowed by NAME RECORDING If you wish the name to be read aloud with its associated number you must take the following ...

Страница 22: ...L until P appears in the LCD display Store Change a Name Recording Press MENU Use or to select NAME RECORDING Press DIAL to select Use or to select the desired telephone number Press and hold DIAL until a tone is heard Say the desired name Speak clearly and at a distance of 15 20cm from the machine The recording can be up to 3 seconds long Release DIAL Press CID when you are ready to exit ...

Страница 23: ...book entries If names have been recorded and the VOICE function is ON the entries will be read aloud Or Find the telephone number by pressing the first letter of the stored name refer to the table on the previous page Press CID to exit Dialling using a Phone Book Entry Locate the required telephone number as shown in one of the above methods see View Phone Book Entries Press DIAL The number will b...

Страница 24: ... Press DIAL Press DELETE to modify the name and insert the new letters Use or to move to the required letter Press DIAL SAVED will be displayed Note Remember that any name recordings will be deleted and must be re recorded after the number name has been modified Delete a Phone Book Entry Locate the required telephone number as shown in one of the above methods see View Phone Book Entries Press DEL...

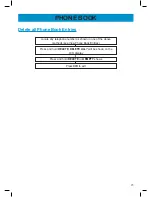
Страница 25: ...ies Locate any telephone number as shown in one of the above methods see View Phone Book Entries Press and hold DELETE DELETE ALL will be shown on the LCD display Press and hold DELETE until EMPTY shows Press CID to exit PHONE BOOK ...

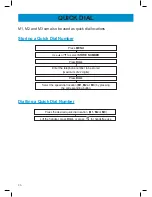
Страница 26: ... select STORE NUMBER Press DIAL Enter the telephone number to be stored maximum of 22 digits Press DIAL Select the speed dial location M1 M2 or M3 by pressing the corresponding button Dialling a Quick Dial Number Press the desired quick dial location M1 M2 or M3 Lift the handset press DIAL or press for handsfree use ...

Страница 27: ...r socket to track if the failure is coming from your telephone or your PTT socket There may be too many communication devices connected to a single telephone line e g another telephone modem or facsimile machine Contact your network provider for help in calculating the limit for your home or business line No number is displayed when the telephone rings Please contact your telephone network provide...

Страница 28: ...hey could damage the finish or the electrics inside Environmental Do not expose to direct sunlight Always ensure there is a free flow of air over the surfaces of the tele phone Do not place any part of your product in water and do not use it in damp or humid conditions e g bathrooms Do not expose your product to fire or other hazardous conditions Unplug your phone from the telephone socket during ...

Страница 29: ...l devices connected to one line should not exceed five 5 0 To be certain of the number of devices you may connect to your line as determined by the REN you should contact your local telephone company to determine the maximum REN for your calling area If this equipment causes harm to the telephone network the telephone company will notify you in advance that temporary discontinuance of service may ...

Страница 30: ... equipment and receiver Connect the equipment into an outlet on a circuit different from that to which the receiver is connected Consult the dealer or an experienced radio TV technician for help If trouble is experienced with this equipment for repair or warranty infor mation please contact our customer service staff at 248 577 5400 If the equipment is causing harm to the telephone network the tel...

Страница 31: ...gligence or breakage to any parts This includes shipping damage failure to follow instructions misuse fire floods use of incompatible accessories Acts of God or failure in your phone service carrier s line service The product must not be tampered with or taken apart by anyone who is not an authorized SonicAlert representative Tampering with the phone will void ant written or implied warranties Son...

Отзывы: