background image


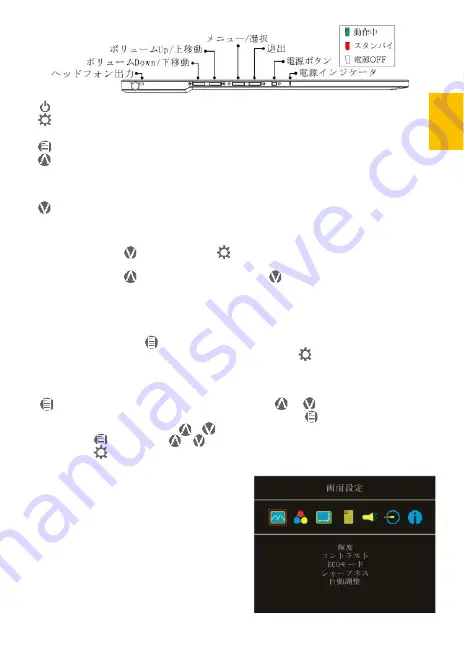
ホットキーの説明


電源ボタン:モニタの

On/Off

に使用します。 


退出/自動設定ボタン:

OSD

メニューの操作時にこのボタンで一つ前のページに戻る

ことができます。 


メニュー/セレクトボタン:このボタンで

OSD

メニューを呼び出すことができます。


ボリューム

Up/

上移動ボタン:

OSD

メニューが表示されていないときはこのボタン

でスピーカのボリュームを上げることができます。押し続けることで連続的にボ

リューム操作ができます。

OSD

メニューが表示されているときはカーソルを上/左移動

するために使用します。


ボリューム

Down/

下移動ボタン:

OSD

メニューが表示されていないときはこのボタ

ンでスピーカのボリュームを下げることができます。押し続けることで連続的にボ

リューム操作ができます。

OSD

メニューが表示されているときはカーソルを下/右移動

するために使用します。


「音量を下げる/下      」ボタンと「終了


」ボタンを同時に押すと、モニタの各設定

を工場出荷時の設定値に戻すことができます。


「音量を上げる/上     」ボタンと「音量を下げる/下      」ボタンを同時に押すと、
ミュートモードになり、もう一度押すと、ミュートモードを解除できます。


その

2. OSD

の解説


On-Lap

モニタの最初の起動時、右上に「

Language Select

(言語選択)」メニューが表示さ

れます。「メニュー/選択      」ボタンを押して使用言語を選択してください。次の起動時か

Language Select

」項目は表示されません。選択せずに「終了     」を押して


Language Select

」メニューを消すこともできますが、次回起動時にまた表示されます。


1.


ボタンによる基本的操作の説明 


ボタンを押すと、

OSD

メニューが表示されます。      ・       を押して、メュー内容の

表示を上下に移動させます。調整機能を作動させたい場合は      を押します。選択した機
能にサブメニューがある場合は      ・      を押すと表示されます。調整したい機能を選択
するときは        を押します。     ・      を押して選択した機能の設定を変更します。終了
するときは         を押すと自動的に終了します。その他の機能を調整するときは上述のス
テップを繰り返して下さい。 


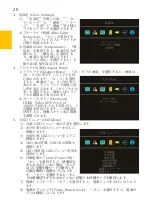
2.


画面設定(

Display Settings) 

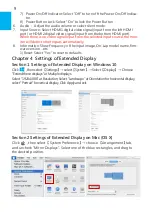
図のように、

ディスプレイ設定

を開い

た後、

輝度

コントラスト

シャープネス

が調整できます。


1)


省電力モード(

ECO Mode)

:省電力モー

ドを起動すると、明るさが最大

50

まで

に制限されます。


2)


自動調整(

Auto Adjust)

:「自動アスペク

ト比調整」「自動明るさ調整」を起動す
ると、モニタに連続して動画を再生する
際に、自動でアスペクト比、明るさを調
整し、鑑賞画質を向上させます。


19 


Содержание On-Lap 1305H

Страница 1: ...Manual of 1305 Read Me Before Usage Operating Video...

Страница 2: ...ection 3 Store the Monitor in the Protective Cover 5 Section 4 Connect to Headphone or Speaker 5 Chapter 3 Hot Keys LED and OSD Instructions 6 Section 1 Hot Keys LED Indications 6 Section 2 OSD Descri...

Страница 3: ...V WEEE V 13 1 13 2 14 14 1 14 2 16 3 17 4 17 LED OSD 18 1 LED OSD 18 2 OSD 19 21 1 Windows 10 21 2 Mac OS X 21 22 1 22 2 23 3 23 24...

Страница 4: ...uckle of protec tive cover away from your desktop when the PC is in sleep mode or boost ing 5 Cleaning On Lap Monitor Unplug the power input before cleaning Please use soft cloth to clean touch screen...

Страница 5: ...caused by hitting or cracking monitor accidentally or purposely or collapsing or overturning monitor II LCD Pixel Statement There is slightly uneven brightness on the screen when displaying different...

Страница 6: ...the emission limits 3 The manufacturer is not responsible for any radio or TV interference caused by unauthorized modification to this equipment It is the responsibilities of the user to correct such...

Страница 7: ...point for the recycling of waste electrical and electronic equipment For more information about where you can drop off your waste equipment for recycling please contact your local city office your ho...

Страница 8: ...ter 1 Parts of On Lap Product Accessories Section 1 Parts Description Fig Part description of 1305 Cover Stand Fig 1305 Buttons LED Lights Audio Jack Description Fig On Lap 1305 Monitor Connection Por...

Страница 9: ...tions Section 1 Installation of Horizontal Display The min viewing angle of horizontal display is 40 degrees Do not attach the magnetic buckle higher than the blue line otherwise it may cause the moni...

Страница 10: ...e monitor into the Protective Cover Rotate down the Cover Locks to prevent the monitor from sliding out P S If the monitor does not get enough power from a single USB port it may cause splash screen o...

Страница 11: ...firstly and take out the monitor then trun the monitor s back side to the Protective Cover Do keep the but tons on the topside 1 Put the bottom half of the monitor into the Protective Cover 2 Put the...

Страница 12: ...cause the scratches and the Cover Locks cannot be locked on Section 4 Connect to Headphone or Speaker On Lap 1305 s audio jack supports both analog audio and digital audio optical outputs When your d...

Страница 13: ...ed to adjust Increase up or Decrease down continuously press the button and don t release Do not press two buttons at the same time or it may cause no response or fault response LED Light Description...

Страница 14: ...de Section 2 OSD Description When turning on On Lap monitor at the first time the Language Select menu appears on the left top Please press Menu Select button to choose the language you like then the...

Страница 15: ...black borders to fill the 16 9 screen When select Original the monitor displays the image in its origi nal size 2 Overscan only available when inputing HDMI video signal ex 1080P 720P Enabling this f...

Страница 16: ...ror Displays Select one of the blue rectangles and drag to the desired position 7 Power On Off Indicator Select Off to turn off the Power On Off Indica tor 8 Power Button Lock Select On to lock the Po...

Страница 17: ...78 H 178 V CR 10 Response Time 12 5 ms Typ Video Input HDMI 2 Audio Output Earphone Jack HDCP Support Yes HDCP CEC Support Yes Plug and Play VESA DDC2B C1 Power Consumption 8W Power Consumption Standb...

Страница 18: ...0 60 000 1280x768 60Hz 47 776 59 870 1280x800 60Hz 49 702 59 810 1280x960 60Hz 60 000 60 000 1280x1024 60Hz 63 981 60 020 1360x768 60Hz 47 712 60 015 1366x768 60Hz 47 712 59 790 1360x1024 60Hz 63 606...

Страница 19: ...se use headphone for audio output 3 Please check volume settings whether Mute has been turned on or not 4 Theearphonejackonlyoutputsthroughaheadphone AudioJackcan tbeconnectedtothelaptopasaudiooutput...

Страница 20: ...1 2 USB USB USB 3 On Lap 5V 2A DC 5V PC USB x2 5V 2A AC 4 On Lap PC PC 5 6 7 8...

Страница 21: ...IV 9 10 30 10 2 2 1 11 1 2 3 4 5V 5 6...

Страница 22: ...99 99 0 01 WEEE Rear Dock EU EU V...

Страница 23: ...1 On Lap 1305 On Lap 1305 LED On Lap 1305 13...

Страница 24: ...On Lap1305 HDMI A USB A 1 2m 1 USB A to USB A 1 2m 1 AC 5V Max 2A 1 1 2 1 2 1 40 14...

Страница 25: ...Cover Lock 1 2 Cover Lock On Lap1305 PC PC USB AC USB A to USB A PS PC USB 1 USB AC 15...

Страница 26: ...60 16 2 Cover Lock 1 2 Cover Lock On Lap1305 PC PC USB AC...

Страница 27: ...Cover Lock 4 On Lap1305 Headphone Out PC DVD HDMI On Lap1305 5 1 On Lap1305 Headphone Out 3 17 USB A to USB A PS PC USB 1 USB AC...

Страница 28: ...LED OSD 1 LED LED On Lap OFF 18...

Страница 29: ...On Off OSD OSD Up OSD OSD Down OSD OSD 2 OSD On Lap Language Select Language Select Language Select 1 OSD 2 Display Settings 1 ECO Mode 50 2 Auto Adjust 19...

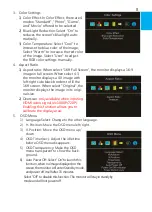
Страница 30: ...Blue Light Reduction 3 Color Temperature RGB 4 Aspect Ratio 1 Aspect Ratio 16 9 16 9 4 3 4 3 2 Overscan HDMI Video 1080P 720P 5 OSD OSD Menu 1 OSD 2 OSD 3 OSD 4 OSD OSD 5 OSD OSD 6 Auto Power Off 15 7...

Страница 31: ...21 6 0 7 Input Source HDMI 1 HDMI HDMI 2 HDMI 8 Information On Lap Reset 1 Windows10 1920x1080 2 Mac OS X...

Страница 32: ...n Lap1305H 13 3 16 9 1920x1080 1677 300 cd m Typ 1000 1 Typ 178 H 178 V CR 10 12 5 ms Typ HDMI 2 HDCP HDCP CEC VESA DDC2B C1 8W 0 5W Off 0 5W 5V 1 6A 0 50 20 60 W H T 320mm 203mm 9mm 325mm 214mm 15 4m...

Страница 33: ...810 1280x960 60Hz 60 000 60 000 1280x1024 60Hz 63 981 60 020 1360x768 60Hz 47 712 60 015 1366x768 60Hz 47 712 59 790 1360x1024 60Hz 63 606 59 836 1400x1050 60Hz 65 317 59 978 1440x900 60Hz 55 935 59 8...

Страница 34: ...No Signal 1 2 HDMI On Lap HDMI 1 2 AC 3 1 2 On Lap 1305 3 0 4 PC PC Out of Range Out of Range On Lap HDMI 24...

Страница 35: ...GeChic Corporation 5F 3 No 138 Zhongming S Rd West Dist Taichung Taiwan R O C Customer Service service gechic com Rev 2017 11 24 www gechic com...

Страница 36: ...1 http www gechic com http www tekwind co jp products GEC category php On Lap1305H No...

Отзывы: