

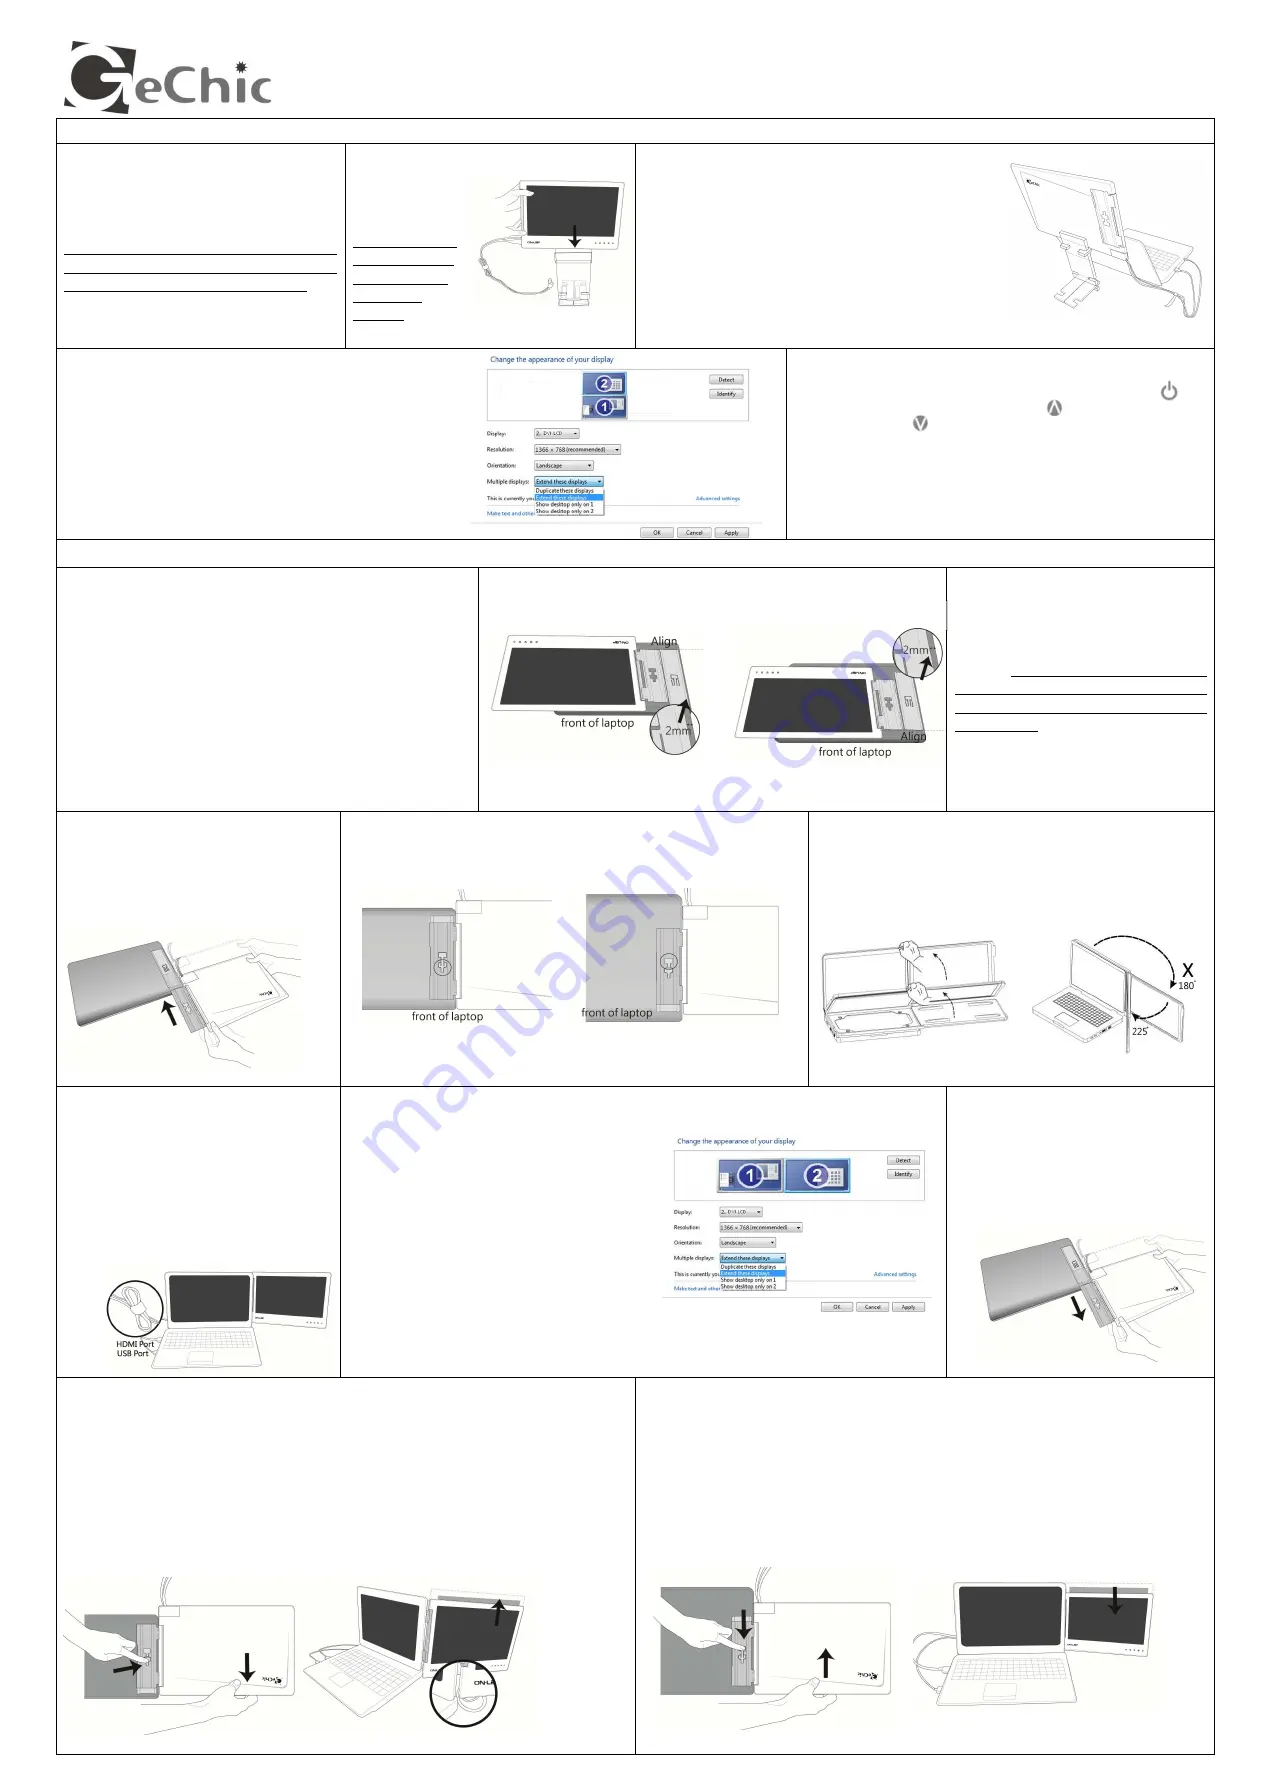
Installation Instructions - Upward Extension Display
1
Install the video and USB power
cable
Insert the video power connector into the
video power port of the On-Lap Monitor.
The left side of the video power connector
should be aligned with the edge of the
On-Lap Monitor without sticking out. The
connector is not properly connected if it is
sticking out, and the Monitor cannot be
used. Refer to Fig. 1-1 "Horizontal Display"
2
Install Stand Bricks
Place the On-Lap
Monitor on
Stand Bricks II.
Note: Center the
On-Lap Monitor
for close fitting
with Stand
Bricks II.
3
Connect the On-Lap to the laptop
Place the laptop in front of the On-Lap Monitor and
align the upper side of the laptop to the lower display
edge of the On-Lap Monitor. Connect the USB power
connector to the laptop's USB port, and then connect
the digital video connector to the laptop's HDMI video
output port (If analog video and USB power cable is
used, connect the analog video connector to the
laptop's D-sub port).
4
Make the laptop and monitor extension setting
After switching on the laptop, go to Windows’ “Control Panel” to
make the monitor extension setting.
If you are using Windows 7:
Select “2.DVI LCD” (digital video) or
“2. display device: VGA” (analog video) for
Display
.
Select “1366x768” for
Resolution
Select "Landscape" for
Orientation
Select "Extend these displays" for
Multiple displays
, and drag
Display 2 to the top side of Display 1.
5
Switch on the laptop
Switch on the laptop’s monitor and press the power button
of
the On-Lap; Adjust the brightness: press
to make the monitor
brighter and press
to make the monitor dimmer
Installation Instructions- Dual Monitor Display
1
Install the Holder Plate to the back cover of the
laptop’s monitor
[Note: This mode may not be suitable for laptop size smaller than
13" and ultra-thin laptop.]
Open the shaft’s Hinge Plate of the On-Lap Monitor to 180° and
places the On-Lap Monitor on the laptop's back cover. Tear off the
double-sided adhesive tape on the Holder Plate and attach the
Holder Plate to the laptop, as illustrated. Note:
1) Keep the Holder Plate 2mm from the edge of the laptop
2) Align the On-Lap Monitor to the front edge of the laptop's back cover.
3) Keep the direction of the Holder Plate the same as that of the shaft’s
Hinge Plate
4) If the laptop’s back cover is not smooth, use more double-sided
adhesive tape on the Holder Plate as required, before installation.
1-1
Mounting the Holder Plate
[Note: Do not reverse the direction of the Holder Plate as this will reverse the
direction of the On-Lap Monitor after installation.]
2
Install the video and USB
power cable
Insert the video power connector into
the video power port of the On-Lap
Monitor. The left side of the video power
connector should be aligned with the
edge of the On-Lap Monitor without
sticking out. The connector is not
properly connected if it is sticking out,
and the Monitor cannot be used. Refer
to Fig. 1-1 "Horizontal Display"
3
Install the On-Lap to the laptop’s
back cover
As illustrated, align the shaft’s Hinge plate
of the On-Lap to the Holder Plate, to slide
the shaft’s Hinge plate into the Holder
Plate.
3-1
3-2
Rotate the On-Lap Monitor clockwise so that it is parallel to the
laptop; open the laptop monitor and the On-Lap Monitor at the
same time, as illustrated. Adjust the angle of the On-Lap
Monitor. A recommended angle is between 180° and 225°
3-3
Connect the On-Lap to the
laptop
As illustrated, connect the USB power
connector to the laptop's USB port, and
then connect the digital video connector to
the laptop's HDMI video output port [If
analog video and USB power cable is used,
connect the analog video connector to the
laptop's D-sub port]. Tidy the redundant
cables with cable clips.
4
Start the laptop and monitor extension setting
After switching on the laptop, go to “Control
Panel” of Windows operating system to proceed
with monitor extension setting.
If you use Windows 7,
Select “2.DVI LCD” (digital video) or “2. display
device: VGA” (analog video) for
Display
Select “1366x768” for
Resolution
Select "Landscape" for
Orientation
Select "Extend these displays" for
Multiple
displays
, and drag Display 2 to the right side of
Display 1.
5
Remove the On-Lap from the
laptop
As illustrated, align the shaft’s Hinge
Plate of the On-Lap Monitor with the
Holder Plate, and slide the shaft’s Hinge
Plate into the Holder Plate.
5-1
Adjust the height of the On-Lap on the laptop’s back cover ( laptop is
smaller than the monitor)
As illustrated, move the On-Lap Monitor upward from the laptop’s back cover, press down
on the positioning clip at the first positioning hole, and move the On-Lap Monitor until the
positioning clip pops up from the second positioning hole.
Fig.: Moving the positioning clip from the first positioning hole to the second
positioning hole. After On-Lap Monitor moves up, it is no longer fixed to the bottom of the
laptop, and the laptop’s monitor can be tilted backward.
[Note: If your laptop is smaller than On-Lap Monitor, the cable may get stuck when flipping
the Monitor (see lower right figure).]
5-2
Adjust the height of the On-Lap on the laptop’s back cover ( laptop is
larger than the monitor)
As illustrated, move the On-Lap Monitor downward from the laptop’s back cover, press
down on the positioning clip at the second positioning hole, and move the On-Lap Monitor
until the positioning clip pops up from the first positioning hole.
Fig.: Moving the positioning clip from the second positioning hole to the first
positioning hole. After the On-Lap Monitor moves down, the viewable area of the
On-Lap Monitor is close to that of a 15.6” laptop monitor.
If the laptop smaller than the On-Lap
If the laptop larger than the On-Lap
If the laptop larger than the On-Lap
If the laptop smaller than the On-Lap
Fig.: Make the positioning clip wedge
to the second positioning hole (when
the laptop is larger than the On-Lap
Monitor)
Fig.: Make the positioning clip wedge
to the first positioning hole (when the
laptop is smaller than the On-Lap
Monitor)
On-Lap
1302
Quick Installation Guide


