

On-Lap Monitor Description
Application Supported
If the user's digital camera, video player,
smart phone or electronic game player and
other products can support the digital video
output (DVI or HDMI output), such 3C
products can be used along with the On-Lap.
Note: The actual effect is relevant to the
video signal output format and the mode of
operation of the information product, not all
products can be played in full-screen on the
On-Lap.
IMPORTANT
※
Keep the laptop away from the table edge
to prevent it from falling off the table if it
topples.
※
Keep the laptop away from the table edge
to prevent it from falling off the table if it
topples
.
※
The cable may be damaged if you pull it
out by force.
※
Please push forward the protruding part
between the video and power cable
connector and
the back cover
of the monitor
to get out the
connector by
fingertip.
※
Use the laptop and monitor on a level table. If the table is not level, the laptop and monitor may topple; if the monitor is rotated to a position behind the laptop monitor, it may cause
the laptop to fall backwards. Turning the On-Lap Monitor to an angle between 0° and 180° is not recommended.
※
Do not install On-Lap Monitor on moving parts, such as window of a vehicle; the monitor may fall off in moving, causing damage to human bodies.
※
Do not install On-Lap Monitor on walls, doors, signage, bathrooms, ceilings and other dangerous places, and do not fall off the On-Lap Monitor in installation to
prevent it from injuring
human bodies
.
※
Do not flip open the On-Lap Monitor to a horizontal position first, and avoid knocking against objects on the table in opening your laptop.
※
Place the monitor to a bag with protective function in carrying, and avoid knocking against objects in the bag to prevent damaging the screen.
※
On-Lap 1302 only reads the DVI digital video signal, but does not support the full HDMI interface, and it does not have speakers, so On-Lap 1302 cannot make a sound.
※
The Product is not waterproof. Do not use the Product at or near a place with water.
※
Do not insert any object into the Product’s slots or gaps.
※
The shortcut keys are the capacitive sensing buttons, which is sensitive by gentle touching. Do not press hard or press fast and continuously. Repeatedly pressing the button will make
the button slow in response. For continuous adjustment of "Increase/Up" or "Decrease/Down", press and hold the corresponding button for automatic and continuous Increase
/Decrease.
※
Please visit www.gechic.com for downloading the On-Lap Monitor user manual, or getting more fun with dual-screen laptop. Customer Service:
Installation Instructions - Horizontal Display
1
Install the Digital video and USB
power cable
Insert the video power connector into the
video power port of On-Lap. The left side of
the video power connector should be
aligned at the edge of the On-Lap without
any prominent part if well inserted. The
connector is not at the suitable place if
there is any prominent part, indicating that
the monitor cannot be used.
1-1
Insert the latch into the groove of
the video power connector of the On-Lap
2
Install Stand Bricks
Buckle the narrow opening [9 mm wide] of
the Stand Brick to the left and right sides of
the On-Lap. Please be careful not to oppress
the cable. Adjust the position of the Stand
Brick along the edge of the On-Lap to
change the angle between the monitor and
the desktop.
3
Connect the On-Lap to the laptop
Connect the USB power connector to the
laptop's USB port, and then connect the
digital video connector to the laptop's HDMI
video output port
4
Make the laptop and monitor extension setting
After switching on the laptop, go to
“Control Panel” of Windows operating
system to proceed with monitor
extension setting.
If you use Windows 7,
Select “2.DVI LCD” (digital video) or
“2. display device: VGA” (analog video)
for
Display.
Select “1366x768” for
Resolution
Select "Landscape" for
Orientation
Select "Extend these displays" for
Multiple displays
, and drag Display 2 to
the right side of Display 1.
5
Switch on the laptop
Switch on the laptop’s monitor and press the
power button
of the On-Lap;
Adjust the brightness: press
to make the
monitor brighter and press
to make the
monitor dimmer.
※
※
※
※
Note: The unavailability of “Duplicate these
displays” or “Extend these displays” on the laptop
may be limited by the graphics chip of the laptop or
have the graphics chip features limited due to the
power saving mode of the laptop or have the
graphics chip driver updated. It is recommended to
ask for laptop manufacturer or graphics chip
manufacturer for technical support.
Installation Instructions – Vertical Display
1
Install the video and USB power
cable
Insert the video power connector into the
video power port of On-Lap. The left side of
the video power connector should be
aligned at the edge of the On-Lap without
any prominent part if well inserted. The
connector is not properly connected if it is
sticking out, and the Monitor cannot be
used. Refer to Fig. 1-1 "Horizontal Display"
2
Install Stand Bricks
Buckle the narrow
opening [9 mm wide] of
Stand Bricks to the left
and right sides of On-Lap
Monitor. Be careful not to
squeeze the cable. Adjust
the position of the Stand
Bricks along the edge of the On-Lap
Monitor to change the angle
between the Monitor and the table.
3
Connect the On-Lap to the laptop
Connect the USB power connector to the laptop's USB port, and then
connect the digital video connector to the laptop's HDMI video
output port.
Note: Viewing On-Lap
Monitor from the left side is
better
,
, ,
,
viewing is poorer
from the right side
4
Make the laptop and monitor extension setting
After switching on the laptop, go to Windows’ “Control Panel”
to make the monitor extension setting.
If you are using Windows 7:
Select “2.DVI LCD” (digital video) or
“2. display device: VGA” (analog video) for
Display
Select “1366x768” for
Resolution
Select "Portrait (flipped)" for
Orientation
Select "Extend these displays" for
Multiple displays
, and drag
Display 2 to the right side of Display 1.
5
Switch on the laptop
Switch on the laptop’s monitor and press the power button
of the
On-Lap; Adjust the brightness: press
to make the monitor
brighter and press
to make the monitor dimmer
※
※
※
※
Note: The unavailability of “ Portrait (flipped) ” on the laptop may be
limited by the graphics chip of the laptop or have the graphics chip features
limited due to the power saving mode of the laptop or have the graphics
chip driver updated. It is recommended to ask for laptop manufacturer or
graphics chip manufacturer for technical support.
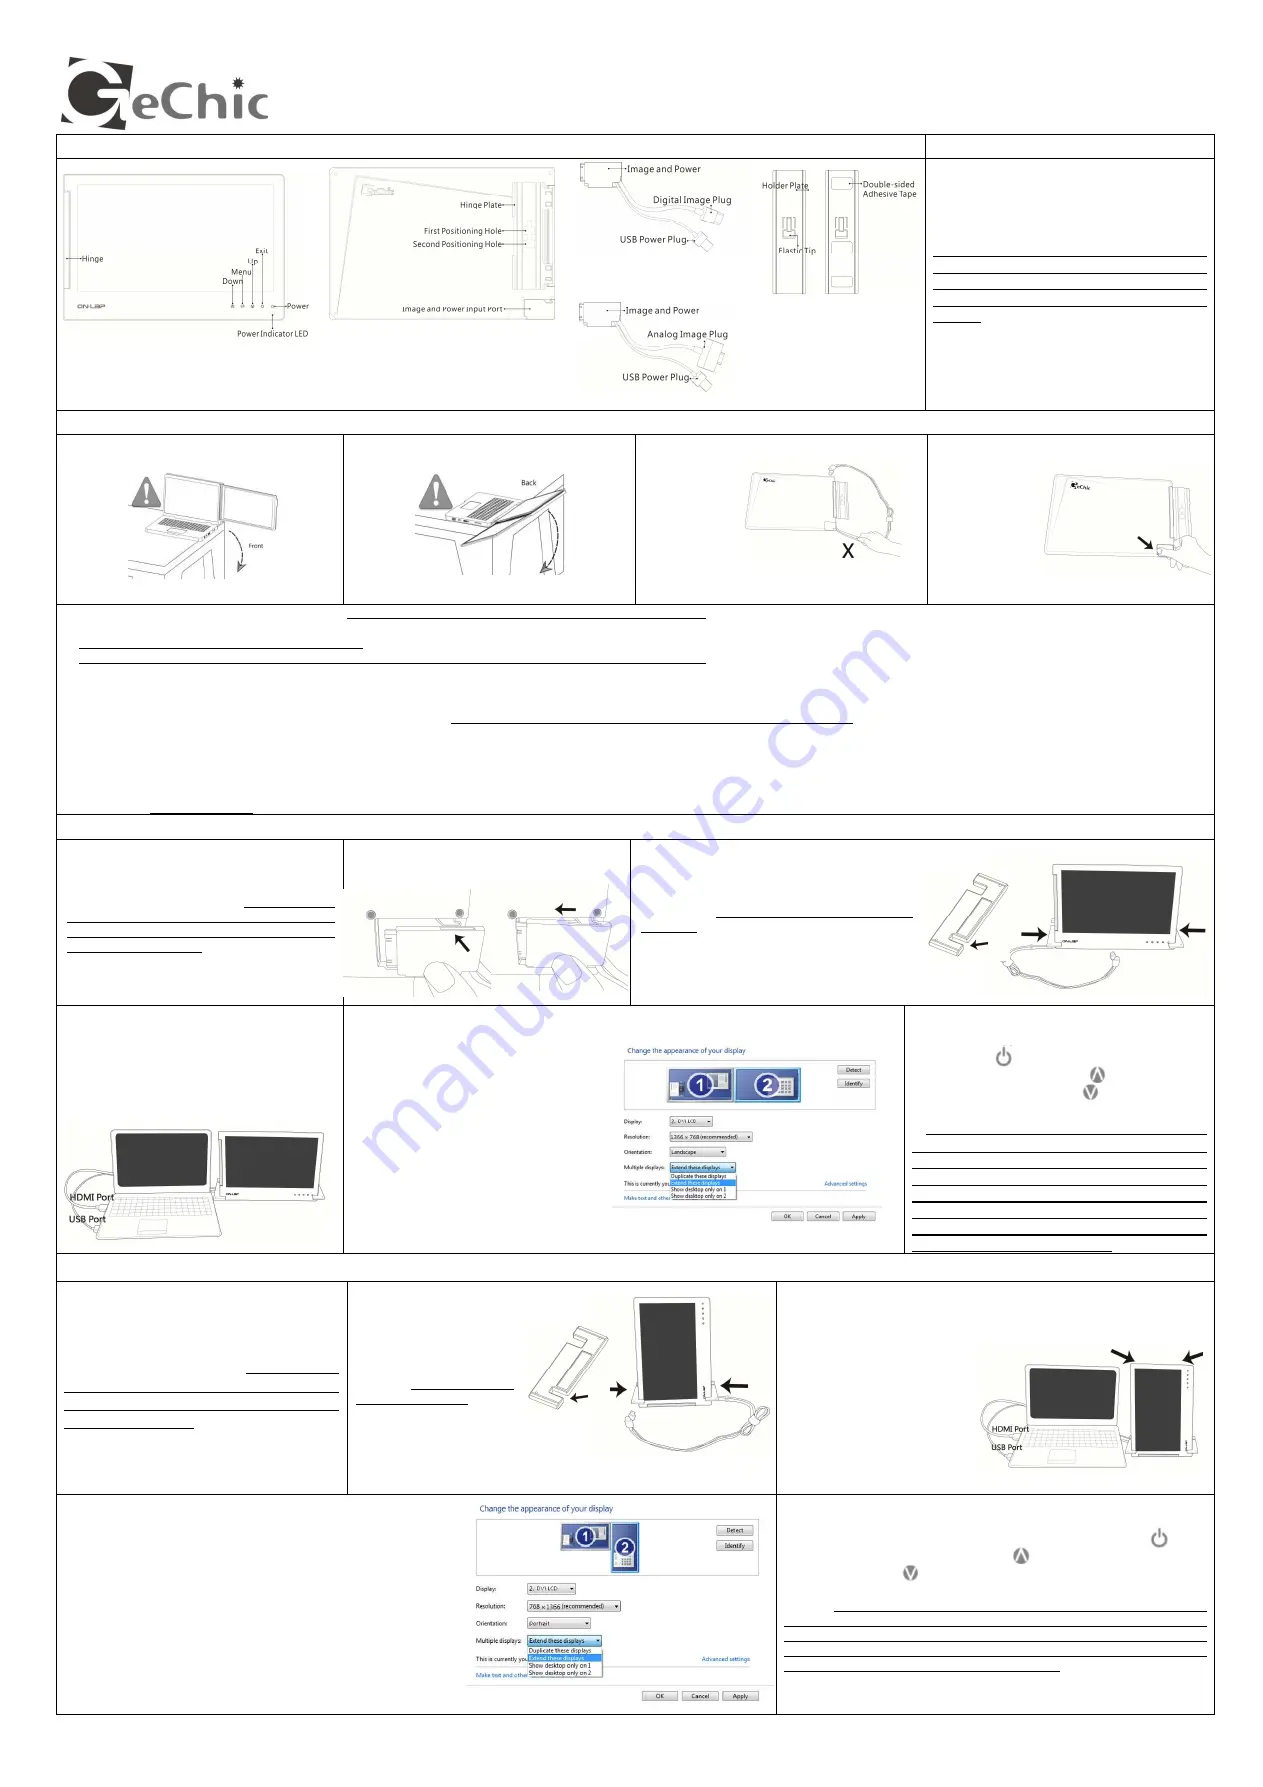
On-Lap
1302
Quick Installation Guide
Front Back
Holder Plate
Figure: Front Parts Description of
On-Lap1302
Figure: Back Parts Description of
On-Lap1302
Figure: Digital Video and USB
power cable
Figure: Analog Video and
USB power cable


