background image

Section 6 Install On

-

Lap Proprietary HDMI

-

A & USB

-

A to 

Dock Port Cable(Optional)


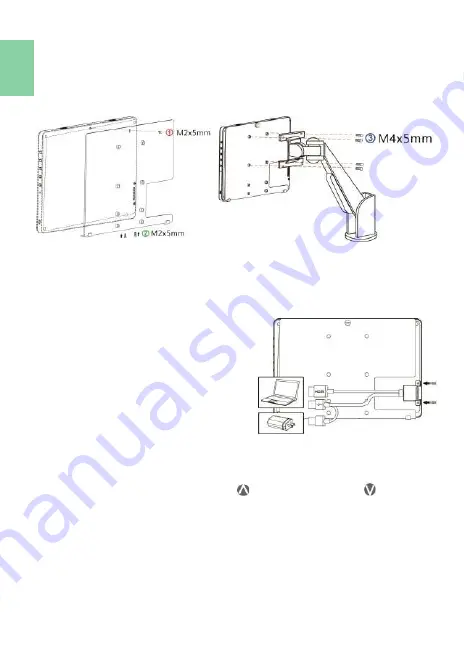
In the Fig. shown, remove the rubber bung at the rear of the monitor firstly. 
Insert "On

-

Lap Proprietary HDMI

-

A & USB

-

A to Dock Port Cable" to the rear port of 

1102, and then screw it up. Plug in USB

-

connector to computer's USB port; HDMI

-

A connector to computer's HDMI port. 
Please press the menu button of the mon-
itor to enter OSD menu and choose 
"HDMI 2" as "Input Source."


Chapter 3 Hot Keys, LED and OSD Instructions 


Section 1  Hot Keys & LED Indications


Notice: If need to adjust “Increase/up      ” or “Decrease/down      ” 


continuously , press the button and don't release. Do not press two 
buttons at the same time, or it may cause no response or fault response.


LED Light Description

:  

LED Light: It shows 

green

 light when turning on On

-

Lap Monitor and  shows 

Orange


light when stand by. There is no light when the monitor is off.


6


Section 5 Mount On

-

Lap 1102I to VESA 75 Monitor Arm or 

Wall Mount (With 1102 Multi Mount Kit)(Optional)


As the fig., firstly use three M2x5mm screws to fix the monitor to the Moni-
tor Bracket. Then use four M4x5mm screws to fix the Monitor Bracket to the 
arm. 


Содержание 1102I

Страница 1: ...ユーザーガイド On Lap 1102I ...

Страница 2: ...t with 1102 Multi Mount Kit Optional 5 Section 5 Mount On Lap 1102 to VESA 75 Monitor Arm or Wall Mount with 1102 Multi Mount Kit Optional 6 Section 6 Install On Lap Proprietary HDMI A USB A to Dock Port Cable Optional 6 Chapter 3 Hot Keys LED and OSD Instructions 6 Section 1 Hot Keys LED Indications 6 Section 2 OSD Description 7 Chapter 4 Settings of Extended Display 9 Section 1 Settings of Exten...

Страница 3: ... V V 13 1 13 2 14 15 1 15 2 16 3 1102I T1S2 16 4 1102 17 5 1102 On Lap 1102 VESA75 18 6 HDMI A USB A Dock 18 LED OSD 18 1 LED OSD 18 2 2 OSD 19 21 1 Windows 10 21 21 1 21 2 Windows 10 7 21 22 1 22 2 23 3 23 23 ...

Страница 4: ...n Do not use benzene alcohol thinner am monia abrasive cleaners compressed air or other corrosive solvents These solvents may cause permanent damage on the screen or leave unremova ble stain 6 Please do not place the monitor on a shaky or unstable table cupboard or trolley and do not use the On Lap Monitor on a moving vehicle The Product may be severely damaged from overturning or falling 7 The pr...

Страница 5: ...is recovered slowly by turning off the power for a few hours Federal Communications Commission FCC Class B Statement Notice This equipment has been tested and found to comply with the limits for a class B digital device pursuant to part 15B of the FCC Rules These limits are designed to provide reasonable protection against harmful interference in a residential installation If this equipment does c...

Страница 6: ...rganization on ISO9000 level WEEE Symbol Information This symbol on the product accessories or literature indicates that this prod uct and its electronic accessories e g adapter cables and Rear Dock must not be disposed of with your other household waste Instead it is your re sponsibility to dispose of these items by handing it over to a designated collection point for the recycling of waste elect...

Страница 7: ...Chapter 1 Parts of On Lap Product Accessories Section 1 Parts Description 1 ...

Страница 8: ...tor Mini HDMI to Micro HDMI Video Cable 2 1m One plug is mini HDMI male for camera s mini HDMI port the other plug is Micro HDM male connecting to On Lap monitor Micro HDMI to Micro HDMI Video Cable 1 2m One plug is Micro HDMI male for camera s Micro HDMI port the other plug is Micro HDMI male for connecting to On Lap monitor On Lap proprietary HDMI A USB A to dock port cable 2m Proprietary cable ...

Страница 9: ...e fig below rotate aside the Cover Locks firstly and take the monitor out Then turn the monitor s backside to the Protective Cover Put the bottom half of the monitor into the Protective Cover and Put the top half of the monitor into the Protective Cover Rotate down the Cover Locks to prevent the monitor from sliding out As the fig connect On Lap 1102 to a laptop On Lap 1102 can be pow ered on thro...

Страница 10: ...kside outward Please also rotate down the Cover Lock to prevent the monitor from sliding out Warning Please keep the Rear Dock Port downward in the Protective Cover If the monitor is put upside down in the Protective Cover it may cause the scratches and the Cover Locks cannot be locked on Section 3 Install 1102I Monitor on T1S2 Stand Optional As shown in the Fig screw the monitor to the VESA brack...

Страница 11: ...ting the viewing angle of 75 62 42 or 25 use two M4x5mm screws to fix Bracing Plate to the Monitor Bracket Notice When M505 1503 1102 monitor is displayed vertically the center line of the monitor isn t on the pivot of T1S2 stand When rotating 1102I to portrait mode please tilt the monitor to 180 de gree rotate it to vertical mode and tilt back to the viewing angle 5 ...

Страница 12: ...D and OSD Instructions Section 1 Hot Keys LED Indications Notice If need to adjust Increase up or Decrease down continuously press the button and don t release Do not press two buttons at the same time or it may cause no response or fault response LED Light Description LED Light It shows green light when turning on On Lap Monitor and shows Orange light when stand by There is no light when the moni...

Страница 13: ...e reset as the factory settings Section 2 OSD Description When turning on On Lap monitor at the first time the Language Select menu appears on the left top Please press Menu Select button to choose the language you like then the Language Select menu won t appear next time If press Exit button to disable the Language Select menu it will appear again when powering on the monitor next time 1 Display ...

Страница 14: ...ically Only available when inputting VGA video signal 2 H Position Move screen image to left right 3 V Position Move up down screen image 4 Clock Adjust the pixel clock for hori zontal sweep If the frequency is not correct the screen shows vertical stripes and the image is not proportional 5 Phase Adjust the phase of the pixel clock signal With a wrong phase adjustment the screen shows horizontal ...

Страница 15: ...ts the monitor will show no signal warning message and won t check other video sources 3 CEC Mode When On is selected users can turn on or off the monitor by connecting to the device with HDMI CEC function such as DVD player camera or PlayStation game console 8 Information Show the frequency of the input image On Lap model firmware version etc 1 Reset Select Yes to reset to defaults Chapter 4 Sett...

Страница 16: ... will be no longer available Section 2 Touch Screen Settings on Windows 10 7 If the computer doesn t enable touchscreen function automatically or the monitor doesn t sense touch position accurately please use Windows 10 7 Tablet PC Settings in Control Panel to start touch screen setting In Windows 10 search Calibrate and select Calibrate the screen for pen or touch input In Windows 7 click Tablet ...

Страница 17: ...i touch Support Windows10 7 Connectivity HDMI 2 VGA 1 Audio output Earphone jack Speaker 1 0W Max 2 HDCP Support Yes HDMI CEC Support Yes Plug and Play VESA DDC2B C1 Power Consumption Standby Mode Off Mode 8 5W 0 5W 0 5W Rating Power 5V 1 7A Environment Condition Operation 0 50 Storage 20 60 Dimensions W H D 294mm 194mm 12mm monitor 299mm 209mm 21mm monitor cover Weight Typical 670g monitor 920g m...

Страница 18: ...59 978 1440x900 60Hz 55 935 59 887 1600x900 60Hz 55 990 59 946 1600x1024 60Hz 63 675 59 901 1680x1050 60Hz 65 290 59 954 1920x1080 60Hz 67 500 60 000 Supported Operating Modes 1920x1080P 50Hz 59 94Hz 60Hz 1280x720P 50Hz 59 94Hz 60Hz 720x480P 59 94Hz 60Hz 640x480P 59 94Hz 60Hz Problem Solutions Touch On Lap 1102I in the extended display but the cursor appears only on the main display not 1102I Plea...

Страница 19: ...IV ...

Страница 20: ...V ...

Страница 21: ...13 ...

Страница 22: ...14 ...

Страница 23: ...横置き表示の最低角度は 40 です 吸着面 をブルーの線より高いところに置かないでくださ い それよりも高いところにおくと倒れることがあ ります 15 ...

Страница 24: ... 16 ...

Страница 25: ...17 ...

Страница 26: ...18 LED OSD LED ...

Страница 27: ... 19 ...

Страница 28: ...20 3 ...

Страница 29: ...8 21 ...

Страница 30: ... R53848 RoHS 22 ...

Страница 31: ... 47 776 59 870 1280x800 60Hz 49 702 59 810 1280x960 60Hz 60 000 60 000 1280x1024 60Hz 63 981 60 020 1360x768 60Hz 47 712 60 015 1366x768 60Hz 47 712 59 790 1360x1024 60Hz 63 606 59 836 1400x1050 60Hz 65 317 59 978 1440x900 60Hz 55 935 59 887 1600x900 60Hz 55 990 59 946 1600x1024 60Hz 63 675 59 901 1680x1050 60Hz 65 290 59 954 1920x1080 60Hz 67 500 60 000 1920x1080P 50Hz 59 94Hz 60Hz 1280x720P 50Hz...

Страница 32: ...1年 保証 販売店のスタンプ GeChic Corporation 11F 3 No 138 Zhongming S Rd West Dist Taichung Taiwan R O C service gechic com Rev 2021 6 9 ...

Отзывы: