


7
CONNECTING A RIGID VALVE DRAIN TUBE
•
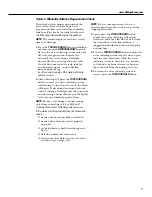
To adapt a copper drain tube to the softener, use a hacksaw to cut the barbed end from
the drain fitting as shown in Fig. 4B. Rotate the drain fitting so the cutting blade clears
the valve housing to prevent damage to valve. Buy a compression fitting (1/4
″
female
pipe thread x 1/2
″
O.D. tube) and needed tubing from your local hardware store.
INSTALL THE BRINE TANK OVERFLOW FITTINGS AND HOSE
•
Insert the rubber grommet into the 3/4
″
diameter hole in the brine tank sidewall
as shown in Fig. 5.
•
Push the end of the hose adapter elbow into the grommet as shown in Fig. 5.
•
Attach a length of hose (use remaining hose from Step 4) to the hose adapter
elbow. Use a hose clamp to hold it in place.
•
Locate the other end of the hose at the drain point.
DO NOT ELEVATE
this hose
higher than the elbow on the brine tank.
IMPORTANT: DO NOT TEE OVERFLOW HOSE TO VALVE DRAIN HOSE.
NOTE:
This drain is for safety only. If the cabinet (brine tank) should over-fill with
water, the excess is carried to the drain.
INSTALL GROUNDING CLAMPS AND WIRE
DANGER:
Failure to properly attach ground clamp could result in electrical shock
.
•
If plumbing is metal, to
maintain electrical ground continuity
in the house cold
water piping, install the included ground clamps as shown in Fig. 6.
•
Clean pipe with emery paper in the area where the clamp is to be installed.
•
Install grounding clamps as shown, making sure ground clamps fit freely around pipe.
•
Make sure lock washer is in place.
•
Hand tighten screw, then one more full turn with screwdriver.
NOTE:
When replacing an existing softener, also replace grounding clamps.
If removing softener completely, hard-plumb the water line with same type of
pipes as the original to assure plumbing integrity and ground continuity over
the life of the home.
FLUSH PIPES, EXPEL AIR FROM SOFTENER AND TEST YOUR
INSTALLATION FOR WATER LEAKS:
CAUTION: To avoid water or air pressure damage to softener inner parts,
be sure to do the following steps in exact order.
•
Fully open 2 cold soft water faucets nearby the softener.
•
Place bypass valve in “bypass” position by pushing the stem inward.
7
6
5
4a
Fig. 4B
Fig. 5
Overflow drain hose
Hose clamp
Grommet
Clip
1/4
″
NPT threads
Barbs
1/2
″
O.D.
copper tube (not
furnished)
Cut barbs
from drain
fitting
Compression fitting, 1/4
″
NPT X 1/2
″
O.D. tube (not
furnished)
Do not connect to valve
drain hose.
•
Fully open the house main water pipe shutoff valve. Observe a steady flow from both faucets opened in step A, above.
•
Place bypass valve in the “service” position EXACTLY as follows. KEEP SOFT WATER FAUCETS OPEN.
SLOWLY pull or slide the valve stem (out) toward the service position, pausing several times to allow the softener to pressurize slowly.
•
After about 3 minutes, open a HOT water faucet for 1 minute, or until all air is expelled, then close. NOTE:
If water appears
cloudy or has salty taste, allow to run for several more minutes, or until clear.
•
Close all water faucets.
•
Check your plumbing work for leaks and fix right away if any are found. Be sure to observe previous caution notes.
•
Turn on the gas or electric supply to the water heater. Light the pilot, if applicable.
ADD WATER AND SALT TO THE BRINE TANK:
•
Lift the cabinet (brine tank) cover. Add about 3 gallons of water into the tank.
Do not add into the brinewell.
•
Fill tank with NUGGET, PELLET or coarse SOLAR water softener salt with a purity of 99.5% or higher.
Do not use
rock, block,
granulated and ice cream-making salts, or
salt with iron-removing additives
(except for Diamond Crystal
®
Red•Out
®
brand salt).
NOTE:
If the softener is installed in a humid basement or other damp area, it is better to
fill the tank with less salt, more frequently.
Eighty to 100 lbs. of salt will last for several months, depending on water hardness, family size and water softening system model.
CONNECT TO ELECTRICAL POWER:
•
Remove packaging material from the outside of the transformer.
DO NOT PULL ON OR DISCONNECT WIRING.
•
The softener works on 24 volt-60Hz electric power. The included transformer changes standard 120-volt AC house power to
24 volts.
Plug the transformer into a 120-volt outlet only.
Be sure the outlet is always live so it cannot be switched off by mistake.
PROGRAM THE TIMER:
See Programming the Timer section.
10
9
8
Hose adapter elbow
Fig. 6
Ground clamp
From valve outlet
To valve inlet
Содержание GNSF35Z
Страница 22: ...22 Parts list Model GNSF35Z03 ...
Страница 23: ...23 Parts list www GEAppliances com ...
Страница 26: ...26 Notes ...
Страница 27: ...27 Notes ...
Страница 28: ...28 Notes ...