background image

Model Line Series

GFC320V
GFC325V
GFC520V
GFC525V
GFC530V
GFC535V
GFC720V
GFB760V

GFC1020V

Dis

p

osa

ll

www.GEAppliances.com

F

o

od W

a

st

e Dis

pose

r

Safety Information

Connecting Electricity . . . . . . .2, 3
Safety Precautions  . . . . . . . . . . . .2

Installation Instructions

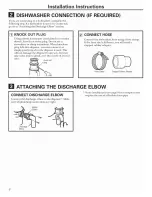
Attaching the Discharge 
Elbow  . . . . . . . . . . . . . . . . . . . . . .6
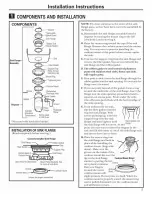
Components and Installation 
of Sink Flange. . . . . . . . . . . . . . . .5
Connecting Disposer to
Sink Flange . . . . . . . . . . . . . . . . . .7
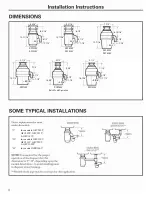
Dimensions/Typical
Installations  . . . . . . . . . . . . . . . . .8
Dishwasher Connection . . . . . . . .6

Operating Instructions

Batch Feed Models . . . . . . . . . . . .9
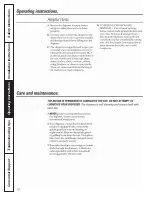
Care and Maintenance  . . . . . . .10
Continuous Feed Models. . . . . . .9

Troubleshooting Tips

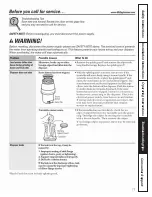
Before You Call for 
Service . . . . . . . . . . . . . . . . . . . . .11

Customer Service

Warranty . . . . . . . . . . . . . . . . . . .12

Write the model and serial numbers 
for your Disposall here:

Model # _____________________

Serial #  _____________________

You can fi nd them on a label on 
the bottom of the disposer.

165D4700P229
560C460P01 Rev. B

49-5903     01-01 JR

Owner’s Manual 

& Installation 

Instructions

Содержание GFC320V

Страница 1: ...Disposer to Sink Flange 7 Dimensions Typical Installations 8 Dishwasher Connection 6 Operating Instructions Batch Feed Models 9 Care and Maintenance 10 Continuous Feed Models 9 Troubleshooting Tips B...

Страница 2: ...Installation Instructions Operating Instructions Troubleshooting tips Consumer Support Safety Instructions...

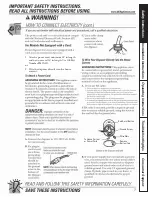
Страница 3: ...r Power Cord Installation Instructions Operating Instructions Troubleshooting tips Consumer Support Safety Instructions 1 Attach a power cord minimum 18 in length and not to exceed 36 in length Use GE...

Страница 4: ...Part Number PM3X215...

Страница 5: ......

Страница 6: ......

Страница 7: ......

Страница 8: ...1 2 4 1 2 GFC320V GFC325V 12 11 16 5 3 16 5 3 8 6 1 8 1 1 2 4 1 2 GFC520V GFC525V 12 11 16 5 3 16 5 3 8 6 15 16 1 1 2 4 1 2 GFC530V GFC535V 13 7 16 7 3 4 5 3 8 7 1 4 1 1 2 4 1 2 GFC720V 14 1 2 8 1 2...

Страница 9: ...Installation Instructions Operating Instructions Troubleshooting tips Consumer Support Safety Instructions...

Страница 10: ...Installation Instructions Operating Instructions Troubleshooting tips Consumer Support Safety Instructions...

Страница 11: ...Installation Instructions Operating Instructions Troubleshooting tips Consumer Support Safety Instructions...

Страница 12: ...installation or maintenance Q Failure of the product if it is abused misused or used for other than the intended purpose or used commercially Q Replacement of house fuses or resetting of circuit break...

Страница 13: ...L nea de Modelos Serie GFC320V GFC325V GFC520V GFC525V GFC530V GFC535V GFC720V GFB760V GFC1020V 165D4700P229 560C460P01 Rev B 49 5903 01 01 JR...

Страница 14: ...Instalaci n Operaci n Solucionar problemas Servicio al consumidor Seguridad...

Страница 15: ...raci n Solucionar problemas Servicio al consumidor Seguridad 1 Adhierauncableel ctrico deunalongitudm nimade18 yquenoexceda36 UsarlapiezaGEn meroPM3X215 o 2 Conecteeltrituradordirectamentealsistemael...

Страница 16: ...Parte No PM3X215...

Страница 17: ......

Страница 18: ......

Страница 19: ......

Страница 20: ...16 1 1 2 4 1 2 GFC320V GFC325V 12 11 16 5 3 16 5 3 8 6 1 8 1 1 2 4 1 2 GFC520V GFC525V 12 11 16 5 3 16 5 3 8 6 15 16 1 1 2 4 1 2 GFC530V GFC535V 13 7 16 7 3 4 5 3 8 7 1 4 1 1 2 4 1 2 GFC720V 14 1 2 8...

Страница 21: ...Instalaci n Operaci n Solucionar problemas Servicio al consumidor Seguridad...

Страница 22: ...Instalaci n Operaci n Solucionar problemas Servicio al consumidor Seguridad...

Страница 23: ...Instalaci n Operaci n Solucionar problemas Servicio al consumidor Seguridad...

Страница 24: ...ser responsable por de todos los cargos de instalaci n relacionados con el reemplazo del triturador Lo que GE no cubrir Q Los viajes de servicio hacia su casa para ense arle c mo usar el producto Q In...

Страница 25: ...d vier 7 Dimensions Types d installation 8 Connexion au lave vaisselle 6 Mode d emploi Mod les chargement discontinu 9 Entretien et maintenance 10 Mod les chargement continu 9 Astuces de d pannage Av...

Страница 26: ...emple bo tes de conserve canettes ustensiles ou papier aluminium f huile chaude ou autres liquides chauds g pis de ma s entiers Q Lorsque vous n utilisez pas le broyeur laissez le bouchon du drain en...

Страница 27: ...dans le broyeur Pour relier directement votre broyeur au circuit lectrique domestique INSTRUCTIONS DE MISE LA TERRE cet appareil doit tre connect un circuit lectrique permanent en m tal et mis la terr...

Страница 28: ...es du produit provoqu es par une installation incorrecte ne sont pas couvertes par la garantie PR PARATION 1 D branchez l alimentation du broyeur 2 Retirez l ancien broyeur ou le collet d vier 3 Inspe...

Страница 29: ...uvez d sormais placer le bouchon dans l vier et le remplir d eau pour v rifier l tanch it des joints et l absence de fuites H Placez la bague de montage sur le collet d vier et maintenez la en place t...

Страница 30: ...cier ou goujon en bois enfoncez enti rement la bonde N utilisez pas de tournevis ou d outil pointu Une fois la bonde tomb e dans le broyeur vous pouvez la retirer ou tout simplement la broyer lors de...

Страница 31: ...ent Les pattes de la tr mie doivent se trouver l extr me gauche des encoches de montage Si la bague de montage r siste ajoutez une petite quantit de vaseline ou de savon liquide sur les pattes de la t...

Страница 32: ...po 341 mm GFC520V GFC525V GFC530V GFC535V GFC720V GFB760V Fonctionnement en chargement discontinu GFC1020V DIMENSIONS TYPES D INSTALLATION Instructions d installation Remplacement direct pour la plupa...

Страница 33: ...ongeur de l interrupteur Le bouchon peut maintenant tre enfonc pour boucher l vier sans d marrer le broy eur Lorsque l encoche moyenne de la base du bouchon est align e avec le plongeur de l interrupt...

Страница 34: ...od les chargement discontinu est quip d un pare claboussures amovible pour un nettoyage et une r installation faciles Retirez le pare claboussures le tirant vers le haut Pour le replacer ins rez le da...

Страница 35: ...circuit ou fil rompu dans la connexion au broyeur V rifiez l interrupteur d alimentation lectrique le coffret de fusibles ou le disjoncteur Si les c bles et les pi ces lectriques sont intacts l unit...

Страница 36: ...acement du broyeur GE ne prend pas en charge Q les d placements domicile pour vous apprendre utiliser le produit Q une mauvaise installation Q une d faillance du produit suite un abus mauvaise utilisa...

Отзывы: