background image

Impreso en China

Soporte al Consumidor.

Página Web de GE Appliances

GEAppliances.com

¿Tiene alguna pregunta sobre su electrodoméstico? ¡Pruebe la página Web de GE Appliances 24 horas al
día, cualquier día del año! Para mayor conveniencia y servicio más rápido, ya puede descargar los Manuales
de los Propietarios, pedir piezas o incluso hacer una cita en línea para que vengan a realizar una
reparación. También puede “Ask Our Team of Experts ™ ” (Preguntar a nuestro equipo de expertos) sobre
cualquier cuestión y mucho más...

Solicite una reparación

GEAppliances.com

El servicio de expertos GE está a tan sólo un paso de su puerta. ¡Entre en línea y solicite su reparación
cuando le venga bien 24 horas al día cualquier día del año! O llame al 800.GE.CARES (800.432.2737)
durante horas normales de oficina.

Real Life Design Studio (Estudio de diseño para la vida real)

GEAppliances.com

GE apoya el concepto de Diseño Universal—productos, servicios y ambientes que pueden usar gente de
todas las edades, tamaños y capacidades. Reconocemos la necesidad de diseñar para una gran gama de
habilidades y dificultades físicas y mentales. Para más detalles cobre las aplicaciones de GE Diseño Universal,
incluyendo ideas de diseño para la cocina para personas con discapacidades, mire nuestra página Web hoy
mismo. Para personas con dificultades auditivas, favor de llamar al 800.TDD.GEAC (800.833.4322).

Garantías ampliadas

GEAppliances.com

Compre una garantía ampliada y obtenga detalles sobre descuentos especiales disponibles mientras su
garantía está aún activa. Puede comprarla en línea en cualquier momento, o llamar al (800.626.2224)
durante horas normales de oficina. GE Consumer Home Services estará aún ahí cuando su garantía termine.

Piezas y accesorios

GEAppliances.com

Aquellos individuos con la calificación necesaria para reparar sus propios electrodomésticos pueden 
pedir que se les manden las piezas o accesorios directamente a sus hogares (aceptamos las tarjetas 
VISA, MasterCard y Discover). Haga su pedido en línea hoy, 24 horas cada día o llamar por teléfono 
al 800.626.2002 durante horas normales de oficina.

Las instrucciones descritas en este manual cubren los procedimientos a seguir por cualquier usuario. Cualquier
otra reparación debería, por regla general, referirse a personal calificado autorizado. Debe ejercerse precaución
ya que las reparaciones incorrectas pueden causar condiciones de funcionamiento inseguras. 

Póngase en contacto con nosotros

GEAppliances.com

Si no está satisfecho con el servicio que recibe de GE, póngase en contacto con nosotros en nuestra página
Web indicando todos los detalles así como su número de teléfono o escríbanos a: General Manager,

Customer Relations
GE Appliances,
Appliance Park
Louisville, KY 40225

Registre su electrodoméstico

GEAppliances.com

¡Registre su nuevo electrodoméstico en línea—cuando usted prefiera!

El registrar su producto a tiempo le

proporcionará, si surgiera la necesidad, una mejor comunicación y un servicio más rápido bajo los términos
de su garantía. También puede enviar su tarjeta de registro pre-impresa que se incluye en el material de
embalaje.

Содержание ASH08

Страница 1: ...stallation 9 14 Troubleshooting Tips 16 Normal Operating Sounds 16 Consumer Support Consumer Support Back Cover Product Registration 17 18 Warranty 19 49 7424 11 01 JR ASH08 ASW08 ASH10 ASW10 ASH12 ASW12 Air Conditioners Owner s Manual and Installation Instructions GEAppliances com Write the model and serial numbers here Model __________________________ Serial __________________________ Find these...

Страница 2: ... in the vicinity of this or any other appliance SAFETY PRECAUTIONS Do not under any circumstances cut or remove the third ground prong from the power cord For personal safety this appliance must be properly grounded The power cord of this appliance is equipped with a 3 prong grounding plug which mates with a standard 3 prong grounding wall outlet to minimize the possibility of electric shock hazar...

Страница 3: ... made to a properly grounded 2 prong wall outlet by use of a UL listed adapter available at most local hardware stores The larger slot in the adapter must be aligned with the larger slot in the wall outlet to provide proper polarity in the connection of the power cord When disconnecting the power cord from the adapter always hold the adapter in place with one hand while pulling the power cord plug...

Страница 4: ...oner Controls Remote Control ON OFF Turns air conditioner on and off Display Shows the set temperature time remaining on timer or fan speed F1 LOW F2 MED or F3 HIGH MODE Use to set the air conditioner to COOL or FAN mode Increase Decrease Pads Use to set temperature when in COOL mode FAN Use to set the fan speed to LOW F1 MED F2 or HIGH F3 TIMER ON When the air conditioner is off it can be set to ...

Страница 5: ...to keep the room at the set level of comfort Set the thermostat at a lower number and the indoor air will become cooler Set the thermostat at a higher number and the indoor air will become warmer NOTE If the air conditioner is off and is then turned on while set to COOL it will take approximately 3 minutes for the compressor to start and cooling to begin Cooling Descriptions For Normal Cooling Sel...

Страница 6: ...rol at midpoint For Maximum Cooling Select HIGH COOL with the temp control at the highest number available on your knob For Quieter Nighttime Cooling Select LOW COOL with the temp control at midpoint Temp Controls The temp control is used to maintain the room temperature The compressor will cycle on and off to keep the room at the same level of comfort When you turn the knob to a higher number the...

Страница 7: ...he fan ON The fan and compressor cycle on and off together This results in wider variations of room temperature and humidity Normally used when the room is unoccupied OFF The fan runs all the time while the compressor cycles on and off This switch must be set at OFF in order to use the fan settings on the mode control Air Direction Side to Side On some models the side to side air direction is adju...

Страница 8: ...professionally steam cleaned a service available through your GE service outlet Grille and Case Turn the air conditioner off and remove the plug from the wall outlet before cleaning To clean use water and a mild detergent Do not use bleach or abrasives Care and cleaning of the air conditioner 8 Consumer Support Troubleshooting Tips Operating Instructions Safety Instructions Installation Instructio...

Страница 9: ...he power cord Do not change the plug on the power cord of this air conditioner Aluminum house wiring may present special problems consult a qualified electrician Before You Begin Some models require 115 120 volt ac 60 Hz grounded outlet protected with a 15 amp time delay fuse or circuit breaker The 3 prong grounding plug minimizes the possibility of electric shock hazard If the wall outlet you pla...

Страница 10: ...nstall the Air Conditioner before beginning Parts Included Sill support 2 Top mounting rail Right accordion panel Foam top window gasket Window sash seal Left accordion panel Type B 8 Type C Bolt 2 Window Installation Instructions Security bracket 1 Top mounting rail seal strip Bottom inner case gasket Type D 1 on some models Type A 18 or 19 ...

Страница 11: ...hind it if present that holds the grille in place On models with a raise up inlet grille lift it see the Care and Cleaning section and remove the screw behind it if present that holds the grille in place Pull the bottom grille corners out to release the lower tabs on each side NOTE Do not pull the bottom edge toward you more than 3 or you may damage the tabs of the grille Lift the grille up and of...

Страница 12: ...es from the outside of the case Insert the frames for the accordion panels into the top and bottom mounting rails Attach the accordion panels to the side of the case using 6 type A screws B A Remove the Air Conditioner From the Case Remove the 2 screws on each side of the case Keep these for later use Slide the air conditioner from the case by gripping the base pan handle and pulling forward while...

Страница 13: ...case should be slightly tilted to the outside Use a level about a 1 2 bubble will be the correct case slant to the outside Locate the 3 screw holes along the bottom front edge of the case Center the case side to side in the window and mount it to the window sill using 3 type B screws Extend the left and right accordion panels to the vertical window sashes and attach with 4 type B screws D C B A 6 ...

Страница 14: ...ush them in Attach the front grille to the case by inserting the tabs on the grille into the slots on the front of the case Push the grille in until it snaps into place Secure the front grille to the case by replacing the screw removed in Step 3 If a screw was not removed in Step 3 secure the grille with a type A screw for models with a raise up inlet grille or a type D screw for models with a sli...

Страница 15: ...certain a wall receptacle is available close to the hole location or make arrangements to install a receptacle Place the case in the wall opening and secure with 12 1 long 10 wood screws NOTE Drill pilot holes if necessary for proper installation If the frame is oversized use shims to prevent case distortion C B A 1 The case may be installed through the wall in both existing and new construction R...

Страница 16: ...ode press the not be set correctly DECREASE pad On models with control knobs turn the temperature knob to a higher number The air filter is dirty Clean the filter at least every 30 days See the Operating Instructions section The room may have been hot When the air conditioner is first turned on you need to allow time for the room to cool down Cold air is escaping Check for open furnace registers a...

Страница 17: ...otection or you may request your money back on the remaining value of your contract No questions asked It s that simple Protect your refrigerator dishwasher washer and dryer range TV VCR and much more any brand Plus there s no extra charge for emergency service and low monthly financing is available Even icemaker coverage and food spoilage protection is offered You can rest easy knowing that all y...

Страница 18: ...ct is registered or register online at GEAppliances com 1 2 3 Model Number Serial Number Cut here Complete and mail your Consumer Product Ownership Registration today Have the peace of mind of knowing we can contact you in the unlikely event of a safety modification After mailing the registration below store this document in a safe place It contains information you will need should you require ser...

Страница 19: ... provide reasonable and necessary maintenance In commercial locations labor necessary to move the unit to a location where it is accessible for service by an individual technician Replacement of house fuses or resetting of circuit breakers Failure due to corrosion on models not corrosion protected Damage to the product caused by improper power supply voltage accident fire floods or acts of God Inc...

Страница 20: ... warranty and learn about special discounts that are available while your warranty is still in effect You can purchase it on line anytime or call 800 626 2224 during normal business hours GE Consumer Home Services will still be there after your warranty expires Parts and Accessories GEAppliances com Individuals qualified to service their own appliances can have parts or accessories sent directly t...

Страница 21: ...en ventanas 9 14 Ideas para la identificación y reparación de problemas 16 17 Sonidos normales de operación 17 Apoyo al consumidor Apoyo al consumidor al dorso Garantía 19 49 7424 11 01 JR ASH08 ASW08 ASH10 ASW10 ASH12 ASW12 Acondicionadores de Aire Manual del Propietario e Instrucciones de Instalación GEAppliances com Escriba el modelo y número de serie aquí Número de modelo ______________ Número...

Страница 22: ...idos inflamables en la proximidad de éste o algún otro electrodoméstico PRECAUCIONES DE SEGURIDAD Bajo ninguna circunstancia corte o retire la tercera púa tierra del cable eléctrico En pos de la seguridad personal este electrodoméstico debe ser siempre conectado a tierra El cable eléctrico de este electrodoméstico está equipado con un enchufe de tres púas tierra que combina con un tomacorriente es...

Страница 23: ...iente listado UL disponible en la mayoría de las ferreterías La ranura mayor en el adaptador debe estar alineada con la púa mayor en la pared para proporcionar una polaridad apropiada en la conexión del cable eléctrico Cuando se disponga a desconectar el cable eléctrico del adaptador siempre sostenga el adaptador en su lugar con una mano mientras tira del cable eléctrico con la otra mano Si no hac...

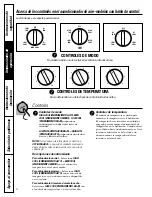
Страница 24: ... ajustada el tiempo restante en el sincronizador o la velocidad del ventilador F1 LOW BAJO F2 MED MEDIO o F3 HIGH ALTO MODO Usado para ajustar el acondicionador de aire al modo COOL FRÍO o FAN VENTILADOR Teclas de Increase aumentar Decrease reducir Usado para ajustar la temperatura cuando se encuentre en el modo COOL FRÍO FAN VENTILADOR Usado para ajustar la velocidad del ventilador a LOW F1 BAJO ...

Страница 25: ...a temperatura deseada Ajuste el termostato a un número menor y el aire interno se enfriará más Si lo ajusta a un número mayor la temperatura del aire interno se calentará más NOTA Si el acondicionador de aire está apagado y entonces es encendido mientras está ajustado en COOL FRÍO tomará aproximadamente 3 minutos para que el compresor comience a enfriar otra vez Descripciones de enfriamiento Para ...

Страница 26: ... el control de temperatura en el nivel medio Para enfriamiento máximo Seleccione HIGH COOL ENFRIAMIENTO ALTO con el control de temperatura en un número mayor disponible en su teclado Para enfriamiento silencioso durante la noche Seleccione LOW COOL ENFRIAMIENTO BAJO con el control de temperatura en el nivel medio Controles de temperatura El control de temperatura es usado para mantener la temperat...

Страница 27: ...o entre encendido y apagado Esto da como resultado mayores variaciones de temperaturas y humedad en la habitación Normalmente este es usado cuando la habitación no está siendo ocupada OFF APAGADO El ventilador es accionado todo el tiempo mientras el compresor hace ciclo entre apagado y encendido Este interruptor debe quedar ajustado a OFF APAGADO para poder usar los ajustes del ventilador en el mo...

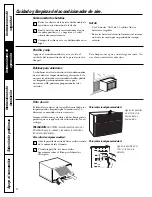
Страница 28: ...odría ser limpiada profesionalmente con vapor y nosotros en GE podemos proporcionarle tales servicios Parrilla y caja Apague el acondicionador de aire y retire el enchufe del tomacorriente de la pared antes de limpiar Para limpiar use agua y un detergente suave No use cloro o materiales abrasivos Cuidado y limpieza del acondicionador de aire 8 Apoyo al consumidor Solución de problemas Instruccione...

Страница 29: ...ico de este acondicionador de aire Los cables caseros de aluminio podrían presentar problemas especiales Consulte a un técnico electricista calificado ANTES DE COMENZAR Algunos modelos requieren tomacorrientes de 115 120 voltios de corriente alterna y 60 Hz conectado a tierra protegido con un fusible de dilatación de tiempo de 15 amperios o un cortacircuito El enchufe de 3 púas con conexión a tier...

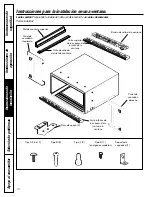
Страница 30: ...rtes incluidas Pieza de apoyo 2 Riel de montaje superior Panel de acordeón derecho Parte superior de la espuma de la junta de la ventana Banda de sello de la ventana Panel de acordeón izquierdo Tipo B 8 Tipo C 2 Instrucciones para la instalación en una ventana Soporte de seguridad 1 Cinta de sellado del riel de montaje Parte inferior de la espuma de la junta de la ventana Tipo D 1 en algunos model...

Страница 31: ...imensiones de la abertura de la ventana más adelante Todas las partes de apoyo deben quedar totalmente aseguradas a algún metal mampostería o a la madera El tomacorriente eléctrico debe estar al alcance del cable eléctrico del acondicionador de aire 1 2 más alto que el marco Marco de ventana de tormentas Madera Repisa 1 Retire la parrilla frontal si está pegada Retire la cinta de envío si todavía ...

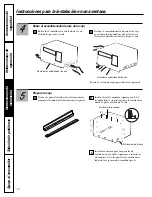
Страница 32: ...la caja Inserte los marcos para los paneles de acordeón en los rieles superiores e inferiores de montaje Una los paneles de acordeón al lado de la caja usando 6 tornillos tipo A B A Retire el acondicionador de aire de la caja Retire los 2 tornillos en cada lado de la caja Guárdelos para más tarde Deslice el acondicionador de aíre de la caja agarrando la empuñadura del cárter base y tire hacia adel...

Страница 33: ...acia el exterior Use un nivel la inclinación de 1 2 de burbuja será la correcta hacia el exterior Localice los 3 agujeros para los tornillos a lo largo del frente inferior de la caja Centre la caja de lado y lado en la ventana y móntela en el apoyo de la ventana usando 3 tornillos tipo B Extienda los paneles de acordeón derecho e izquierdo a las bandas verticales de la ventana y péguelos con 4 tor...

Страница 34: ...la parrilla del frente a la caja insertando las orejillas en la parrilla en las ranuras en el frente de la caja Empuje la parrilla hasta que encaje en su lugar Asegure la parrilla frontal en la caja reemplazando el tornillo removido en el Paso 3 Si un tornillo no removido en el Paso 3 asegure la parrilla con un tornillo tipo A para modelos con parrilla de entrada elevadizas o un tornillo tipo D pa...

Страница 35: ...órese de que existe un tomacorriente disponible cerca del orificio o haga arreglos para que se instale uno Coloque la caja en la abertura de la pared y asegúrela con 12 tornillos de madera de 1 10 NOTA Taladre los agujeros piloto si es necesario para una instalación apropiada Si el marco es demasiado grande use cuñas para evitar la distorsión de la caja C B A 1 La caja podría instalarse a través d...

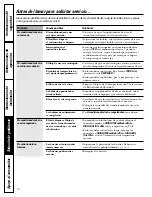
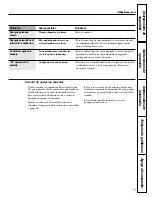
Страница 36: ...os modelos con teclado En el modo COOL Frío está ajustado apropiadamente presione la tecla DECREASE En los modelos con botones gire la temperatura a un número mayor El filtro de aire está sucio Limpie el filtro cada 30 días por lo menos Ver la sección de Instrucciones de Operación La habitación podría haber Cuando el acondicionador de aire se enciende usted estado caliente necesita darle tiempo pa...

Страница 37: ... operación Instrucciones de seguridad Instrucciones de instalación GEAppliances com Problema Causas posibles Qué hacer Hay agua goteando Tiempo húmedo y caliente Esto es normal afuera Hay agua goteando en el El acondicionador de aire no Para drenar el agua apropiadamente cerciórese de que interior de la habitación está inclinado hacia afuera el acondicionador de aire está inclinado ligeramente des...

Страница 38: ...18 Notas Apoyo al consumidor Solución de problemas Instrucciones de operación Instrucciones de seguridad Instrucciones de instalación ...

Страница 39: ...onar mantenimiento razonable y necesario En locales comerciales la mano de obra necesaria para retirar la unidad hacia un lugar para revisión por parte de un técnico individual Reemplazo de fusibles de la casa o reajuste del sistema de circuitos Fallos debido a la corrosión en modelos que no están protegidos contra la corrosión Daño al producto causado por voltaje inapropiado hacia el equipo accid...

Страница 40: ...a detalles sobre descuentos especiales disponibles mientras su garantía está aún activa Puede comprarla en línea en cualquier momento o llamar al 800 626 2224 durante horas normales de oficina GE Consumer Home Services estará aún ahí cuando su garantía termine Piezas y accesorios GEAppliances com Aquellos individuos con la calificación necesaria para reparar sus propios electrodomésticos pueden pe...

Отзывы: