


g) Proceed according to the points h, i and j of the
instructions for cleaning oil filters (refer to par.
9.6).
9.6 CLEANING OF OIL FILTERS
In most cases the oil filters have to be cleaned for
the first time after 50 operating hours. Besides
thorough cleaning of the gauze filter element of
the oil suction filter, the (red) paper filter element
of the oil discharge filter must be exchanged with
the blue marked element. Also after the
installation has been extended or modified, the oil
suction filter should be cleaned and the (red) oil
discharge filter renewed as if the compressor had
just been put into operation.
The time at which the next cleaning has to be
carried out highly depends on te cleanliness of the
installation.
Dirty oil (refer to par. 9.5) may cause clogging of
the (grey marked) oil suction filter. A strong
pollution of this filter is indicated by a falling oil
pressure; in this case it is necessary to clean the
filter (ultra-soon cleaning system). It is
recommended, therefore, regularly to check the
oil pressure during the first 50 operating hours.
When the filters remain practically clean, cleaning
can take place simultaneously with the other
maintenance operations.
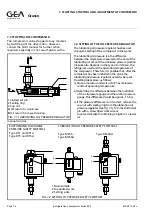
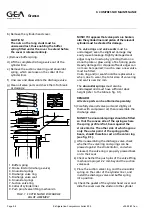
To clean the (blue and grey marked) filters
proceed as follows:
a) Evacuate the compressor (refer to par. 9.4)
b) Unscrew the lower filter cup of both filter
housings in which event the filter elements are
released. Catch the oil in a beaker.
c) Clean the gauze filter element of the oil suction
filter only using a high frequent liquid cleaning
system (ultra soon device). After cleaning,
thorouhly dry the element; if possible, blow
through the filter element with compressed air
against the normal oil flow direction. Dip the
element into compressor oil and put aside.
d) Clean both filter cups and dry them with a
non-fibrous cloth.
e) Use the new set of seals! Remove and renew all
o-rings including the centre seal of both upper
filter housing.
f) Place the gauze filter element and a new (grey
marked) paper filter element in their
corresponding filter cups.
MIND! The paper filter element (oil discharge
filter) should be placed on the right-hand side
of the pump.
g) Screw the filter cups (do not forget the o-ring
around the filter cup) into their corresponding
filter upper housings.
h) Remove the plug on top of the suction filter
housing; fill this housing with fresh oil and
replace the plug with a new alu ring.
i) Purge the compressor (refer to par. 9.9).
j) Check the oil level and top up oil as described in
par. 9.3, topping up oil with compressor operating.
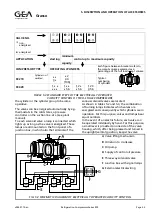
9.7 CLEANING OF THE SUCTION GAS STRAINER
a) Evacuate the compressor (refer to par. 9.4)
b) Remove the bolts from the suction strainer
cover that is most far away from the suction
line and remove the cover (if necessary, loosen
cover with a rubber or plastic hammer).
c) Pull the strainer element out of the suction
strainer housing without damaging the gauze.
d) Clean the element by rinsing it in a solvent.
Then thoroughly dry the element preferably
with compressed air.
e) Check the gauze for damage.
f) Slide the strainer element again into the
housing and fit the suction strainer cover.
Check the sealing ring for proper condition.
g) Purge the compressor (refer to par. 9.9).
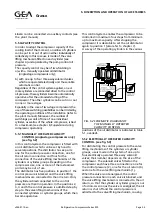
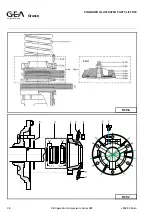
9.8 DISMOUNTING, INSPECTION AND
RE-ASSEMBLY OF SUCTION AND DISCHARGE
VALVES
The suction and discharge valves of a refrigeration
compressor are parts that are heavily loaded both
mechanically and thermally. Wear and life time of
the valves strongly depend on the working
conditions of the compressor.
A high working temperature and rapid temperature
variations shorten the life time of the valves, which,
for this reason, require regular inspection.
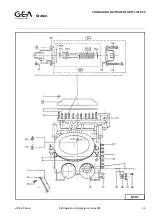
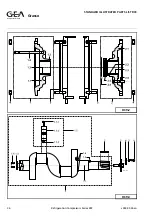
For dismounting, inspection and re-assembly of
the valves, proceed as follows (refer to fig. 9.1):
a) Evacuate the compressor (refer to par. 9.4).
Refrigeration Division
Grasso
9. COMPRESSOR MAINTENANCE
v003.98.11.en
Refrigeration Compressors Series RC9
Page 9.3


