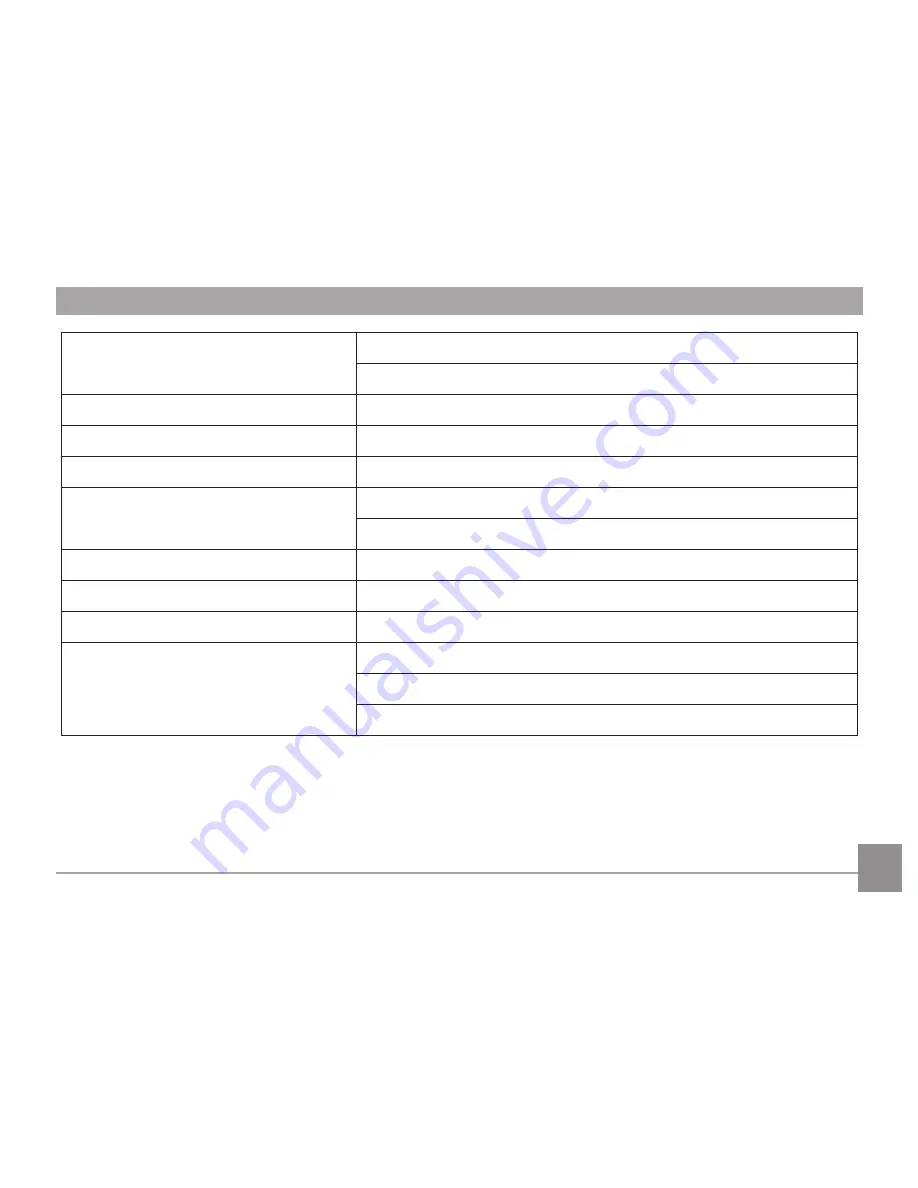
background image

81

Recording Media

Internal Memory: Approx. 13MB

SD/SDHC Card (Up to 16GB Support) [Nonsupport MMC Card]

Other Features

PictBridge, ExifPrint Support, Multi-Language Support (26 Languages)

Jacks

AV-OUT/USB 2.0 (Mini 8 pin USB)

Power

AA Alkaline Battery(×4) AA NiMH Battery(×4) (Not Included)

Shooting Capability (Battery Performance)

Approx. 300 Shots of AA Alkaline Battery (Based on CIPA Standards)

Approx. 500 Shots of AA NiMH Battery (Based on CIPA Standards)

Operation Environment

Temperature: 32 ~ 104°F / 0 ~ 40

o

C, Humidity: 0 ~ 90%

Dimensions (W×H×D)

Approx. 4.0×2.9×2.6in. / 103.0×74.0×68.0mm (Based on CIPA Standards)

Weight

Approx. 12oz. / 350g (Body Only)

Supplied Accessories (May Differ Depending 
On Country or Area)

AA Alkaline Battery(×4), USB Cable

Shoulder Strap, CD-ROM, Lens Cover

Quick Start Guide, Feature Guide, Warranty Card

Содержание X400 Power Pro Series

Страница 1: ...EN GE Digital Camera Power Pro Series X400 Appendix Camera Connectivity Using the Menus Playback Camera Function Controls Basic Operation Getting Started User Manual imagination at work...

Страница 2: ...de U S Canada 1 310 755 6857 WARNING To prevent fire hazard or electrical shock do not expose the camera battery pack or other accessories to water or humidity For Customers in the U S A Tested to Com...

Страница 3: ...xpose the batteries to water and take particular care to keep the terminals dry Do not heat the batteries or throw them into a fire Donotattempttodeform disassembleormodifythebatteries Keep the batter...

Страница 4: ...afety Information Please read the following important information carefully before using this product Do not take apart or attempt to service the camera yourself Do not drop or knock the camera Improp...

Страница 5: ...nt avoid possible condensation by placing the camera in a cooler area and let it slowly adjust to room temperature Always place the camera on a vibration free surface About this Manual This manual pro...

Страница 6: ...attery and SD SDHC Card Not included 12 Turning On and Off 14 Setting Language and Date Time 14 Set Display Language 14 Set Date Time 15 Using the Mode Dial 16 About the LCD Screen 17 Using Quick Reco...

Страница 7: ...ASCN 34 Landscape 34 Portrait 34 Night Portrait 35 Backlit Portrait 35 Night Landscape 35 Macro 35 Auto 35 Panorama 35 Scene Mode SCN 36 Landscape 37 Sport 37 Beach 37 Sunset 37 Fireworks 37 Night La...

Страница 8: ...46 AF Mode Auto Focus mode 47 AF Assist Beam 47 Expo Metering Exposure Metering 48 Continuous Shot 48 Continuous AF 49 Digital Zoom 50 Quick Review 50 Date Imprint 51 Movie Menu 52 Expo Metering Expo...

Страница 9: ...re version 68 CONNECTIONS 69 Connecting to a PC 69 Setting the USB Mode 69 Transferring Files to your PC 69 Connecting to a PictBridge Compatible Printer 71 Setting the USB Mode 71 Connecting the Came...

Страница 10: ...contain the camera model you purchased along with the following items If anything is missing or appears to be damaged please contact your retailer Unpacking USB Cable CD ROM Warranty Card AA Size Alka...

Страница 11: ...Installing Shoulder Strap and Lens Cap 1 2 3 4 1 3 2 To Install Shoulder Strap To Install Lens Cap...

Страница 12: ...Camera Views Front View Back View 1 4 2 3 12 13 14 15 16 5 6 8 9 10 11 7 disp...

Страница 13: ...10 Top View Left View Bottom View Right View 17 18 19 20 open optical zoom WIDE 15x 27 405mm 22 21 23 24 25 26 27 ON OFF 28 29...

Страница 14: ...ication Button 4 Lens 14 Self timer Button Down Button 24 Stabilization Button 5 LCD Screen 15 Flash Button Left Button 25 Shoulder Strap Mount 6 Status Indicator 16 OK Button 26 ON OFF 7 Movie Button...

Страница 15: ...12 Insert the Battery and SD SDHC Card Not included 2 Insert the enclosed AA batteries into the battery slot according to the correct polarity as shown below 1 Open the battery compartment 1 2 4 3...

Страница 16: ...l SD SDHC cards are not included The use of 64MB to16 GB memory cards from recognized manufacturers such as Panasonic and Toshiba are recommended for reliable data storage To remove the SD SDHC card o...

Страница 17: ...g procedures to set the camera Language Date Time to your preferences 1 Push ON OFF to turn the camera on 2 Press Up Down Left Right button to select the settings 3 Press the button to confirm the set...

Страница 18: ...then press Up Down buttons to adjust values 3 Press the button to confirm the settings Set Date Time 1 Press the button and use the Left Right button to select the General Setup menu Scroll down to Da...

Страница 19: ...rture automatically Shutter Priority S Setting allows you to choose a specific shutter speed while the camera will adjust the aperture automatically to ensure correct exposure Aperture Priority A Allo...

Страница 20: ...h thoroughly with water Drink large quantities of water and induce vomiting Then seek medical assistance immediately About the LCD Screen When you turn the camera on various icons are shown on the LCD...

Страница 21: ...de press the Recording Shortcut button to enter the recording mode directly and begin video recording After recording press the Recording shortcut button or Shutter button again and you can store the...

Страница 22: ...creen shows for the current zoom status Shooting in Auto Mode Auto mode is the easiest mode to take photos While operating in this mode the camera automatically optimizes camera settings to adjust you...

Страница 23: ...heflashwillfirewitheachshotevenifthereisenough availablelighttotakethephotowithoutflash Flash Red Eye Slow Synchro Using this mode for slow synchro shots with red eye reduction Flash Slow Synchro This...

Страница 24: ...Press the Down button to enter the Self Timer menu 2 Press the Left Right button to select the following three modes Self timer Off Disables the self timer Self timer 2 sec A single picture is shot 2...

Страница 25: ...ro Macro On Select this to focus on subjects 5cm from the lens 3 Press the button to confirm the settings and exit the menu EV Exposure Value The EV control allows for an override of the camera s auto...

Страница 26: ...abled by the user Face detection is disabled in Panorama Mode 1 When the face detection feature is enabled it will display a frame around detected faces in the camera s field of view 2 Press the Shutt...

Страница 27: ...ter button half way to focus 3 Press the Shutter button all the way to capture the image the camera will automatically release the shutter when it detects a smile 4 Use the Smile Detection button to d...

Страница 28: ...25 25 While in Shooting mode press the button to reduce blurred images caused by inadvertent hand shake The LCD will display either the Continuous or Single stabilization icon Stabilization...

Страница 29: ...ons To set the Advanced Functions 1 Pull up the Advanced Function Menus by pressing the button 2 Press Down button to enter the advanced function selection screen press the Left Right button to select...

Страница 30: ...re quality Quality Best Quality Fine Quality Normal Size The size setting refers to the image resolution in pixels A higher image resolution allows you to print that image in larger sizes without degr...

Страница 31: ...lor Auto Color Vivid Color Black White Color Sepia WB White Balance The White Balance allows you to adjust the color temperature for different lighting sources to ensure accurate color reproduction Th...

Страница 32: ...sor performance in darker environments a higher ISO value is required A lower ISO value is needed when shooting in bright conditions Pictures at higher ISO will generally have more noise than those at...

Страница 33: ...12 11 10 9 8 7 6 5 4 3 2 1 16 17 19 18 4 24 23 22 21 20 4 1 Shooting Mode Icons Auto Mode ASCN Mode Program AE Shutter Priority Aperture Priority Manual Mode Portrait Panorama Mode Scene Mode 2 AF Mo...

Страница 34: ...posure Compensation EV value 14 Shutter Speed 15 Aperture Value 16 Focus Frame 17 Stabilization 18 Continuous Shot 19 Face Detection 20 Picture Color Adjustable only in M P S and A modes 21 White Bala...

Страница 35: ...t in Memory 9 Battery Status 10 Zoom 11 Zoom Value Scale Displayed only when zoom is activated 12 Image Stabilization 13 Recording Status Icon Recording standby Recording For optimal video shooting it...

Страница 36: ...k Mode Icon 2 DPOF File 3 File Protection 4 Picture Number 5 SD Memory Card Built in Memory 6 Battery Status 7 Image Zoom 8 Zoom Magnification Area 9 Current Display Area 10 Memory Space this picture...

Страница 37: ...LCD screen will display the following icons 2 Hold the camera steadily and aim at the subject The optimum scene mode will be selected automatically 3 Press the Shutter button halfway down to focus 4...

Страница 38: ...ou to create a panoramic picture The camera will automatically compose a panoramic picture using the individual shots that you take Follow these easy steps to create a panoramic picture 1 Turn the mod...

Страница 39: ...een baseline during camera moving which leads to shooting failure and you need to shoot again Panorama Mode can stitch 2 or 3 pictures maximum In Manual Scene mode you can select from a total of 20 sc...

Страница 40: ...Sketch Landscape For landscapes Vivid reproduction of green and blue Sport For fast moving subjects Capture sharp action shots without blur Beach For taking good pictures in the scenes with strong su...

Страница 41: ...r museum or flash free area Retain color and reduce blur Photo frame For adding interesting frame effects to the photo Panning Shot Produces background image blur that emphasizes motion of the main su...

Страница 42: ...enter the Auto Program Exposure settings menu 2 Press the Left Right button to select the combination of EV shutter speed and aperture for your scene Auto Program Exposure P In Portrait Mode the came...

Страница 43: ...select EV shutter speed 3 Press the Up Down button to select the parameter adjustment 4 Press the button to confirm the settings and enter the shooting screen 3 Press the Up Down button to select the...

Страница 44: ...y setting s menu 2 Press the Left Right button to select EV aperture 3 Press the Up Down button to select the parameter adjustment 4 Press the button to confirm the settings and enter the shooting scr...

Страница 45: ...or video clips stored in the internal memory or on the SD memory card 3 To play a selected video clip press the button to enter the movie playback mode During video playback the operating instructions...

Страница 46: ...on to display thumbnail images of the photos and videos on the screen W Zoom out T Zoom in 1 Use the Zoom button to switch between 3x3 4x4 and Date Folder thumbnail display 2 When displaying 3x3 and 4...

Страница 47: ...magnification area frame and the frame of the whole photo will display on the screen 5 Use the navigation buttons to pan across the image 6 Press the button to return the image to its original scale M...

Страница 48: ...to playback mode 2 Select the picture or video clip you want to delete with the Left Right button 3 After pressing the Up Delete button the delete screen will display on the screen 4 Select Yes or Bac...

Страница 49: ...ion button to go to the sub menu 4 In the sub menu press the Up Down button to select a setting and press the function button to confirm that setting and exit the sub menu 5 Use the Up Down Left Right...

Страница 50: ...gle AF The focus frame appears in the center of the LCD screen to focus on the subject Multi AF The camera automatically focuses the subject in a wide area to find the focus point AF Assist Beam This...

Страница 51: ...ntinuous Shot Use this setting to perform continuous shooting After entering this mode you can shoot multiple images by continuously holding the shutter button down There are five available options Of...

Страница 52: ...AF With Continuous AF turned on the camera will continually adjust focus automatically in response to any camera or subject movement The flash is disabled in this mode in order to enable quick succes...

Страница 53: ...taking a picture The picture stays on the LCD screen for an adjustable period of time Four options are available Off 1 sec 2 sec 3 sec Digital Zoom Use this setting to enable or disable the Digital Zo...

Страница 54: ...51 Date Imprint Include a Date Time stamp in the photo image Off Date Date Time...

Страница 55: ...Right button select the tab with the function you want to adjust and press the Down button 2 Press the Up Down button to select the function and press the Right button to go to the sub menu 3 Press t...

Страница 56: ...m Spot metering targets a small area in the center of the camera s field of view Center metering targets a slightly larger area in the center of the cameras field of view AiAE Artificial Intelligence...

Страница 57: ...ntally erased use this setting to lock one or all of the files To protect unprotect a picture or video 1 Use the Up Down arrow button to select Protect press the or Right button to enter the submenu 2...

Страница 58: ...t all previous protection settings will be cancelled Delete There are three ways to delete files Delete One 1 In the Delete Option select One and then press the button 2 Press the Left Right button to...

Страница 59: ...Yes to delete the file Cancel to return to the menu and then press to confirm The indicator means a file is protected File protection must be removed first before a file can be deleted Deleting files...

Страница 60: ...setting Resizing an image creates a new file that contains the image in the size you select The file with the original image also remains in the memory Rotate You can use this setting to change the o...

Страница 61: ...setting allows you to crop photos and save them as new pictures To trim a picture 1 With the camera in Playback mode press the menu button to access the Photo Menu Then use the Left Right button and...

Страница 62: ...mize the highlights and lowlights captured to more accurately represent the actual scene 1 Select HDR setting in the Playback menu as described previously 2 Press the Left and Right button to find the...

Страница 63: ...enter and adjust settings Press the button to confirm settings 3 Use the Up Down navigation buttons to select Start to run the slideshow or Cancel to return to the Playback menu 4 Press the button to...

Страница 64: ...the wallpaper sub menu Press Right and select either User Nature or Sparkling Press function to confirm the setting User Nature Sparkling Startup Screen Use the UP Down button to select the Welcome W...

Страница 65: ...ault Use the Up Down button to select the Back to Default option press the or Right button to select whether to take the default settings press the Left Button to return to last page and press to exit...

Страница 66: ...b that corresponds with the function you want to adjust and press the Down button 2 Switch between different functions with the Up Down button 3 Press the Right button to enter the sub menu After sele...

Страница 67: ...buttons to switch between volume shutter key self timer and power tone fields 3 Press the Right button then press the Up Down button to adjust the volume or change the tone and press the button to co...

Страница 68: ...items have the following options LCD off On 30 sec 1 Min 2 Min Camera off On 3 Min 5 Min 10 Min 4 Press the button to confirm Language See Setting the Language section on page 14 Zone The Zone setting...

Страница 69: ...navigation button to select Yes or No Then press the button to confirm the setting 3 Select Yes the camera will format the selected media Note that when you perform the Format Memory function it only...

Страница 70: ...ct 1 Select File Numbering in the File Software menu then press Right 2 Select the option with the Up Down button and press the button for confirmation Copy to Card Copy internal memory to SD memory c...

Страница 71: ...latest firmware version you can go to the following website www ge com digitalcameras and look under Support Reset Settings Use this setting to restore the camera to its original factory default setti...

Страница 72: ...confirm the setting Transferring files to your PC The computer will automatically detect the camera as a removable drive Double click the My Computer icon on the desktop to locate the removable drive...

Страница 73: ...g to the appeared menu Macintosh Drag the untitled icon to the Trash Untitled 5 Disconnect the camera once transfer is completed If the USB option is set to PC Turn the camera off and disconnect the U...

Страница 74: ...photos directly to a PictBridge compatible printer using the supplied USB cable without the need for a PC Setting the USB mode The camera s USB port can be set to connect with either a PC or a Printer...

Страница 75: ...cable to the USB port on the printer If the camera is not connected to a PictBridge compatible printer the following error message will appear on the LCD screen The above error message would also app...

Страница 76: ...Japan etc PAL Europe Asia excluding Taiwan Oceania etc Note The TV output will not display properly if an incorrect video system is selected Use this feature to switch the video system from either NTS...

Страница 77: ...he following sections for more detailed information on each setting Print with Date If you have set the date and time on your camera the date and time will be recorded and saved with each photo you ta...

Страница 78: ...utton again Print without Date Use this setting to print the photos without dates on them 1 Select Print without Date from the PictBridge menu The following screen appears 2 Use the Left Right navigat...

Страница 79: ...on again Print Index You can use this setting to print an index of all the photos currently in your camera s memory 1 Select Print index from the PictBridge menu The following screen will appear 2 Sel...

Страница 80: ...ettings beforehand See DPOF section on page 56 1 Select Print DPOF from the PictBridge menu The follow ing screen will appear 2 Select Yes to print or exit then press the button again Exit To exit the...

Страница 81: ...405mm Tele F number F3 0 Wide F5 2 Tele Lens Construction 11 groups 14 elements Optical Zoom 15x Focusing Range Normal Wide 23 6in 60cm Tele 47 2in 120cm Macro 1 9in 5cm Wide Only Viewfinder No Anti H...

Страница 82: ...JPEG Movie Movie Format MOV Motion JPEG Audio G 711 Monaural Shooting Modes Auto ASCN P S A Manual Panorama Movie Portrait Scene Landscape Sport Beach Sunset Fireworks Night Landscape Night Portrait P...

Страница 83: ...osure Compensation 2EV in 1 3 Step Increments Shutter Speed 1 2000 4 Seconds Manual 30 Seconds Continuous Shooting Yes Playback Modes Single Photo Index 9 16 Thumbnails Slide Show Movie Date Zoom Appr...

Страница 84: ...attery Performance Approx 300 Shots of AA Alkaline Battery Based on CIPA Standards Approx 500 Shots of AA NiMH Battery Based on CIPA Standards Operation Environment Temperature 32 104 F 0 40 o C Humid...

Страница 85: ...here are no images on the SD memory card or in the internal memory Lens Error The lens is probably stuck and the camera will power off automatically System Error Unexpected error encountered Write Pro...

Страница 86: ...No other actions are allowed during video audio recording Warning Battery exhausted The batteries are depleted This file cannot be played back The picture format is not recognized by the camera No con...

Страница 87: ...rty appearswhentakingpictures Useasoftclothtocleanthelensonyourcamera Use the Image Stabilization mode Images and video files cannot be saved The SD memory card is full Replace the SD memory card with...

Страница 88: ...to memory card is slow Using a memory card below Class 4 may result in slower recording times Use an SDHC card and shoot after formatting the card Cannot write to the memory card The SD memory card ha...

Страница 89: ...2012 General Imaging Company Printed in China imagination at work http www ge com digitalcameras...

Отзывы: