


12
4. Press and release the
‘auto’
button on the right side of the
monitor. A red light will illuminate near the top left of the
display indicating automatic recording mode is active.
5. In manual or scan mode, press and release the
‘stdby’
button. The screen will turn off.
6. When motion and/or sound is detected by camera,
the screen will automatically turn back on and will begin
recording.
‘REC’
will appear fl ashing on top of the display.
Additionally, the name of the recording will appear to the
right of
‘REC’
in blue.
7. To exit auto record mode, press and release the
‘stdby’
button and then the
‘auto’
button on the right side of the
monitor.
Automatically Record with 1
st
priority motion and/or
sound detection
Activates recording and ‘jumps’ to the applicable camera when
motion and/or sound is detected.
NOTE:
See ‘how-to’ instructions in the ‘Automatically Record with
motion and/or sound detection’ section of the manual.
Requires more than one camera.
- Before recording, it’s recommended to set the correct date and
time. Refer to the ‘Settings’ section of the manual for instructions.
- When activated, the directional keypad, ‘menu’ button, ‘ok’ button
and ‘volume’ buttons are disabled.
- Maximum recording time is 10 minutes of continuous motion and/
or sound detected by camera. After 10 minutes, the monitor will
record to a new fi le if camera still detects motion and/or sound. The
task will repeat itself indefi nitely until all storage space is consumed
(unless the overwrite feature is activated).
• WITHOUT notifi cation alarm-
...To be notifi ed with the screen illuminated
In quad view only (split screen), the screen will ‘jump’ to the
applicable camera when motion and/or sound is detected. The
screen will remain lit and record for approximately 15 seconds
after the video motion and/or sound stops.
...To be notifi ed with the screen in standby mode
In addition to turning the screen back on when motion and/or
sound is detected, the screen will ‘jump’ to the applicable camera.
The screen will remain lit and record for approximately 15 seconds
after the video motion or sound stops.
• WITH notifi cation alarm-
...To be notifi ed with the screen illuminated
In quad view only (split screen), the screen will ‘jump’ to the
applicable camera when motion and/or sound is detected. The
screen will remain lit and record for approximately 15 seconds
after the video motion and/or sound stops. Additionally, sounds
4 beeping tones when audio or video motion is detected. Alarm
can be triggered repeatedly for an indefi nite period of time.
NOTE:
Alarm only sounds when applicable camera is displayed on
the screen.
...To be notifi ed with the screen in standby mode
In addition to turning the screen back on and beeping 4 tones
when motion and/or sound is detected, the screen will ‘jump’ to
the applicable camera. The screen will remain lit and record
for approximately 15 seconds after the video motion and/or
sound stops.
PLAYBACK & DELETION OF RECORDED VIDEOS
• Playback
1. In single or sequential viewing
mode, press the
‘ok’
button.
A list of folders stored on the
memory card will appear on
the screen.
2. Use the directional keypad to
select the folder named,
‘VIDEO’
and press and release
the
‘ok’
button. A new list of
folders sorted by the date the
video(s) were recorded will
appear on the display.
3. Use the directional keypad to
select the folder desired. Press
and release the
‘ok’
button
to select. A list of individual
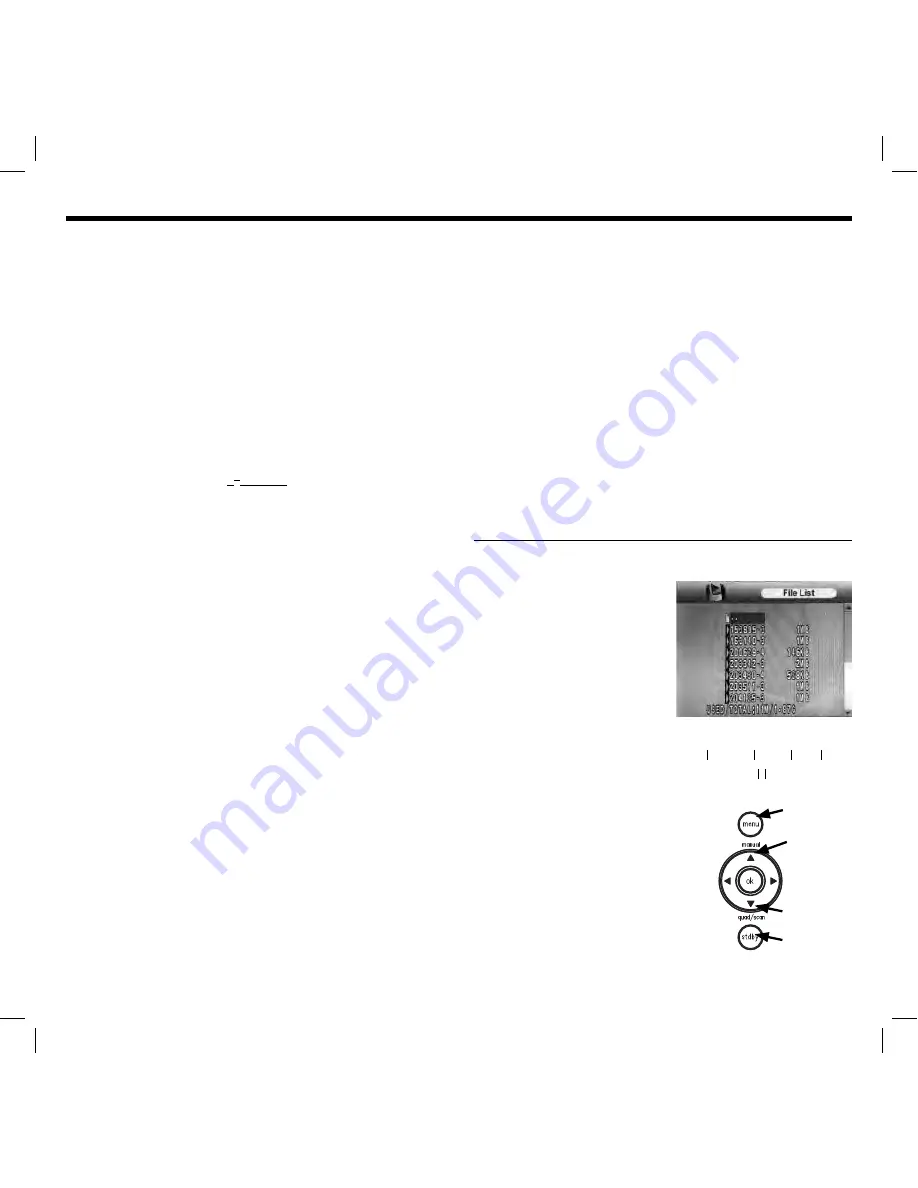
video fi les will appear.
The newest videos will
appear near the bottom
of the list.
Files are named
according to time recorded,
fi le number and size.
203342-3 2MB
recording time
(24hr format)
fi le#
recorded
fi le size
hrs mins secs
back
play/pause
fast
forward
stop
delete
rewind


