GE H
EALTHCARE
D
IRECTION
FQ091013, R
EVISION
1
V
IVID
I
N
AND
V
IVID
Q
N S
ERVICE
M
ANUAL
Chapter 8 - Replacement Procedures
8-7
8-2-3
Hard Disk Replacement Procedure
NOTE:
When replacing the BEP or Hard Disk, one must either obtain new access codes that will fit the
system ID which is programmed on the BEP, or program the BEP system ID to fit the access codes
already registered in the Hard Disk. Only qualified personnel should perform these tasks.
8-2-3-1
Tools
Use the appropriate flat and Phillips-type screw drivers as indicated in the Hard Disk replacement procedure.
8-2-3-2
Time Required
10 minutes
8-2-3-3
Preparation
Shut down the Vivid
i
n/ Vivid q N ultrasound unit, as described in
8-2-3-4
Hard Disk Removal Procedure
1) Make sure the Vivid
i
n/ Vivid q N LCD Display cover is securely closed and that the scanner is
standing firmly on a flat surface.
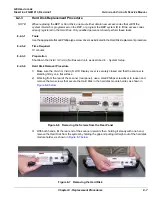
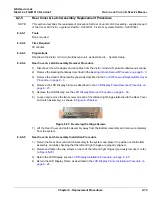
2) Working from the rear of the scanner (rear panel), use a small Phillips screwdriver to loosen and
remove the two screws that secure the Hard Disk in the hard disk module holder, as shown in
Figure 8-6 Removing the Screws from the Rear Panel
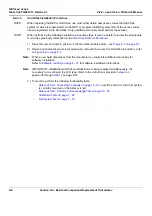
3) With both hands, tilt the rear end of the scanner
upwards
then, holding it steady with one hand,
remove the Hard Disk from the system by holding the grip and pulling it straight out of the hard disk
module holder, as shown in
.
Figure 8-7 Removing the Hard Disk
Содержание Vivid in
Страница 2: ......
Страница 30: ...GE HEALTHCARE DIRECTION FQ091013 REVISION 1 VIVID I N AND VIVID Q N SERVICE MANUAL xxviii...
Страница 739: ......


