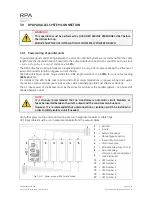
background image

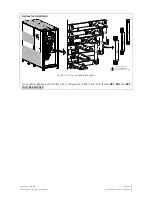
Transport fastening to remove 

Rear side

SGSU_400

-500_S2_U

PS transpo

rt fastenin

g_01


Fig. 3.6-3   Transport fastening to remove 


The chokes fitted in the UPS cabinet are supported both at the chassis. 


These supports must be removed before placing the cabinet in the final location. 

 
These supports are yellow and are indicated with an appropriate symbol on the assembly layout 
drawing (see 

Fig. 3.6-1)


For parallel systems, the delivery also includes the bus control cables for inter-
connecting the UPS modules.


Packing material recycling 

GE

, in compliance with environment protection, use only environmentally friendly 

material. 
UPS packing materials must be recycled in compliance with all applicable 
regulations.


Modifications reserved 

Page 17/41 

OPM_SGS_ISG_M40_M50_2US_V021.doc 

User Manual 

SG Series 400 & 500 UL S2


Содержание SG Series 400

Страница 1: ...tallation Guide Uninterruptible Power supply SG Series 400 500 400 500 kVA 480Vac UL S2 GE Consumer Industrial SA General Electric Company CH 6595 Riazzino Locarno Switzerland T 41 0 91 850 51 51 F 41...

Страница 2: ...ined in this publication is intended solely for the purposes indicated The present publication and any other documentation supplied with the UPS system is not to be reproduced either in part or in its...

Страница 3: ...erform start up and commissioning of the UPS Please Contact GE GLOBAL SERVICES at least two weeks prior to schedule start up and commissioning at 1 800 637 1738 or by E mail at pqservice ge com Distri...

Страница 4: ...00 is a product that needs to be installed by a licensed and knowledgeable contractor We recommend that this manual be kept next to the UPS for future references If any problems are encountered with t...

Страница 5: ...nd External Battery Breaker connection 29 3 8 5 Interface to External Bypass for single unit 30 3 8 6 Connections to External Bypass switch in case of RPA Parallel System 30 3 8 7 Set up for SG Series...

Страница 6: ...removing the sidewalls of the UPS make sure that all earth connections when reassembling are correctly reattached This UPS is intended for use in a controlled indoor environment free of conductive co...

Страница 7: ...attery terminals Do not allow a tool to short between individual or separate battery terminals or to the cabinet or rack Do not lay tools or metal parts on top of the battery and do not lay them where...

Страница 8: ...may occur CAUTION internal parts have dangerous voltage present Risk of electric shock PE Earth GND Ground PROTECTIVE GROUNDING TERMINAL A terminal which must be connected to earth ground prior to mak...

Страница 9: ...0 general view with optional 5th harmonic filter and removed protection panels 1 Opening for top cable entry 2 Opening for bottom cable entry 3 Bus bars for Utility input and Load output 4 Bus bars fo...

Страница 10: ...e of the center of gravity marked on the package Take all necessary precautions to avoid damage to the cabinet while hoisting the UPS NOTE Check for sufficient floor and elevator loading capacity Fig...

Страница 11: ...3 3 2 Some important functions of the UPS such as the customized functions are defined by parameters stored in a RAM memory A small backup battery located on the Control Unit board supplies the RAM I...

Страница 12: ...I filtering is inherent to the UPS there is no guarantee that the UPS will not influence sensitive devices such as cameras and monitors that are positioned close by If interference is expected the UPS...

Страница 13: ...47 80mm 3 15 2 050mm 80 71 30mm SGSU_400 500_S2_UPS view bottom_01US Please remove the plate before drilling any holes Fig 3 4 1 3 Opening on the bottom of the cabinet for input and output cables Fix...

Страница 14: ...timal room temperature for Battery storage is 68 F 20 C to 77 F 25 C and shall never exceed the range 4 F 20 C to 104 F 40 C The life of valve regulated batteries will be reduced by 50 for each additi...

Страница 15: ...Dealer or the nearest Service Center for appropriate solutions In order to prevent overheating of the UPS the available air intake flow rate must exceed the total air exhaust flow rate requirement of...

Страница 16: ...ndicator for shock and TiltWatch indicator for overthrow on the outside These devices indicate an eventual shock or overthrow during transport Whenever these devices show a possible anomaly the UPS sh...

Страница 17: ...and are indicated with an appropriate symbol on the assembly layout drawing see Fig 3 6 1 For parallel systems the delivery also includes the bus control cables for inter connecting the UPS modules Pa...

Страница 18: ...Fuses are opened there is a supply failure to the Rectifier as well as to the Bypass and Manual Bypass In this case the interconnection links BR1 BR2 and BR3 on the input terminals or bus bars MUST R...

Страница 19: ...ing four pole circuit breakers as protection A potential problem exists for situations with non linear loads The neutral current could be greater than the phase currents The three phase Utility power...

Страница 20: ...put Rectifier AC Input Bypass AC Input DC Input F1 F3 UPS rating Max F2 Nom Nom Max F4 SG Series 400 512 A 615 A 481 A 512 A 615 A 702 A SG Series 500 617 A 708 A 600 A 617 A 708 A 960 A Size of Branc...

Страница 21: ...150 170 100 120 135 2 0 145 175 195 115 135 150 3 0 165 200 225 130 155 175 4 0 195 230 260 150 180 205 250 215 255 290 170 205 230 300 240 285 320 190 230 255 350 260 310 350 210 250 280 400 280 335...

Страница 22: ...eld wiring connections can be made from the front side by removing the front right side panel protection cover panel E as indicated in Fig 3 8 1 1 be advised that installation performed from the front...

Страница 23: ...move the plate before drilling any holes Detail of the power wiring terminal for the AC input output Detail of the power wiring terminal for external battery connection 2 51mm 0 57 14 5mm 2 51mm 2 51m...

Страница 24: ...INPUT OUTPUT power wiring Bus Bars Cable terminations are to the Rectifier Input Output Bus Bars as shown above Connect wire to the Bus Bars using appropriate tools and appropriate torque Torque spec...

Страница 25: ...the Bypass Input 3 wire input ground and the Load does not require a Neutral solidly connect the Output Neutral of the UPS to ground in the Output Distribution Cabinet Wire Neutral Conductors from the...

Страница 26: ...Bus Bars as shown above Connect wire to the Bus Bars using appropriate tools and appropriate torque Torque specification for two hole lugs on Bus Bars see Section 3 8 1 Dual Input Configuration Recti...

Страница 27: ...the Bypass Input 3 wire input ground and the Load does not require a Neutral solidly connect the Output Neutral of the UPS to ground in the Output Distribution Cabinet Wire Neutral Conductors from the...

Страница 28: ...BR2 and BR3 MUST BE REMOVED in case of dual input utility Fig 3 8 3 3 AC bus bars BR1 BR2 and BR3 For separate Bypass and Rectifier input configuration option the AC Bus Bars BR1 BR2 and BR3 MUST BE R...

Страница 29: ...connection between the UPS and external Battery must be done by using a shielded cable or suitable shielded steel conduit External Battery Breaker Release Fig 3 8 4 2 External battery breaker connecti...

Страница 30: ...External Bypass for single unit SG Series 400 500 has to be interfaced to the External Bypass Auxiliary Contacts NO for safety reasons This will prevent contactor K7 from closing when the external byp...

Страница 31: ...e Center for more information NOTE If an emergency generator set supplies the UPS in case of Mains Failure and the system is intended to be operated in eBoost Operation Mode eBoost operation shall be...

Страница 32: ...Center which will help you find cost effective solutions The AC input power of the Bypass must be the same for all units of the parallel system no phase shift allowed between units NOTE It is strongly...

Страница 33: ...of the control bus cable between two parallel unit is 40 ft 12 m Maximal overall length of bus connection between the first and the last unit should not be longer than 276 ft 84 m Verify that control...

Страница 34: ...2_RPA IM0048_03 JA2 JB2 JP2 JP1 Fig 3 9 2 3 Bus connection on intermediate units Intermediate units On the parallel bus PCB P34 Bus Interface of the intermediate units of the parallel system the Jumpe...

Страница 35: ...nits must be made on the electronic module P34 Bus Interface situated at the inside of the UPS door Next parallel unit JA SGSU_400 500_S2_RPA control bus cable_02US A JA1 JA2 JB B JA1 JA2 Fig 3 9 3 2...

Страница 36: ...s JA and JB inside the UPS cabinet In case one unit should be removed from the parallel system the bus cables JA and JB must be removed from the cabinet without disconnecting them from the metal plate...

Страница 37: ...O def RL2 1 12 13 2 14 3 15 4 16 5 17 6 18 7 19 8 20 9 21 10 22 11 1 14 9 1 X1 J2 J3 J5 J4 2 1 JP3 Fig 4 1 1 Customer interface NO Normally Open C Common NC Normally Closed The connectors J4 and J5 ca...

Страница 38: ...minal blocks X1 The meaning of the alarms on the free contacts in standard configuration default is the following X1 1 2 3 or J2 1 2 3 NO C NC Utility Failure X1 4 5 6 or J2 4 5 6 NO C NC Load on Inve...

Страница 39: ...ted by changing a dedicated parameter password required When this NO Normally Open contact closes the output Inverter Contactor K7 it is automatically opened and the Load transfer back to Inverter wil...

Страница 40: ...als XB_01 4 2 3 1 Fig 4 1 8 1 Terminals XB for connection EPO SGS_400 500_Customer interface EPO_01 JP3 J2 Fig 4 1 8 2 Customer interface NOTE This procedure could imply a Load shut down NOTE In case...

Страница 41: ...otes with date and short description all the operations performed on the UPS as maintenance components replacement abnormal situations etc Date Description Done by Modifications reserved Page 41 41 OP...

Отзывы: