GE RGB790DETBB Скачать руководство пользователя страница 52

24

49-85214-3

Mantenimiento (Cont.)

CUID

ADO Y LIMPIEZA

Mantenimiento

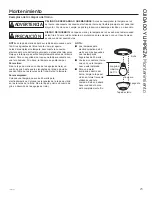
Puerta del Horno Desmontable

La puerta es muy pesada. Tenga cuidado al retirar y levantar la puerta. No levante la puerta usando la manija.

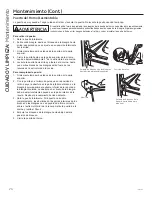
Para retirar la puerta:

1.  Abra la puerta totalmente.

2.  Sobre cada bisagra, deslice el bloqueo de la bisagra hacia 

arriba, asegurando que se ajuste en su posición totalmente 
hacia arriba.

3.  Firmemente tome ambos lados de la puerta por la parte 

superior.

4.  Cierre la puerta hasta que la parte superior de la misma 

quede a aproximadamente 3” de la estructura de la cocina.

5.  Levante la puerta hacia arriba y afuera de la cocina, hasta 

que ambos brazos de las bisagras estén fuera de las 
ranuras de la estructura de la cocina.

Para reemplazar la puerta: 

1.  Firmemente tome ambos lados de la puerta por la parte 

superior.

2.  Con la puerta en el mismo ángulo que en la posición de 

retiro, apoye la abertura en la parte inferior del brazo de la 
bisagra izquierda sobre el extremo inferior de la ranura de 
la bisagra izquierda. La abertura en el brazo de la bisagra 
deberá estar totalmente apoyada en la parte inferior de la 
ranura. Repita el procedimiento del lado derecho.

3.  Abra la puerta totalmente. Si la puerta no se abre 

completamente, las aberturas en las partes inferiores de los 
brazos de las bisagras no se apoyaron de forma correcta 
sobre el extremo inferior de la ranura. Retire la puerta de la 
cocina y repita el Paso 2.

4.  Empuje los bloqueos de la bisagra hacia abajo hasta la 

posición de bloqueo.

5.  Cierre la puerta del horno.

Empuje los bloqueos de las bisagras 

hacia arriba para desbloquearlos

Abertura

Empuje los bloqueos de la 

bisagra hacia abajo para 

bloquear

Posición de retiro

Si se eliminan de forma inapropiada, las bisagras de la puerta del horno se podrán abrir repentinamente 
y ocasionar lesiones personales sobre extremidades que estén cerca de la bisagra. Siga las siguientes 
instrucciones, a fin de evitar riesgos de lesión al retirar y volver a instalar la puerta del horno.

ADVERTENCIA

Содержание RGB790DETBB

Страница 1: ...leaning The Door and Drawer 22 Maintenance 23 Troubleshooting Tips 25 Ranges Self Cleaning Gas Write the model and serial numbers here Model __________________ Serial ___________________ You can find...

Страница 2: ...rneath the range to see that the rear leveling leg is engaged in the bracket On some models the storage drawer or kick panel can be removed for easy inspection If visual inspection is not possible sli...

Страница 3: ...P gas If required these adjustments must be made by a qualified technician in accordance with the installation instructions and local codes The agency performing this work assumes responsibility for t...

Страница 4: ...bottom of the oven door and at the bottom of the range under the warming drawer lower oven drawer or kick panel Use only dry pot holders moist or damp pot holders on hot surfaces may result in burns...

Страница 5: ...en foods with excessive amounts of ice Use proper pan size and avoid pans that are unstable or easily tipped Select cookware that is matched to the size of the burner Burner flames should be adjusted...

Страница 6: ...s stored in an oven can ignite Do not leave items on the cooktop near the oven vent which is in the center of the backguard Items may overheat resulting in a risk of fire or burns When using cooking o...

Страница 7: ...ness Do not leave paper products plastics canned food or combustible materials in the drawer They may ignite Do not touch the heating element or the interior surface of the drawer These surfaces may b...

Страница 8: ...xclusive remedy is product repair as provided in this Limited Warranty Any implied warranties including the implied warranties of merchantability or fitness for a particular purpose are limited to one...

Страница 9: ...CESSORIES Try the GE Appliances Website www geappliances com service_and_support 24 hours a day any day of the year For greater convenience and faster service you can now download Owner s Manuals orde...

Страница 10: ...h the knob in and turn it to the LITE position You will hear a clicking noise the sound of the electric spark igniting the burner When one burner is turned to LITE all burners will spark Sparking will...

Страница 11: ...r surface or oven cooking It conducts heat very slowly and cools very slowly Check cookware manufacturer s directions to be sure it can be used on gas ranges Stove Top Grills Do not use an after marke...

Страница 12: ...12 49 85214 3 on some models 2 2 4 4 8 7 3 5 5 1 7 8 9 9 6 6 3 11 10 Oven Controls USING THE OVEN Oven Controls Convection Non Convection...

Страница 13: ...ntdown is complete To turn the timer off press the Timer pad 9 Delay Time Delays when the oven will turn on Use this to set a time when you want the oven to start Press the Delay Time pad and use the...

Страница 14: ...isable the oven light which turns on when the door opens therefore the bulb must be removed to ensure that the light does not turn on Reference the Maintenance Section for information on how to remove...

Страница 15: ...oving cookware pull the rack out to the bump stop position on the rack support To remove a rack pull it toward you tilt the front end up and pull it out To replace place the curved end of the rack sto...

Страница 16: ...through To use this mode press the Broil pad twice and then press Start It is not necessary to preheat when using this mode Convection Bake Multi Rack The Convection Bake Multi Rack mode is intended f...

Страница 17: ...Leave uncovered use a low sided pan such as a broil pan Bone in chicken breasts legs thighs Broil Lo Bake 3 or B If breaded or coated in sauce avoid Broil Hi modes Broil skin side down first Watch foo...

Страница 18: ...up immediately Let hot surfaces cool then clean and rinse Oven Interior The interior of your new oven can be cleaned manually or by using the Steam Clean or Self Clean modes Spillage of marinades frui...

Страница 19: ...rior The oven door will lock when using this feature Before operating the self clean cycle pre wash inner door and inside window before self cleaning Wipe inner black door before self clean Remove all...

Страница 20: ...Never wash burner heads in your dishwasher as dishwasher detergents will discolor your burners The ports in the burner heads must be kept clean at all times for an even unhampered flame Clogged or dir...

Страница 21: ...ing cup of household ammonia for several hours Afterward scrub grates with a plastic scouring pad soaked in hot soapy water Rinse well and dry When replacing the grates be sure to locate them correctl...

Страница 22: ...amp cloth or sponge Never use harsh abrasives or scouring pads To remove storage drawer 1 Pull drawer straight out until it stops 2 Tilt the front of the drawer up and free of the range To replace sto...

Страница 23: ...t the main fuse or circuit breaker panel Let the bulb cool completely before removing it For your safety do not touch a hot bulb with a damp cloth If you do the bulb may break To remove Turn the glass...

Страница 24: ...edge of the left hinge slot The notch in the hinge arm must be fully seated onto the bottom of the slot Repeat for the right side 3 Fully open the door If the door will not fully open the notches in t...

Страница 25: ...properly and slit as recommended If using aluminum foil conform to pan slits In some areas the power voltage may be low Preheat the broil element for 10 minutes Oven temperature too hot or too cold O...

Страница 26: ...ber or letter flash in the display You have a function error code Press the Cancel Off pad Allow the oven to cool for one hour Put the oven back into operation If the function code repeats Disconnect...

Страница 27: ...section For lower oven drawer models remove the rear access panel by unscrewing the thumb screws in the upper left and right corners Look for the gas shut off lever at the back of the range Burners do...

Страница 28: ...he fuse or reset the circuit breaker The oven is self cleaning Wait for the self clean cycle to finish and the oven to cool Controls improperly set See the Electric warming drawer or Lower oven drawer...

Страница 29: ...Cuidado y Limpieza Limpieza del Horno 18 Limpieza de la Placa de Cocci n 19 Limpieza de la Puerta y el Caj n 22 Mantenimiento 23 Consejos para la Soluci n de Problemas 25 En Canad comun quese con noso...

Страница 30: ...delos el caj n de almacenamiento o el panel de protecci n se pueden retirar para una f cil inspecci n Si no es posible realizar una inspecci n visual deslice la cocina hacia adelante confirme que el s...

Страница 31: ...chufe la cocina o desconecte el suministro de corriente desde el panel de distribuci n del hogar retirando el fusible o desconectando el disyuntor Aseg rese de que todos los materiales de embalaje sea...

Страница 32: ...s secos los sostenedores h medos sobre superficies calientes pueden producir quemaduras debido al vapor No permita que los sostenedores de ollas tengan contacto con los quemadores superficiales la par...

Страница 33: ...o de olla adecuado para evitar que sean inestables o que sufran ca das f cilmente Seleccione utensilios que coincidan con el tama o del quemador Las llamas del quemador se deber n ajustar de modo que...

Страница 34: ...r o dorar en el horno siga las instrucciones del fabricante Nunca ase con la puerta abierta Se proh be asar con la puerta abierta debido al sobrecalentamiento de las perillas de control La funci n de...

Страница 35: ...en el caj n Se pueden incendiar No toque el elemento calentador ni la superficie interior del caj n Es posible que las superficies est n lo suficientemente calientes como para provocar quemaduras Teng...

Страница 36: ...AS IMPL CITAS Su nica y exclusiva alternativa es la reparaci n del producto como se indica en la Garant a Limitada Las garant as impl citas incluyendo garant as impl citas de comerciabilidad o conven...

Страница 37: ...SORIOS Consulte el Sitio Web de Electrodom sticos de GE www geappliances com service_and_support durante las 24 horas cualquier d a del a o Para mayor conveniencia y un servicio m s r pido ahora puede...

Страница 38: ...l Empuje y gire la perilla hasta la posici n LITE Escuchar un ruido de clic el sonido de la chispa el ctrica que enciende el quemador Cuando un quemador se gire a LITE todos los quemadores generar n c...

Страница 39: ...occi n en el horno Conduce el calor de forma muy lenta y se enfr a de forma muy r pida Consulte las instrucciones del fabricante de utensilios de cocina para saber con seguridad si se puede usar con c...

Страница 40: ...12 49 85214 3 Controles del Horno USO DEL HORNO Controles del Horno on some models 2 2 4 4 8 7 3 5 5 1 7 8 9 9 6 6 3 11 10 Convection Convecci n Non Convection Sin Convecci n...

Страница 41: ...r El horno continuar funcionando cuando la cuenta regresiva del temporizador se haya completado Para apagar el temporizador presione la tecla Timer Temporizador 9 Delay Time Tiempo de Retraso Genera u...

Страница 42: ...la puerta se abre por lo tanto la l mpara debe ser retirada para asegurar que la luz no se encienda Para acceder a informaci n sobre c mo retirar la l mpara de luz consulte la Secci n de Mantenimient...

Страница 43: ...silios de cocina empuje el estante hacia afuera del tope posici n de detenci n sobre el soporte del estante Para retirar el estante empuje el mismo hacia usted incline el extremo frontal hacia arriba...

Страница 44: ...rio realizar el precalentamiento al usar este modo Convection Bake Multi Rack Honeado por Convecci n en Estantes M ltiples El modo Convection Bake Multi Rack Honeado por Convecci n en Estantes M ltipl...

Страница 45: ...tenci n a la comida al asarla Centre la comida debajo del quemador Bifes y Chuletas Asar Alto 5 o C Use una bandeja para asar mueva la comida m s abajo para que quede m s preparada y menos soasada Pre...

Страница 46: ...de inmediato Deje que las superficies calientes se enfr en y luego limpie y enjuague Interior del Horno El interior de su nuevo horno puede ser limpiado de forma manual o utilizando los modos Steam Cl...

Страница 47: ...sta que el horno se haya enfriado Una vez que el horno se haya enfriado limpie cualquier ceniza que haya quedado en el horno Estantes del Horno Todas las parrillas del horno se podr n limpiar a mano c...

Страница 48: ...pie las cabezas de los quemadores en el lavavajillas ya que los detergentes usados en lavavajillas descolorar n los quemadores Las hendiduras de las cabezas de los quemadores se deben mantener limpias...

Страница 49: ...mon aco hogare o durante varias horas Luego friegue las rejillas con un estropajo de pl stico con agua caliente y jab n Enjuague a fondo y seque Al reemplazar las rejillas aseg rese de ubicarlas de fo...

Страница 50: ...ivos duros ni almohadillas para fregar Para retirar el caj n de almacenamiento 1 Empuje el caj n hacia afuera hasta que se detenga 2 Incline el frente del caj n hacia arriba y afuera de la cocina Para...

Страница 51: ...ficha D a la tapa de vidrio un cuarto de giro en direcci n de las agujas del reloj NOTA Las l mparas para electrodom stico de 40 watts son m s peque as que las l mparas hogare as de 40 watts Vuelva a...

Страница 52: ...a parte inferior del brazo de la bisagra izquierda sobre el extremo inferior de la ranura de la bisagra izquierda La abertura en el brazo de la bisagra deber estar totalmente apoyada en la parte infer...

Страница 53: ...io usado para la olla y la rejilla para asar no se ajust ni cort de forma apropiada seg n lo recomendado Si usar papel de aluminio deber usarse conforme con las aberturas de la olla En algunas reas es...

Страница 54: ...ebido a que la temperatura interior del horno no descendi por debajo de la temperatura de bloqueo Presione la tecla Cancel Off Cancelar Apagar Deje que el horno se enfr e F y un n mero o letra titila...

Страница 55: ...rnillos de pulgar en las esquinas superior izquierda y derecha Busque la palanca de cierre del gas en la parte trasera de la cocina El quemador no se enciende La funci n Lock Controls Controles de Blo...

Страница 56: ...n de auto limpieza Espere a que el ciclo de auto limpieza finalice y que el horno se enfr e Los controles est n configurados de forma incorrecta Consulte la secci n del caj n calentador o la secci n...

Отзывы: