background image

16

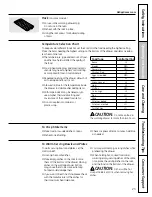
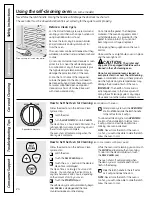
Not all features are on all models.

Using the clock and timer. 

(on some models)

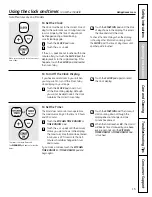
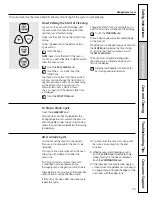
To Reset the Timer

If the display is still showing the time
remaining, you may change it by touching
the KITCHEN TIMER ON/OFF or TIMER
ON/OFF 
pad, then touch the or – pads until
the time you want appears in the display.

If the remaining time is not in the display
(clock, delay start or cooking time are 
in the display), recall the remaining time by
touching the KITCHEN TIMER ON/OFF or
TIMER ON/OFF pad and then touching the 
or – pads to enter the new time you want.

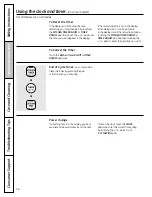
To Cancel the Timer

Touch the Kitchen Timer On/Off or TIMER
ON/OFF 
pad twice.

End of Cycle Tones 

(on some models)

Clear the tones by pressing the pad 
of the function you are using.

Power Outage

If a flashing time is in the display, you have
experienced a power failure. Reset the clock.

To reset the clock, touch the CLOCK
pad twice. Enter the correct time of day 
by touching the or – pads. Touch 
the START/ON pad.

Consumer S

uppor

t

Tr

oubleshooting Tips

Car

e and Cleaning

Operating Instructions

Safety Instructions

or

or

or

or

Содержание RB758

Страница 1: ... 10 11 Sabbath Feature 19 20 Selecting Types of Cookware 9 Self Cleaning 24 25 Special Features 18 Surface Units 7 8 Timed Baking and Roasting 17 Warming Drawer 22 23 Care and Cleaning 26 33 Glass Cooktop 32 33 Troubleshooting Tips 34 37 Accessories 38 Consumer Support Consumer Support Back Cover Warranty 39 GEAppliances com Write the model and serial numbers here Model __________________ Serial _...

Страница 2: ...nce is in use They should never be allowed to sit or stand on any part of the appliance Do not allow anyone to climb stand or hang on the door storage drawer warming drawer or cooktop They could damage the range and even tip it over causing severe personal injury Do not store flammable materials in an oven or near the cooktop CAUTION Items of interest to children should not be stored in cabinets a...

Страница 3: ...n the oven or warming drawer can be smothered completely by closing the door and turning the oven off or by using a multi purpose dry chemical or foam type fire extinguisher Do not touch the surface units the heating elements or the interior surface of the oven These surfaces may be hot enough to burn even though they are dark in color During and after use do not touch or let clothing or other fla...

Страница 4: ...N READ ALL INSTRUCTIONS BEFORE USING 4 Stand away from the range when opening the oven door Hot air or steam which escapes can cause burns to hands face and or eyes Do not heat unopened food containers Pressure could build up and the container could burst causing an injury Keep the oven vent unobstructed Keep the oven free from grease buildup Place the oven rack in the desired position while the o...

Страница 5: ...r together before heating or as fats melt slowly Always heat fat slowly and watch as it heats Use a deep fat thermometer whenever possible to prevent overheating fat beyond the smoking point SURFACE UNITS ALL MODELS GEAppliances com The purpose of the warming drawer is to hold hot cooked foods at serving temperature Always start with hot food cold food cannot be heated or cooked in the warming dra...

Страница 6: ...ecommended cleaning cream to clean the cooktop To avoid possible damage to the cooking surface do not apply cleaning cream to the glass surface when it is hot After cleaning use a dry cloth or paper towel to remove all cleaning cream residue Read and follow all instructions and warnings on the cleaning cream labels Do not lift the cooktop Lifting the cooktop can lead to damage and improper operati...

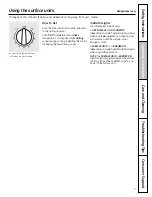
Страница 7: ... UNIT on or BURNER ON depending on model indicator light will glow when any surface unit is on NOTE The SURFACE UNIT or BURNER ON indicator light may glow between the surface control settings of Lo and Off but there is no power to the surface units Push the knob in and turn in either direction to the setting you want At both Off and Hi the control clicks into position You may hear slight clicking ...

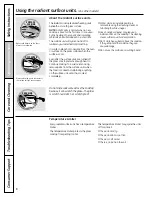
Страница 8: ...ss is scratch resistant not scratch proof Water stains mineral deposits are removable using the cleaning cream or full strength white vinegar Use of window cleaner may leave an iridescent film on the cooktop The cleaning cream will remove this discoloration Don t store heavy items above the cooktop If they drop onto the cooktop they can cause damage Do not use the surface as a cutting board Using ...

Страница 9: ...d procedures from reputable sources These are available from manufacturers such as Ball and Kerr and the Department of Agriculture Extension Service To prevent burns from steam or heat use caution when canning Check pans for flat bottoms by using a straight edge Pans with rounded curved ridged or warped bottoms are not recommended Wok Cooking We recommend that you use only a flat bottomed wok They...

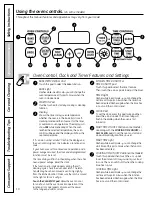
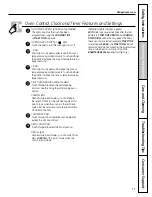
Страница 10: ... the oven back into operation If the function error code repeats disconnect the power to the range and call for service KITCHEN TIMER ON OFF or TIMER ON OFF pad Touch this pad to select the timer feature Then touch the and pads to adjust the timer TIMER Light Flashes while in edit mode you can change the set time at this point Glows when the timer has been activated Flashes again when the time has...

Страница 11: ...he length of time for the self clean cycle at this point Glows when the oven is in the self clean cycle After the self clean cycle the light will turn off Unlatch the door CLEAR OFF Pad Touch this pad to cancel ALL oven operations except the clock and timer BROIL HI LO Pad Touch this pad to select the broil function BROILLight Flashes while in edit mode you can switch from HI to LO BROIL at this p...

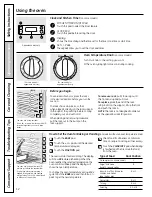
Страница 12: ... display will show the oven temperature To change the oven temperature during BAKE cycle touch the BAKE pad and then the or pads to get the new temperature Check food for doneness at minimum time on recipe Cook longer if necessary Touch the CLEAR OFF pad when baking is finished and then remove the food from the oven Type of Food Rack Position Frozen pies on cookie sheet C Angel food cake B bundt o...

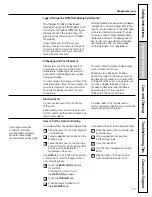
Страница 13: ...ositions in the Broiling Guide Close the oven door Turn the Oven Temperature Knob to BROIL When broiling is finished turn the Oven Temperature Knob to OFF Do not use aluminum foil on the bottom of the oven Never entirely cover a rack with aluminum foil This will disturb the heat circulation and result in poor baking A smaller sheet of foil may be used to catch a spillover by placing it on a lower ...

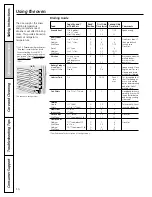
Страница 14: ...e Fish Fillets 1 lb 1 4 to 1 2 thick D 5 5 Handle and turn very carefully Brush with lemon butter before and during cooking if desired Salmon Steaks 2 1 thick D 10 5 Turn carefully Do not Fillets 2 1 2 to 3 4 thick D 10 turn skin side down Ham Slices 1 2 thick C 6 6 precooked 1 thick C 8 8 Pork Chops 2 1 2 thick C 10 10 Slash fat Well Done 2 1 thick about 1 lb C 15 15 Lamb Chops Medium 2 1 thick a...

Страница 15: ...or the automatic oven timing functions to work properly The time of day cannot be changed during a timed baking or self cleaning cycle Touch the CLOCK pad twice Touch the or pads If the or pads are not touched within one minute after you touch the CLOCK pad the display reverts to the original setting If this happens touch the CLOCK pad and reenter the time of day Touch the START ON pad until the t...

Страница 16: ...ching the KITCHEN TIMER ON OFF or TIMER ON OFF pad and then touching the or pads to enter the new time you want To Cancel the Timer Touch the Kitchen Timer On Off or TIMER ON OFF pad twice End of Cycle Tones on some models Clear the tones by pressing the pad of the function you are using Power Outage If a flashing time is in the display you have experienced a power failure Reset the clock To reset...

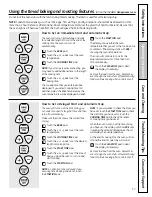
Страница 17: ... the CLEAR OFF pad to clear the display if necessary Remove the food from the oven Remember even though the oven shuts off automatically foods continue cooking after controls are off How to Set a Delayed Start and Automatic Stop The oven will turn on at the time of day you set cook for a specific length of time and then turn off automatically Make sure the clock shows the correct time of day Touch...

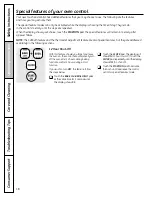
Страница 18: ... following sections Special features of your oven control 12 Hour Shut Off With this feature should you forget and leave the oven on the control will automatically turn off the oven after 12 hours during baking functions or after 3 hours during a broil function If you wish to turn OFF this feature follow the steps below Touch the BAKE and BROIL HI LO pads at the same time for 3 seconds until the d...

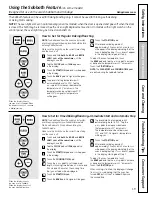
Страница 19: ...nd tap the or pads to increase or decrease the temperature in 25 increments Touch the START ON pad When cooking is finished the display will change from to indicating that the oven has turned OFF but is still set in Sabbath Remove the cooked food Using the Sabbath Feature on some models Designed for use on the Jewish Sabbath and Holidays GEAppliances com How to Set for Regular Baking Roasting NOTE...

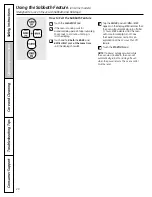
Страница 20: ... Tap the CLOCK pad until ON or OFF appears in the display ON indicates that the oven will automatically turn off after 12 hours OFF indicates that the oven will not automatically turn off See the Special Features section for an explanation of the 12 Hour Shut Off feature Touch the START ON pad NOTE If a power outage occurred while the oven was in Sabbath the oven will automatically turn off and st...

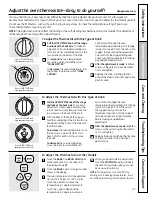
Страница 21: ...on Other Models Touch the BAKE and BROIL HI LO pads at the same time for 3 seconds until the display shows SF Touch the BAKE pad A two digit number shows in the display The oven temperature can be adjusted up to 35 F hotter or 35 F cooler Touch the pad to increase the temperature in 1 degree increments Touch the pad to decrease the temperature in 1 degree increments When you have made the adjustme...

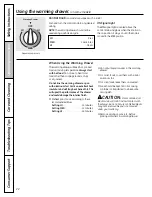
Страница 22: ...foods leave them uncovered Food should be kept hot in its cooking container or transferred to a heat safe serving dish CAUTION Plastic containers or plastic wrap will melt if in direct contact with the drawer pan or a hot utensil Melted plastic may not be removable and is not covered under your warranty Remove serving spoons etc before placing containers in warming drawer Control Knob on models eq...

Страница 23: ...er bottom may cause them to become extremely hot and could damage them If you want to heat fine china please check with the manufacturer of the dishes for their maximum heat tolerance You may warm empty serving dishes while preheating the drawer When holding hot cooked foods and warming empty serving dishes at the same time place the serving dishes on the rack and the food on the bottom of the dra...

Страница 24: ...n some models Before a Clean Cycle Wipe up heavy soil on the oven bottom How to Set the Oven for Cleaning on some models with press pads Follow the directions in the Before a Clean Cycle section Latch the door Touch the SELF CLEAN pad Touch the or pads until the desired Clean Time is displayed The Clean Time is normally 4 hours and 20 minutes You can change the Clean Time to any time between 3 and...

Страница 25: ...low the directions in the Before a Clean Cycle section Latch the door NOTE Never force the latch If the oven is too hot you will not be able to slide the latch Allow the oven to cool Touch the SELF CLEAN pad Touch the or pads to set the Clean Time The Clean Time is preset for 4 hours and 20 minutes You can change the Clean Time to any time between 3 and 5 hours depending on the amount of soil in y...

Страница 26: ...sistance to abrasion If you notice the gasket becoming worn frayed or damaged in any way or if it has become displaced on the door you should have it replaced Lift Off Oven Door With proper care the porcelain enamel finish on the inside of the oven top bottom sides back and inside of the door will stay new looking for years Let the range cool before cleaning We recommend that you wear rubber glove...

Страница 27: ...r to the range GEAppliances com 27 Do not clean the bake element or the broil element Any soil will burn off when the elements are heated To clean the oven floor gently lift the bake element Clean with warm soapy water Clean the oven racks with an abrasive cleanser or scouring pad After cleaning rinse the racks with clean water and dry with a clean cloth NOTE Take the racks out of the oven before ...

Страница 28: ...olution of vinegar and water For rinsing use clean water Polish dry with a soft cloth Do not use abrasive cleansers strong liquid cleaners plastic scouring pads or oven cleaners on the control panel they will damage the finish The control knobs may be removed for easier cleaning Make sure the knobs are in the OFF positions and pull them straight off the stems for cleaning The knobs can be cleaned ...

Страница 29: ...ng the drawer forward and free To replace the warming drawer Place the left drawer rail around the inner left rail guide and slide it in slightly to hook it Place the right drawer rail around the inner right rail guide and slide it in slightly to hook it Slide the drawer all the way in NOTE For models with an electric warming drawer before performing any adjustments cleaning or service disconnect ...

Страница 30: ...ide supports that lock into position when the cooktop is lifted up After cleaning under the cooktop with hot mild soapy water and a clean cloth lower the cooktop Be careful not to pinch your fingers To lower the cooktop push the rods back and gently lower the cooktop until it rests in place NOTE Do not lift the cooktop on radiant top models Lifting the cooktop can lead to damage and improper opera...

Страница 31: ... with aluminum foil or any other material Oven Vent To clean the outside glass finish use a glass cleaner Rinse and polish with a dry cloth Glass Window on some models Stainless Steel Surfaces on some models Do not use a steel wool pad it will scratch the surface To clean the stainless steel surface use warm sudsy water or a stainless steel cleaner or polish Always wipe the surface in the directio...

Страница 32: ... Ceramic Cooktop Cleaner and a paper towel The CERAMA BRYTE Ceramic Cooktop Scraper and all recommended supplies are available through our Parts Center See instructions under To Order Parts section on next page NOTE Do not use a dull or nicked blade Heavy Burned On Residue Use a CERAMA BRYTE Cleaning Pad for Ceramic Cooktops Normal Daily Use Cleaning ONLY use CERAMA BRYTE Ceramic Cooktop Cleaner o...

Страница 33: ...sting shows that if you are cooking high sugar mixtures such as jelly or fudge and have a spillover it can cause permanent damage to the glass surface unless the spillover is immediately removed Be careful not to slide pots and pans across your cooktop It will leave metal markings on the cooktop surface These marks are removable using the CERAMA BRYTE Ceramic Cooktop Cleaner with the CERAMA BRYTE ...

Страница 34: ...oth bottoms the cookware and the surface of the cooktop Cookware has been slid across the cooktop surface Areas of discoloration Food spillovers not cleaned See the Cleaning the glass cooktop section on the cooktop before next use Hot surface on a model This is normal The surface may appear discolored with a light colored glass when it is hot This is temporary and will disappear cooktop as the gla...

Страница 35: ...rmostat Easy to do yourself adjustment section Food does not Oven is not set to BROIL On models with a temperature knob make sure you turn broil properly it all the way to the BROILposition On models with a BROIL HI LO pad make sure it is turned on Improper rack position See the Broiling guide being used Food being cooked in a hot pan For best results use a pan designed for broiling Make sure it i...

Страница 36: ...aighten the door push down on the high corner Oven makes This is the sound of the This is normal clicking noise heating element turning off and on during cooking functions F and a number You have a function error code Press the CLEAR OFF pad Put the oven back or letter flash in into operation the display If the function code repeats Disconnect all power to the range for at least 30 seconds and the...

Страница 37: ...d of the metal This is normal popping sound heating and cooling during both the cooking and cleaning functions Excessive smoking Excessive soil Press the CLEAR OFF pad Open the windows to rid during a clean cycle the room of smoke Wait until the light on the SELF CLEAN pad goes off Wipe up the excess soil and reset the clean cycle Oven door will Oven too hot Allow the oven to cool below locking te...

Страница 38: ...xtra heavy duty oven racks NOW AVAILABLE for your range GE s innovative self cleanable porcelain coated oven racks Heavy Duty Durable Able to be cleaned in a self cleaning oven Visit GEAppliances com for more information Surface Elements Drip Pans Oven Racks Broiler Pan Oven Elements Light Bulbs Knobs Cleaner Cleaning Pads Scraper Consumer Support Troubleshooting Tips Care and Cleaning Operating I...

Страница 39: ...n area where service by a GE Authorized Servicer is not available you may be responsible for a trip charge or you may be required to bring the product to an Authorized GE Service location for service In Alaska the warranty excludes the cost of shipping or service calls to your home Some states do not allow the exclusion or limitation of incidental or consequential damages This warranty gives you s...

Страница 40: ...t special discounts that are available while your warranty is still in effect You can purchase it on line anytime or call 800 626 2224 during normal business hours GE Consumer Home Services will still be there after your warranty expires Parts and Accessories GEAppliances com Individuals qualified to service their own appliances can have parts or accessories sent directly to their homes VISA Maste...

Отзывы: