


22
49-4000214 Rev 0
TROUBLESHOOTING TIPS
Troubleshooting Tips...
Before you call for service
Problem
Possible Cause
What To Do
Start status indicator
light flashing
The door was opened or the
cycle was interrupted.
Press the
Start
pad once and close the door within 4
seconds to start the dishwasher. Press the
Start
pad a
second time when the dishwasher is running only if you
wish to cancel the cycle.
Dishwasher BEEPS
once every minute
This is a reminder that your
dishwasher door has been left
open during operation. It will
continue beeping until you
press Start and close the door.
Press
Start
and close the door.
Beeping at the end
of the cycle (on
some models)
This is normal. Dishwasher
will beep twice at the end of
the cycle.
To turn off the double beep indicator (or re-activate it if
it was previously turned off), press the
Dry Boost
pad 5
times within 3 seconds. A triple beep will sound to indicate
the end-of-cycle beep option has been turned on or off.
Dishes and flatware
not clean
Ultra-Fine Filter or Fine
Filter is clogged
See the
Care and Cleaning
section.
Low inlet water temperature
Make sure inlet water temperature is correct (see the
USING THE DISHWASHER
section). Turn on the hot
water faucet nearest the dishwasher, let run until the water
temperature stops rising. Then start the dishwasher and
turn off the faucet. This ensures the entering water is hot.
Select
Boost
if available.
Water pressure is
temporarily low
Turn on a faucet. Is water coming out more slowly than usual?
If so, wait until pressure is normal before using your dishwasher.
Normal water pressure to the dishwasher should be 20-120 psi.
Air gap or disposer clogged
Clean the air gap or flush the disposer.
High drain loop or air gap
not installed
Refer to the Installation Instructions for proper drain line
installation.
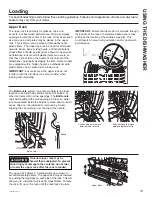
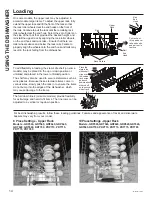
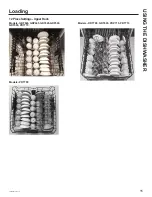
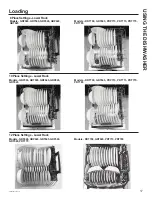
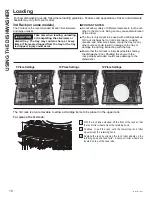
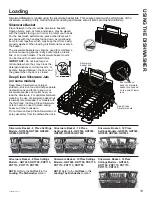
Improper rack loading
Make sure large dishware does not block the detergent
dispenser or the wash arms. See the
Loading
section.
Poor performing detergent
Use a highly rated detergent such as
Finish
®
Quantum
®
Automatic Dishwashing Detergent
.
Spots and filming
on glasses and
flatware
Extremely hard water
Use rinse agents such as
Finish
®
Jet-Dry
®
Rinse Aid
to
prevent spots and prevent new film build-up.
If water is extremely hard, a softener may be required.
Low inlet water temperature
Make sure water temperature is at least 120°F (49°C).
Overloading or improper
loading of the dishwasher
Load dishwasher as shown in the
Loading
section.
Old or damp powder
detergent
Make sure detergent is fresh.
Use a highly rated
detergent such as
Finish
®
Quantum
®
Automatic
Dishwashing Detergent
.
Rinse agent dispenser empty
Refill with rinse agent such as
Finish
®
Jet-Dry
®
Rinse Aid
.
Too little or low performing
detergent
Make sure you use the proper amount of highly rated
detergent.
Cloudiness on
glassware
Combination of soft water
and too much detergent
This is called etching and is permanent. To prevent this
from happening, use less detergent if you have soft water.
Wash glassware in the shortest cycle that will get it clean.
Low performing phosphate-
free detergent
See
A white film on glassware, dishware and the
interior
in this
TROUBLESHOOTING
section.
Water temperature entering
the dishwasher exceeds 150°F
This could be etching. Lower the water heater
temperature.
Slight odor coming
from unit during dry
portion of cycle
This is normal when the Dry
Boost option is used for the
first time. It is caused by the
heating of new parts and will
disappear in a short time.
No action is required.
Содержание Profile Series
Страница 3: ...49 4000214 Rev 0 3 WELCOME Notes...