2
GE is a registered trademark used under license from General Electric company
DEH4
02
28
R
0
2 06 2
0
—
ABB Inc.
305 Gregson Drive Cary, NC 27511
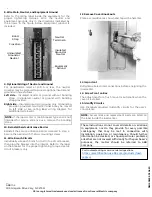
8. Wire Main, Neutral, and Equipment Ground
Refer to the rating label inside the equipment for the
proper tightening torques. Wire the neutral and
equipment grounds only in the directions indicated by
the arrows in the figure below. Equipment ground is
included.
9. Optional Wiring of Neutral and Ground
For panelboards rated at 150 A or less, the neutral
crossbar may be removed to provide optional neutral and
ground wiring as follows:
Left side
–
Insulated neutral or ground without bonding
strap. Uninsulated neutral or ground with bonding
strap provided.
Right side
–
Insulated neutral or ground only. No bonding
provision provided. Neutral terminal A may be moved
to left side or see rating label wiring diagram for
additional terminal kit.
NOTE:
If the load center is main breaker type and is not
intended for service entrance use, remove the bonding
strap.
10. Reinstall Service Entrance Barrier
Reinstall the service entrance barrier removed in step 2.
Secure the barrier with the two mounting screws.
11. Wire Branch Circuits
Individually wire each branch circuit into a circuit breaker,
then plug the breaker into the interior. Refer to the label
on the breaker for the proper tightening torque. Use GE
circuit breakers only.
12. Remove Cover Knockouts
Place a screwdriver as shown and tap with a hammer.
13. Important
Retighten all electrical connections before energizing the
load center.
14. Screw Front on Box
The adjustment for a flush mount is automatic when the
cover is installed.
15. Identify Circuits
Use the labels provided to identify circuits for the user’s
convenience.
NOTE:
Accessories and replacement parts are listed on
the label inside the load center.
These instructions do not cover all details or variations
in equipment, nor do they provide for every possible
contingency that may be met in connection with
installation, operation, or maintenance. Should further
information be desired, or should particular problems
arise that ar
e not covered sufficiently for the purchaser’s
purposes, the matter should be referred to ABB
Company.
Neutral
Terminal A
Insulated
Ground or
Neutral
Equipment
Ground
Uninsulated
Ground or
Neutral
Crossbar
Bond
Strap
For troubleshooting or service related questions,
https://electrification.us.abb.com/products/load-


