background image

Installation Instructions

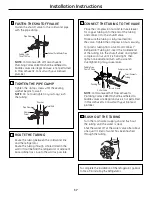
TURN ON THE WATER SUPPLY

Turn the water on at the shutoff valve (house water
supply) and check for any leaks.

12

PLUG IN THE REFRIGERATOR

See the grounding information attached to the power
cord.

13

33

LEVEL THE REFRIGERATOR

The leveling legs have 2 purposes:

1)

Leveling legs adjust so the refrigerator is
firmly positioned on the floor and does not
wobble.

2)

Leveling legs serve as a stabilizing brake
to hold the refrigerator securely in position
during operation and cleaning. The leveling
legs also prevent the refrigerator from
tipping.

Turn the leveling legs

clockwise to raise

the refrigerator,

counterclockwise to lower

it.

CAUTION:

To avoid possible

personal injury or property damage,
the leveling legs must be firmly touching
the floor.

14

A

Flat-Head Screwdriver

LEVEL THE REFRIGERATOR DOORS

Remember a level refrigerator is necessary for
getting the doors perfectly even. If you need help,
review the previous section on leveling the
refrigerator.

If you open the freezer door, you can see
the center hinge.

Insert the supplied 4 mm Allen wrench into
the shaft of the center hinge.

Adjust the height by turning clockwise
or counterclockwise. When you turn
counterclockwise, the door will move up.

After adjusting the doors, insert the supplied
fastener ring using a pair of pliers in the gap
between the hinge grommet and the center
hinge. The number of fastener rings you will
need to insert depends on the gap.

NOTE:

Four fastener rings are enclosed with

the refrigerator. Thickness of each fastener ring
is 0.04

.

15

A

B

When
the left
door is
lower than
the right
door.

When
the left door
is higher
than
the right
door.

Adjustment
point

Adjustment
point

D

C

Содержание PFSS6SKXSS - Profile 25.8 cu. Ft....

Страница 1: ...ds 38 Consumer Support Consumer Support Back Cover Owner s Registration for Canadian Customers 43 44 Performance Data Sheet 47 State of California Water Treatment Device Certificate 48 Warranty for Ca...

Страница 2: ...fore cleaning and making repairs NOTE We strongly recommend that any servicing be performed by a qualified individual Do not refreeze frozen foods which have thawed completely PROPER DISPOSAL OF THE R...

Страница 3: ...red it is your personal responsibility and obligation to have it replaced with a properly grounded 3 prong wall outlet The refrigerator should always be plugged into its own individual electrical outl...

Страница 4: ...s the default display on the refrigerator From this screen you can change the fresh food and freezer temperatures select the desired ice and water dispenser setting and access other functions as liste...

Страница 5: ...dispenser paddle is pushed the light automatically comes on off after 5 seconds when pad is released To turn the light on manually press the LIGHT button The dispenser light will stay on until the LI...

Страница 6: ...C 63 Calcium 8 Iron 0 17 Percent Daily Values DV are based on a 2 000 calorie diet Apple Serving Size 138g Calories 72 Calories from Fat 0 Total Fat 0g 0 Sat Fat 0g 0 Trans Fat 0g 0 Cholesterol 0g 0...

Страница 7: ...en screens using the LEFT and RIGHT arrow keys on the sides of the display On the thumbnail screen select photos one at a time by touching that photo select all of the photos by selecting the ALL butt...

Страница 8: ...ER 2 FRESH FOOD 38 SUBSTITUTIONS PHOTOS NUTRITION FACTS CONVERSIONS SETTINGS 12 00 PM HOLD 3 SECONDS WATER DISPENSER WATER FILTER GOOD EXTRAS LOCK Select an ingredient WATER DISPENSER BACK HOME SCREEN...

Страница 9: ...Consumer Support Troubleshooting Tips Operating Instructions Safety Instructions Installation Instructions GEAppliances com SETTINGS cont FREEZER 2 FRESH FOOD TURBO COOL LOCK SUBSTITUTIONS PHOTOS NUT...

Страница 10: ...AVER by pressing the button check will be gone COOLING SYSTEM This feature turns off the cooling system in the fresh food and freezer compartments without shutting off the electricity to the refrigera...

Страница 11: ...to adjust the BRIGHTNESS of the display and to choose a SCREEN SAVER For BRIGHTNESS use the LEFT and RIGHT arrow keys to dim and brighten the screen For SCREEN SAVER use the UP and DOWN arrow keys to...

Страница 12: ...perature has been set the temperature display will return to the actual refrigerator and freezer temperatures after 10 seconds Several adjustments may be required Each time you adjust controls allow 2...

Страница 13: ...igerator temperature cannot be changed during TurboCool The freezer temperature is not affected during TurboCool Hold 3 sec for Turbo Cool ADJUST REFRIGERATOR How it Works TurboFreeze rapidly cools th...

Страница 14: ...spense well Avoid overfilling glass with ice and use of narrow glasses Backed up ice can jam the chute or cause the door in the chute to freeze shut If ice is blocking the chute poke it through with a...

Страница 15: ...Lining up the arrow on the cartridge and the cartridge holder place the top of the new cartridge up inside the holder Do not push it up into the holder Slowly rotate the cartridge clockwise until it...

Страница 16: ...lower shelves Shelves in the refrigerator compartment are adjustable Quick Space Shelf This shelf splits in half and slides under itself for storage of tall items on the shelf below This shelf can be...

Страница 17: ...l lock in place Adjustable Bins on the Door Adjustable bins can easily be carried from refrigerator to work area To remove Lift bin straight up then pull out To replace or relocate Slide in the bin ju...

Страница 18: ...nd vegetables may be damaged using the Deli Drawer setting Do not store lettuce or other leafy produce in this drawer CAUTION Do not store glass bottles in this drawer If they are frozen they can brea...

Страница 19: ...ivider Removal To remove Pull basket out to the stop position Tilt up the rear of the bin Lift it out to remove To replace Hook the top corners of the divider over the hole of the basket Drawer Remova...

Страница 20: ...s with water Throw away the first few batches of ice to allow the water line to clear Be sure nothing interferes with the sweep of the feeler arm When the bin fills to the level of the feeler arm the...

Страница 21: ...nless steel Using cleaners with chlorine such as bleach may permanently affect the appearance of your new refrigerator Silver accented plastic parts Wash parts with soap or other mild detergents Wipe...

Страница 22: ...e leveling legs located at the bottom front of the refrigerator Pull the refrigerator straight out and return it to position by pushing it straight in Moving the refrigerator in a side direction may r...

Страница 23: ...lace the LED light Freezer Light CAUTION Light bulbs may be hot Unplug the power cord from the outlet Pull drawer out to the stop position Push the clips in on each side and pull down and forward Turn...

Страница 24: ...ation is not covered under the Warranty PREPARATION MOVING THE REFRIGERATOR INDOORS If the refrigerator will not fit through a doorway the refrigerator door and freezer drawer can be removed To remove...

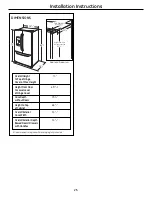
Страница 25: ...Instructions 25 Overall Height 70 to Top of Hinge Cover at Max Height Height from Floor 6913 16 to Lower Level of Hinge Cover Case Depth 291 8 without Doors Height to Top 681 2 of Cabinet Overall Exte...

Страница 26: ...be removed to allow the refrigerator to be safely moved indoors If passageways are less then 31 the leveling legs must be removed as well Start with Step 1 If it is not necessary to remove doors skip...

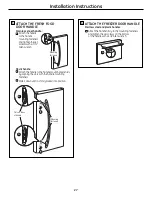
Страница 27: ...ench A ATTACH THE FRESH FOOD DOOR HANDLE Stainless steel handle Attach the handle to the handle mounting fasteners and tighten the set screws with a 3 32 Allen wrench Plastic handle Attach the handle...

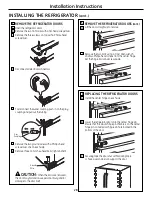
Страница 28: ...ry and or damage to the door itself Installation Instructions INSTALLING THE REFRIGERATOR cont E F G A B C D 5 REMOVE THE REFRIGERATOR DOORS cont Lift the door straight up to remove Remove the two bol...

Страница 29: ...on the door is flush against the cabinet and is not folded Make sure the door is straight and the gap between the doors is even across the front While holding the aligned door in place tighten the top...

Страница 30: ...ft models Remove the 2 bolts securing the leveling leg bracket to the front of the refrigerator cabinet Do this on both sides 30 7 8 REMOVING THE LEVELING LEGS if applicable cont 29 cu ft models Two p...

Страница 31: ...to secure the leveling leg bracket to the underside of the refrigerator cabinet Do this on both sides 9 REPLACING THE FREEZER DOOR Two people may be required to complete this procedure ATTACH AND SECU...

Страница 32: ...he GE SmartConnect tubing the nuts are already assembled to the tubing If you are using copper tubing insert the end of the tubing into the refrigerator connection at the back of the refrigerator as f...

Страница 33: ...firmly touching the floor 14 A Flat Head Screwdriver LEVEL THE REFRIGERATOR DOORS Remember a level refrigerator is necessary for getting the doors perfectly even If you need help review the previous...

Страница 34: ...he level 16 A B SET THE CONTROLS Set the controls to the recommended setting 17 REMOVE PACKAGING A Remove all tape foam and protective packing from shelves and drawers 18 34 LEVEL THE FREEZER DOOR con...

Страница 35: ...the refrigerator is operated before the water connection is made to the icemaker press and release the ICE OFF LOCK pad on the control panel to disengage the icemaker When the refrigerator has been c...

Страница 36: ...ed fitting with a tube cutter and then use a compression fitting Do not cut formed end from GE SmartConnect Refrigerator tubing Shutoff valve to connect to the cold water line The shutoff valve should...

Страница 37: ...e tubing until the water is clear Shut the water off at the water valve after about one quart 1 liter of water has been flushed through the tubing FLUSH OUT THE TUBING 8 SmartConnect Tubing Fasten the...

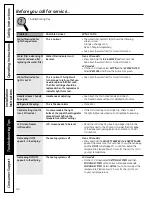
Страница 38: ...the correct temperature The freezer control will click when starting or stopping the compressor Expansion and contraction of cooling coils during and after defrost can cause a cracking or popping soun...

Страница 39: ...thin package or too long is normal Frequent buzzing Ice Off feature is turned Non LCD models sound off but the water supply Press and release the ICE OFF LOCK pad on the control to the refrigerator ha...

Страница 40: ...and reset the refrigerator control outside of refrigerator periods of high humidity one setting colder Turn off Energy Saver mode Moisture collects inside Too frequent or too This is normal in humid...

Страница 41: ...water does not dispense after 24 hours call too cold for service Water spurting from Newly installed filter cartridge Run water from the dispenser for 3 minutes dispenser about 11 2 gallons No water...

Страница 42: ...tach has a gap the Freezer handle sections for detailed instructions Refrigerator beeping This is the door alarm Close door Control setting is not lit On some models the light If the control settings...

Страница 43: ...43 OWNERSHIP REGISTRATION P O BOX 1780 MISSISSAUGA ONTARIO L4Y 4G1 FOR CANADIAN CONSUMERS ONLY Please place in envelope and mail to Veuillez mettre dans une enveloppe et envoyez...

Страница 44: ...44...

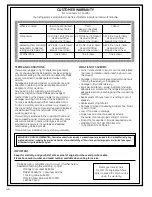
Страница 45: ...ential damages This warranty gives you specific legal rights and you may also have other rights which vary from state to state To know what your legal rights are consult your local or state consumer a...

Страница 46: ...ght bulbs Damage to product caused by accident fire floods or acts of God Loss of food due to spoilage Proper use and care of product as listed in the owner s manual proper setting of controls Product...

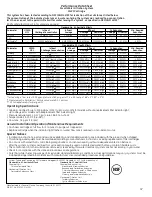
Страница 47: ...8 78 98 65 0 04 mg L 1 4dichlorobenzene 0 075 mg L 0 225 mg L 10 0 2283 mg L 0 000500 mg L 0 000500 mg L 99 78 99 77 0 075 mg L Atrazine 0 003 mg L 0 009 mg L 10 0 0087 mg L 0 0005 mg L 0 0005 mg L 94...

Страница 48: ...y Code for the following health related contaminants Cysts Turbidity Asbestos Lead Mercury Alachlor Atrazine Benzene Carbofuran Lindane Mercury Toxaphene 1 4 dichlorobenzene 2 4 D Microbiological Cont...

Страница 49: ...te d eau 83 85 Installation du r frig rateur 74 82 Pr paration 72 73 Conseils de d pannage 87 91 Bruits normaux de fonctionnement 87 Soutien au consommateur Feuillet de donn es relatives la performanc...

Страница 50: ...le nettoyer ou de le r parer REMARQUE Nous vous recommandons vivement de confier toute r paration un technicien qualifi Ne recongelez pas les aliments surgel s qui ont compl tement d gel 50 COMMENT V...

Страница 51: ...e prise 3 alv oles correctement mise la terre Le r frig rateur doit toujours tre branch dans sa propre prise de courant dont la tension nominale est identique celle indiqu e sur la plaque signal tique...

Страница 52: ...puyer en tout temps sur le bouton HOME cran principal qui se trouve dans le coin inf rieur droit de l cran L cran Home cran principal Bouton Fresh Food r frig rateur Affiche la temp rature r elle et r...

Страница 53: ...l usage et du milieu de fonctionnement Chaque fois que vous proc dez un r glage comptez 24 heures pour que le r frig rateur atteigne la temp rature d sir e DISTRIBUTEUR Le r frig rateur peut distribue...

Страница 54: ...d une portion Choix d une unit Choix d un ingr dient ou d une lettre Bouton de conversions Num ro de la page D filement des pages ou de l alphabet WATER DISPENSER HOME BACK Sodium 1mg 0 Total Carbs 1...

Страница 55: ...an PHOTOS REMARQUE Le distributeur ne fonctionnera pas pendant le t l chargement des photos S LECTION DES PHOTOS L cran PHOTOS affichera 6 photos miniatures ou encore vous pouvez choisir l option plei...

Страница 56: ...mme substituts appara t SUBSTITUTIONS S lection d un ingr dient WATER DISPENSER BACK HOME SCREEN SYSTEM WATER FILTER REFRIGERATOR SETTINGS Bouton SETTINGS R glages Bouton REFRIGERATOR R frig rateur La...

Страница 57: ...t en bon tat la mention ORDER commander s affiche lors qu il est temps d acheter un nouveau filtre ou encore REPLACE Remplacer lorsque le filtre doit tre remplac L tat du filtre eau est galement visib...

Страница 58: ...ME DE REFROIDISSEMENT Cette fonction d sactive le syst me de refroidissement des compartiments r frig rateur et cong lateur sans couper l alimentation de l appareil Sur l cran SYSTEM syst me appuyez...

Страница 59: ...de gla ons REMARQUE D SACTIVEZ la machine gla ons si l alimentation en eau est coup e CRAN Appuyez sur le bouton SCREEN cran sur l cran SETTINGS r glages pour r gler la luminosit BRIGHTNESS de l affic...

Страница 60: ...ce que la temp rature d sir e apparaisse Une fois la temp rature souhait e affich e apr s 10 secondes la temp rature affich e retournera celle du r frig rateur et du cong lateur Plusieurs ajustements...

Страница 61: ...a commande TurboCool fonctionne Le TurboCool n a pas d effet sur la temp rature du cong lateur Hold 3 sec for Turbo Cool ADJUST REFRIGERATOR Hold 3 sec for Turbo Freeze ADJUST FREEZER Fonctionnement L...

Страница 62: ...er le bourrage de la machine gla ons ou de la vrille Pour viter que la glace distribu e ne tombe hors du verre placez le verre proximit de l ouverture du distributeur mais sans le toucher Un peu de gl...

Страница 63: ...s de force dans le support Tournez doucement la cartouche dans le sens des aiguilles d une montre jusqu ce qu elle s arr te Pendant sa rotation la cartouche atteindra elle m me sa position La cartouch...

Страница 64: ...ue le bas de la clayette se fixe en place Clayettes anti d versement Les clayettes anti d versement ont des bords sp ciaux pour emp cher tout d versement aux clayettes inf rieures Clayette escamotable...

Страница 65: ...ssus des soutiens moul s de la porte et poussez vers le bas Le bac se verrouillera en place Bacs non r glables de porte Enl vement Soulevez le bac droit vers le haut puis enlevez en soulevant Remise e...

Страница 66: ...rsque la touche CITRUS agrumes est s lectionn e la temp rature du bac est maintenue approximativement 5 C 41 F Lorsque la touche PRODUCE produits est s lectionn e la temp rature du bac est maintenue a...

Страница 67: ...nier Enl vement Sortez le panier jusqu sa position d arr t Inclinez vers le haut l arri re du bac Soulevez le pour l enlever Remise en place Ins rez les coins sup rieurs du s parateur dans les trous d...

Страница 68: ...instructions l cran pour d sactiver la machine gla ons Un r frig rateur nouvellement install prend de 12 24 heures pour commencer produire des gla ons Vous entendrez un bourdonnement chaque fois que...

Страница 69: ...t endommager de fa on permanente l aspect de votre nouveau r frig rateur Pi ces en mati re plastique plaqu e argent Lavez ces pi ces avec du savon ou un autre d tergent doux Essuyez avec une ponge un...

Страница 70: ...s de sol peuvent tre endommag s particuli rement ceux qui sont coussin s ou dont la surface est gaufr e Soulevez les pieds d inclinaison situ s en bas l avant de votre r frig rateur Tirez le r frig ra...

Страница 71: ...le sens contraire des aiguilles d une montre Remplacez la par une ampoule de la m me puissance ou inf rieure Replacez le capot Rebranchez le r frig rateur NOTE Les ampoules peuvent tre command es au...

Страница 72: ...conduite d eau froide Vous pouvez acheter une trousse d alimentation d eau GE contenant la tuyauterie le robinet d arr t les joints et les instructions chez votre revendeur ou en vous adressant notre...

Страница 73: ...ut 177 8 cm 70 po jusqu au dessus du couvercle sup rieur de la charni re la hauteur maximale Hauteur depuis le sol 177 cm 6913 16 po jusqu au niveau le plus bas du couvercle de la charni re Profondeur...

Страница 74: ...s ais ment le r frig rateur chez vous Si les passages sont plus troits que 31 pouces les pieds de nivellement doivent galement tre retir s Commencez par l tape 1 Si vous n avez pas enlever les portes...

Страница 75: ...de la poign e en alignant les fentes aux fixations de montage de poign e Faites glisser la poign e vers le bas jusqu ce qu elle soit bien fix e en position A A 3 FIXEZ LA POIGN E DE LA PORTE DU COMPA...

Страница 76: ...m me E F G A B C D INSTALLATION DU R FRIG RATEUR suite 5 REMONTAGE DES PORTES DU R FRIG RATEUR Installez la charni re centrale de chaque c t Descendez la porte du r frig rateur sur la broche de la cha...

Страница 77: ...nch it sur la porte s applique contre le caisson et qu il n est pas pli Assurez vous que la porte est droite et que l espace entre les portes est le m me sur toute la fa ade Tout en tenant la porte al...

Страница 78: ...rt du pied de nivellement l avant du r frig rateur R p tez cette proc dure des deux c t s 8 RETRAIT DES PIEDS DE NIVELLEMENT si n cessaire suite Les mod les de 29 pieds cubes La pr sence de deux perso...

Страница 79: ...FIXEZ ET SERREZ L AVANT DU TIROIR AUX GLISSI RES Sortez les assemblages de rail de toute leur longueur de chaque c t du caisson MISE EN GARDE Assurez vous de sortir les rails lat raux la m me longueu...

Страница 80: ...e tuyau de plastique pour installer le filtre Si vous utilisez un tuyau de cuivre placez un crou de compression et une bague manchon l extr mit du tuyau qui vient de l alimentation d eau froide de la...

Страница 81: ...ent deux r les 1 Elles peuvent tre r gl es de mani re permettre l appareil de reposer solidement sur le sol 2 Les pieds de nivellement servent de frein de stabilisation pour tenir le r frig rateur bie...

Страница 82: ...porte Apr s le r glage resserrez toutes les vis 16 C D Exemple L inclinaison est d environ 2 mm comme illustr ci dessous Tournez l ajusteur de hauteur vers 2 0 pour r duire l inclinaison de la porte P...

Страница 83: ...gla ons Pour les mod les pourvus d un cran ACL Si le r frig rateur est utilis avant de raccorder l eau la machine gla ons reportez vous la section MACHINE GLA ONS Fonctions de l cran pour les op ratio...

Страница 84: ...p s i 1 4 et 8 1 bar Une perceuse lectrique Une cl de 1 2 po ou une cl r glable Un tournevis lame plate et un tournevis Phillips Deux crous compression d un diam tre ext rieur de 1 4 po et deux bagues...

Страница 85: ...litre 1 quart d eau par le tuyau PURGEZ LE TUYAU 8 Acheminez le tuyau du tuyau d eau froide au r frig rateur Faites passer le tuyau par un trou perc dans le mur ou le plancher derri re le r frig rate...

Страница 86: ...Notes 86...
Страница 87: ...s permettent de maintenir les bonnes temp ratures Les ventilateurs changent de vitesses pour assurer des conomies d nergie et un refroidissement optimaux CLICS et CLAQUEMENTS Vous pouvez entendre des...

Страница 88: ...CE OFF LOCK glace d sactiv e l approvisionnement en eau du verrouillage du panneau de contr le pour activer la fonctionnalit r frig rateur n est pas branch Ice Off glace d sactiv e puis l ic ne s affi...

Страница 89: ...s trop C est normal l int rieur quand souvent ou trop longtemps il fait humide l air transporte de l humidit l int rieur du r frig rateur quand vous ouvrez les portes La lumi re de compartiment Pas d...

Страница 90: ...r s 24 heures appelez le service L eau jaillit La cartouche du filtre vient Faites couler l eau du distributeur pendant 3 minutes du distributeur d tre install e environ 6 litres La machine gla ons La...

Страница 91: ...e soient pas br l es Mod les non quip s situ es en haut du compartiment et remplacez les le cas ch ant d un cran ACL r frig ration allument les r glages de contr le de la temp rature L cran ACL se blo...

Страница 92: ...e domicile en vertu de la garantie sera fourni dans les r gions o il est disponible et o Mabe estime raisonnable de le fournir Cette garantie est en sus de toute garantie statutaire EXCLUSIONS DE LA G...

Страница 93: ...9 mg L 10 0 0087 mg L 0 0005 mg L 0 0005 mg L 94 22 93 33 0 003 mg L Test utilisant un d bit de 0 50 gpm une pression de 60 psig un pH de 7 5 0 5 et une temp de 20 C 3 C 68 F 5 F Mesures en particules...

Страница 94: ...mes leurs lectrom nagers peuvent recevoir pi ces et accessoires directement la maison cartes VISA MasterCard et Discover accept es Les directives stipul es dans le pr sent manuel peuvent tre effectu...

Страница 95: ...alaci n de la tuber a del agua 129 131 Instalaci n del refrigerador 120 128 Preparaci n para instalar el refrigerador 118 119 Solucionar problemas 132 136 Sonidos normales de la operaci n 132 Servicio...

Страница 96: ...mientras el refrigerador est conectado Desconecte el refrigerador antes de limpiarlo o efectuar reparaciones NOTA Recomendamos enf ticamente encargar cualquier servicio a un personal calificado No vu...

Страница 97: ...u responsabilidad personal y su obligaci n reemplazarlo por un contacto adecuado para tres puntas con conexi n a tierra El refrigerador deber conectarse siempre en su propio contacto el ctrico individ...

Страница 98: ...la puerta Cambie el brillo de la pantalla y reemplace el filtro de agua Pesta a del dispensador Seleccione agua hielo triturado o hielo en cubitos Tambi n acceda a la luz del dispensador Bloqueo de c...

Страница 99: ...ede servir agua o hielo triturado o en cubitos a trav s del dispensador Para efectuar una selecci n presione el bot n DISPENSER y elija WATER agua CRUSHED ICE hielo triturado o CUBED ICE hielo en cubi...

Страница 100: ...S YELLOW BANANA ASPARAGUS PAGE 1 0F 8 Elija la porci n Elija la unidad Elija un ingrediente o letra Bot n de Conversiones N mero de p gina Busque por p gina o por letra WATER DISPENSER HOME BACK Sodiu...

Страница 101: ...na mientras las fotos se est n cargando C MO SELECCIONAR FOTOS La pantalla PHOTOS mostrar 6 fotos en miniatura o puede elegirse la opci n de pantalla completa Despl cese entre pantallas utilizando las...

Страница 102: ...e aparece una lista de ingredientes y proporciones que pueden utilizarse como sustituciones SUSTITUCIONES Seleccione un ingrediente WATER DISPENSER BACK HOME SCREEN SYSTEM WATER FILTER REFRIGERATOR SE...

Страница 103: ...ORDER o si ya es tiempo de cambiar el filtro REPLACE Siga las instrucciones de la pantalla como puede verse en el ejemplo para solicitar o cambiar el filtro de agua El estado del filtro de agua tambi...

Страница 104: ...el AHORRO DE ENERG A presionando el bot n la marca desaparecer COOLING SYSTEM sistema de enfriamiento Esta funci n apaga el sistema de enfriamiento de los compartimentos de alimentos frescos y del co...

Страница 105: ...veces al fabricar una tanda de hielo NOTA Apague OFF la m quina de hielo si el suministro de agua est cortado SCREEN pantalla Seleccione el bot n SCREEN pantalla de la pantalla SETTINGS configuracione...

Страница 106: ...para el compartimento del congelador Deje pasar 24 horas para que la temperatura se estabilice en los niveles preconfigurados Los controles de la temperatura pueden exhibir tanto la temperatura estab...

Страница 107: ...oCool La temperatura del congelador no es afectada durante TurboCool Hold 3 sec for Turbo Cool ADJUST REFRIGERATOR Hold 3 sec for Turbo Freeze ADJUST FREEZER C mo funciona TurboFreeze enfr a r pidamen...

Страница 108: ...en Para evitar que el hielo caiga fuera de los vasos coloque el vaso cerca pero sin tocar la abertura del dispensador Puede dispensarse algo de hielo triturado aunque haya seleccionado CUBED ICE hielo...

Страница 109: ...coloque la parte superior del nuevo cartucho hacia arriba dentro del soporte No lo empuje dentro del soporte Lentamente gire el cartucho en sentido de las agujas del reloj hasta que se detenga Mientra...

Страница 110: ...as tienen bordes especiales para evitar que las salpicaduras se rieguen a los estantes inferiores Sobre las opciones de almacenamiento de alimentos frescos Los estantes en el compartimiento del refrig...

Страница 111: ...gaveta de l cteos hacia arriba luego tire hacia afuera Para reemplazar Enganche la gaveta en los soportes moldeados de la puerta y presione hacia abajo La gaveta se trabar en su lugar Compartimientos...

Страница 112: ...rse alrededordelos41 F 5 C Cuando se selecciona el bot n PRODUCE verduras y frutas la temperatura del caj n puede mantenerse alrededor de los 37 F 3 C Cuando se selecciona el bot n DELI la temperatura...

Страница 113: ...n hacia afuera hasta que se detenga Incline hacia arriba la parte trasera de la gaveta Lev ntela para quitarla Para reemplazar Coloque la canasta sobre el montaje de rieles Remoci n de la divisi n de...

Страница 114: ...ada vez que la m quina de hielos se llene de agua Deseche los primeros cubos de hielo para permitir que la l nea del agua se limpie Aseg rese de que nada interfiera con el movimiento del brazo indicad...

Страница 115: ...mpiadores con cloro como blanqueadores puede afectar permanentemente la apariencia de su nuevo refrigerador Piezas pl sticas plateadas Lave las piezas con jab n u otro detergente suave Limpie con una...

Страница 116: ...o por un cuarto 1 litro de agua Deje abiertas las puertas Modelos que no son de LCD Encienda la caracter stica Ice Off apagado hielo presionando y liberado el bot n ICE OFF LOCK apagado hielo trabado...

Страница 117: ...es Desenchufe el cable de energ a del tomacorriente Tire el caj n hacia afuera hasta que se detenga Presione los ganchos hacia adentro sobre cada lado y presione hacia abajo y adelante Gire la bombill...

Страница 118: ...EFRIGERADOR AL INTERIOR Si el refrigerador no entra por una puerta se pueden retirar la puerta del refrigerador y la gaveta del congelador Para retirar la puerta del refrigerador consulte la secci n I...

Страница 119: ...total hasta 70 177 8 cm la parte superior de la tapa de la bisagra a la altura m x Altura desde el piso 6913 16 177 cm hasta el nivel m s bajo de la tapa de la bisagra Profundidad 291 8 74 cm de la ca...

Страница 120: ...interior Si los pasillos miden menos de 31 pulgados tambi n deben quitarse las patas de nivelaci n Empiece con el Paso 1 Salte el Paso 11 si no se necesita retirar las puertas Deje la cinta y todo el...

Страница 121: ...a los tornillos de montaje alinee las ranuras con los tornillos de montaje Desl cela hasta que encaje firmemente en su lugar A A 3 SUJETE LA MANIJA DE LA PUERTA DEL CONGELADOR Manijas de acero inoxida...

Страница 122: ...los dos pernos utilizando una llave Allen de 3 16 y los dos tornillos Phillips de la bisagra central Separe la bisagra los pernos y tornillo I H C MO QUITAR LAS PUERTAS DEL REFRIGERADOR Abra las puer...

Страница 123: ...erda Verifique que la junta de la puerta est nivelada con el gabinete y que no est doblada Verifique que la puerta est derecha y que el espacio entre las puertas est nivelado en el frente Mientras sos...

Страница 124: ...te los 2 pernos que fijan el soporte de la pata de nivelaci n al frente del gabinete del refrigerador H galo sobre ambos lados 8 C MO QUITAR LAS PATAS DE NIVELACI N si corresponde cont Modelos de 29 p...

Страница 125: ...dos personas para completar este procedimiento CONECTE Y SUJETE EL FRENTE DEL CAJ N A LOS DESLIZADORES Estire los montajes de rieles al m ximo sobre cada lado del gabinete PRECAUCI N Aseg rese de esti...

Страница 126: ...l ctrico 13 C MO VOLVER A COLOCAR LA PUERTA DEL CONGELADOR cont C MO VOLVER A COLOCAR LA GAVETA DEL CONGELADOR Enganche los extremos de la gaveta del congelador dentro de ambos soportes y presione hac...

Страница 127: ...ara que las puertas est n bien equilibradas Si necesita ayuda vuelva a ver la secci n anterior sobre la nivelaci n del refrigerador 15 Cuando la puerta izquierda est m s baja que la derecha Cuando la...

Страница 128: ...co los cuatro tornillos Phillips de la puerta sobre cada lado derecho e izquierdo Afloje el tornillo regulador con un destornillador Phillips para ajustar el nivel 16 A B C MO NIVELAR LA PUERTA DEL CO...

Страница 129: ...l suministro de agua hacia el refrigerador es desde un Sistema de Filtro de Agua de smosis Inversa Y el refrigerador tambi n tiene un filtro de agua use el tap n de derivaci n del filtro del refrigera...

Страница 130: ...tes de comprar aseg rese de que una v lvula tipo silla cumple con los c digos de plomer a en su localidad Instrucciones para la instalaci n CIERRE EL SUMINISTRO PRINCIPAL DE AGUA Abra el grifo m s cer...

Страница 131: ...ir los C digos 248CMR de Plomer a para el Estado de Massachusetts Las v lvulas tipo silla son ilegales y su uso no est permitido en Massachusetts Consulte con un plomero licenciado CONECTE LA TUBER A...

Страница 132: ...ntener las temperaturas correctas Los ventiladores cambian la velocidad para suministrar enfriamiento ptimo y ahorrar energ a CHASQUIDOS ESTALLIDOS CRUJIDO Puede escuchar sonidos como de crujido o est...

Страница 133: ...a la puerta Revise si hay un paquete que mantiene la puerta abierta Escarcha o cristales Se dej abierta la puerta Revise si hay un paquete que mantiene la puerta abierta de hielo en alimentos Apertura...

Страница 134: ...onato de sodio en el refrigerador c mbiela cada tres meses El interior requiere limpieza Vea Cuidado y limpieza Se forma humedad No es extra o durante Seque la superficie con un pa o suave y ajuste el...

Страница 135: ...4 horas Si no sale agua despu s est n configurados a una de 24 horas llame al servicio t cnico temperatura muy baja El agua chorrea Cartucho del filtro reci n Deje correr el agua desde el dispensador...

Страница 136: ...sujetar la manija de la puerta de la manija tiene alimentos frescos y C mo sujetar la manija del congelador una brecha para informaci n m s detallada El refrigerador emite Esto es la alarma de la pue...

Страница 137: ...sedimento excesivo en el suministro de agua Reemplazo de las bombillas si incluidos o los filtros de agua si incluidos Da o al producto causado por accidente fuego inundaciones o actos de Dios Da o i...

Страница 138: ...0 0 0087 mg L 0 0005 mg L 0 0005 mg L 94 22 93 33 0 003 mg L Probado utilizando una tasa de flujo de 0 5 gpm 1 8927 l min presi n de 60 psig 4 218 Kg cm2 pH de 7 5 0 5 temp de 20 3 C Medici n en part...

Страница 139: ...nea en cualquier momento o llamar al 800 626 2224 durante horas normales de oficina GE Consumer Home Services estar a n ah cuando su garant a termine Piezas y accesorios GEAppliances com Aquellos ind...

Страница 140: ...on line anytime or call 800 626 2224 during normal business hours GE Consumer Home Services will still be there after your warranty expires In Canada call 1 888 261 2133 Parts and Accessories In the...

Отзывы: