background image

Consumer Support

Troubleshooting T

ips

Operating Instructions

Safety Instructions

Care and cleaning of the microwave oven.

ge.com 

Helpful Hints

An occasional thorough wiping with a solution of baking soda and water keeps 
the inside fresh.

Unplug the cord before cleaning any part of this oven.

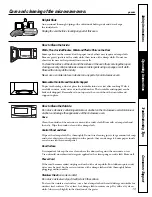
How to Clean the Inside

Walls, Floor, Inside Window, Metal and Plastic Parts on the Door

Some spatters can be removed with a paper towel; others may require a damp cloth.
Remove greasy spatters with a sudsy cloth, then rinse with a damp cloth. Do not use 
abrasive cleaners or sharp utensils on oven walls. 

To clean the surface of the door and the surface of the oven that come together upon
closing, use only mild, nonabrasive soaps or detergents using a sponge or soft cloth.
Rinse with a damp cloth and dry.

Never use a commercial oven cleaner on any part of your microwave oven.

Removable Turntable and Turntable Support 

To prevent breakage, do not place the turntable into water just after cooking. Wash it
carefully in warm, sudsy water or in the dishwasher. The turntable and support can be
broken if dropped. Remember, do not operate the oven without the turntable and 
support in place.

How to Clean the Outside

Do not use cleaners containing ammonia or alcohol on the microwave oven. Ammonia or
alcohol can damage the appearance of the microwave oven.

Case

Clean the outside of the microwave oven with a sudsy cloth. Rinse with a damp cloth and
then dry. Wipe the window clean with a damp cloth. 

Control Panel and Door

Wipe with a damp cloth. Dry thoroughly. Do not use cleaning sprays, large amounts of soap
and water, abrasives or sharp objects on the panel—they can damage it. Some paper towels
can also scratch the control panel.

Door Surface

It is important to keep the area clean where the door seals against the microwave oven. 
Use only mild, non-abrasive detergents applied with a clean sponge or soft cloth. Rinse well.

Power Cord

If the cord becomes soiled, unplug and wash with a damp cloth. For stubborn spots, sudsy
water may be used, but be certain to rinse with a damp cloth and dry thoroughly before
plugging cord into outlet.

Stainless Steel 

(on some models)

Do not use a steel-wool pad; it will scratch the surface.

To clean the stainless steel surface, use a hot, damp cloth with a mild detergent suitable for
stainless steel surfaces. Use a clean, hot, damp cloth to remove soap. Dry with a dry, clean
cloth. Always scrub lightly in the direction of the grain.

19

Содержание PEB2060SMSS - Countertop Microwave Oven

Страница 1: ...s 9 Sensor Features 13 15 Time Features 9 12 Care and Cleaning 19 Troubleshooting Tips 20 Things That Are Normal 20 Consumer Support Consumer Support Back Cover Product Registration 21 22 Warranty 23 MFL38268201 49 40551 04 07 JR ge com Write the model and serial numbers here Model __________________ Serial __________________ You can find them on a label inside the oven ...

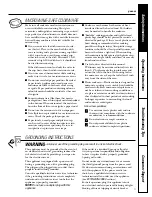
Страница 2: ... the microwave oven is in operation Do not operate this appliance if it has a damaged power cord or plug if it is not working properly or if it has been damaged or dropped If the power cord is damaged it must be replaced by General Electric Service or an authorized service agent using a power cord available from General Electric Do not cover or block any openings on the appliance Use this applianc...

Страница 3: ...n when not in use If materials inside the oven ignite keep the oven door closed turn the oven off and disconnect the power cord or shut off power at the fuse or circuit breaker panel If the door is opened the fire may spread Do not use the Sensor Features twice in succession on the same food portion If food is undercooked after the first countdown use Time Cook for additional cooking time See door...

Страница 4: ...HOT LIQUIDS SUDDENLY BOILING OVER WHEN THE CONTAINER IS DISTURBED OR A SPOON OR OTHER UTENSIL IS INSERTED INTO THE LIQUID To reduce the risk of injury to persons Do not overheat the liquid Stir the liquid both before and halfway through heating it Do not use straight sided containers with narrow necks After heating allow the container to stand in the microwave oven for a short time before removing...

Страница 5: ...h containers tightly covered with plastic wrap remove covering carefully and direct steam away from hands and face Use foil only as directed in this manual TV dinners may be microwaved in foil trays less than 3 4 high remove the top foil cover and return the tray to the box When using foil in the microwave oven keep the foil at least 1 inch away from the sides of the oven Plastic cookware Plastic ...

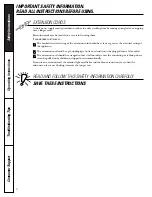
Страница 6: ...al rating of the extension cord should be at least as great as the electrical rating of the appliance The extension cord must be a grounding type 3 wire cord and it must be plugged into a 3 slot outlet The extension cord should be arranged so that it will not drape over the countertop or tabletop where it can be pulled on by children or tripped over unintentionally If you use an extension cord the...

Страница 7: ...e and support must be in place when using the oven The turntable may be removed for cleaning Removable Turntable Support The turntable support must be in place when using the oven NOTE Rating plate oven vent s and oven light are located on the inside walls of the microwave oven Optional Accessories Available at extra cost from your GE supplier Choose the appropriate Installation Kit below to conve...

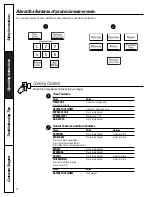
Страница 8: ...tely POWER LEVEL Power level 1 10 ADD 30 SEC Starts immediately Sensor Features and Auto Features Press Enter Options POPCORN Starts immediately more less time VEGETABLE Starts immediately more less time Press once fresh vegetables Press twice frozen vegetables Press three times canned vegetables REHEAT Starts immediately BEVERAGE Starts immediately POTATO Starts immediately more less time CHICKEN...

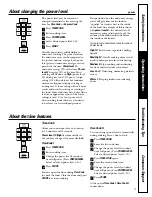
Страница 9: ...s shown with power level 3 the defrost cycle If microwave energy did not cycle off the outside of the food would cook before the inside was defrosted Here are some examples of uses for various power levels High 10 Fish bacon vegetables boiling liquids Med High 7 Gentle cooking of meat and poultry baking casseroles and reheating Medium 5 Slow cooking and tenderizing for stews and less tender cuts o...

Страница 10: ... to 6 min In 1 qt casserole place 2 tablespoons water Corn on the cob fresh 1 to 5 ears 11 4 to 4 min In 2 qt glass baking dish place corn If corn is in per ear husk use no water if corn has been husked add 1 4 cup water Rearrange after half of time frozen 1 ear 3 to 6 min Place in 2 qt oblong glass baking dish 2 to 6 ears 2 to 3 min Cover with vented plastic wrap Rearrange after per ear half of t...

Страница 11: ...water in the cavity until giblets can be removed Turkey breast 4 to 6 lbs 3 to 8 min Place unwrapped breast in microwave safe dish breast side down After first half per lb of time turn breast side up and shield warm areas with foil Defrost for second half of time Let stand 1 to 2 hours in refrigerator to complete defrosting Consumer Support Troubleshooting Tips Operating Instructions Safety Instru...

Страница 12: ...ide below enter food weight For example press pads 1 and 2 for 1 2 pounds 1 pound 3 ounces Press START Time Defrost is explained in the About the time features section There is a handy guide located on the inside front of the oven Remove meat from package and place on microwave safe dish When the oven signals turn the food over Remove defrosted meat or shield warm areas with small pieces of foil A...

Страница 13: ...ked after the countdown use Time Cook for additional cooking time The proper containers and covers are essential for best sensor cooking Always use microwave safe containers and cover them with lids or vented plastic wrap Never use tight sealing plastic containers they can prevent steam from escaping and cause food to overcook Be sure the outside of the cooking containers and the inside of the mic...

Страница 14: ...e automatic popping time To subtract time After pressing POPCORN press 1 immediately after the oven starts for 20 seconds less cooking time Press 1 again to reduce cooking time another 10 seconds total 30 seconds less time To add time After pressing POPCORN press 9 immediately after the oven starts for an extra 20 seconds Press 9 again to add another 10 seconds total 30 seconds additional time 2 1...

Страница 15: ... press the CHICKEN FISH pad once for chicken pieces or twice for fish The oven starts immediately The oven signals when steam is sensed and the time remaining begins counting down Turn or stir the food if necessary Do not open the oven door until time is counting down If the door is opened close it and press START immediately If food is undercooked after the countdown use TIME COOK for additional ...

Страница 16: ...The REM indicator will remain lit to show that the Reminder is set To clear the Reminder before it occurs press REMINDER then 0 The REM indicator will no longer be lit 4 3 2 1 Scroll Speed The scroll speed of the display can be changed Press and hold the AM PM pad about 3 seconds to bring up the display Select 1 5 for slow to fast scroll speed Delay Start Delay Start allows you to set the microwav...

Страница 17: ...ructions Safety Instructions Clock Press to enter the time of day Press CLOCK Enter the time of day Select AM or PM Press START or CLOCK To check the time of day while microwaving press CLOCK 4 3 2 1 Child Lock Out You may lock the control panel to prevent the microwave from being accidentally started or used by children To lock or unlock the controls press and hold CLEAR OFF for about three secon...

Страница 18: ...e even heating and reduce cooking time Venting plastic wrap or covering with wax paper allows excess steam to escape Shielding In a regular oven you shield chicken breasts or baked foods to prevent over browning When microwaving you use small strips of foil to shield thin parts such as the tips of wings and legs on poultry which would cook before larger parts Standing Time When you cook with regul...

Страница 19: ...he oven without the turntable and support in place How to Clean the Outside Do not use cleaners containing ammonia or alcohol on the microwave oven Ammonia or alcohol can damage the appearance of the microwave oven Case Clean the outside of the microwave oven with a sudsy cloth Rinse with a damp cloth and then dry Wipe the window clean with a damp cloth Control Panel and Door Wipe with a damp clot...

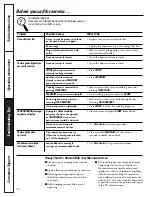
Страница 20: ...after selecting AUTO DEFROST selecting AUTO DEFROST Oven was paused accidentally Press START to restart the cooking program SENSOR ERROR message During the Sensor cooking Close the door and press START immediately appears on display program the door was opened or START PAUSE was pressed before steam could be detected Steam was not detected in Use Time Cook to heat for more time maximum amount of t...

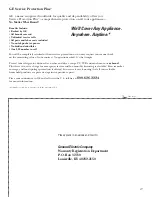
Страница 21: ...otection or you may request your money back on the remaining value of your contract No questions asked It s that simple Protect your refrigerator dishwasher washer and dryer range TV VCR and much more any brand Plus there s no extra charge for emergency service and low monthly financing is available Even icemaker coverage and food spoilage protection is offered You can rest easy knowing that all y...

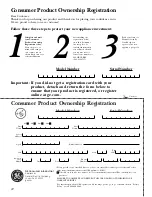
Страница 22: ...here Complete and mail your Consumer Product Ownership Registration today Have the peace of mind of knowing we can contact you in the unlikely event of a safety modification After mailing the registration below store this document in a safe place It contains information you will need should you require service Our service number is 800 GE CARES 800 432 2737 Read your Owner s Manual carefully It wi...

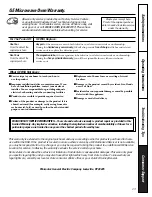
Страница 23: ...s with this appliance Damage caused after delivery What GE Will Not Cover This warranty is extended to the original purchaser and any succeeding owner for products purchased for home use within the USA If the product is located in an area where service by a GE Authorized Servicer is not available you may be responsible for a trip charge or you may be required to bring the product to an Authorized ...

Страница 24: ...that are available while your warranty is still in effect You can purchase it on line anytime or call 800 626 2224 during normal business hours GE Consumer Home Services will still be there after your warranty expires Parts and Accessories ge com Individuals qualified to service their own appliances can have parts or accessories sent directly to their homes VISA MasterCard and Discover cards are a...

Отзывы: