background image

29

TROUBLESHOOTING 

TIPS

Problem

Possible Cause

What To Do

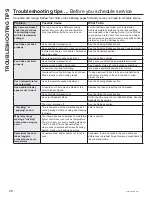
Oven light does not 
work

Light bulb is loose or defective.

Tighten or replace bulb. See the Maintenance section for 
instructions on how to replace the bulb.

Oven will not self-
clean

The temperature is too high to set a 
self-clean operation.

Allow the oven to cool and reset the controls.

Oven controls improperly set.

See the Cleaning the Oven section.

Excessive smoking 
during clean cycle

Excessive soil or grease.

3UHVVWKH


Cancel/Off


pad. Open the windows to rid the 

room of smoke. Wait until the 

LOCKED

 light goes off. Wipe 

up the excess soil and reset the clean cycle.

Oven not clean after a 
clean cycle

Oven controls improperly set.

See the Cleaning the Oven section.

Oven was heavily soiled.

Clean up heavy spillovers before starting the clean cycle. 
Heavily soiled ovens may need to self-clean again or for a 
longer period of time.

Strong “burning” or 
“oily” odor emitting 
from the vent

This is normal in a new oven and will 
disappear in time. 

To speed the process, set a self-clean cycle for a minimum 
of 3 hours. See the Cleaning the Oven  section. This is 
temporary.

Excessive smoking 
during broiling

Food too close to burner element.

Lower the rack position of the food.

Oven door will not 
open or LOCKED light 
is on when you want 
to cook.

The oven door is locked because the 
temperature inside the oven has not 
dropped below the locking temperature.

3UHVVWKH

Cancel/Off

 pad. Allow the oven to cool below the 

locking temperature.

"LOCK DOOR" 
flashes in the display

The self-clean cycle has been selected 
but the door is not closed.

Close the oven door.

“F— and a number 
or letter” flash in the 
display

You have a function error code.

3UHVVWKH

Cancel/Off

 pad. Allow the oven to cool for one 

KRXU3XWWKHRYHQEDFNLQWRRSHUDWLRQ,IWKHIXQFWLRQFRGH
UHSHDWVGLVFRQQHFWDOOSRZHUWRWKHRYHQIRUDWOHDVW

seconds and then reconnect power. If the function error 
code repeats, visit 

GEAppliances.com/service

.

Power outage, clock 
flashes

3RZHURXWDJHRUVXUJH

Reset the clock. If the oven was in use, you must reset 
it by pressing the 

Cancel/Off


pad, setting the clock and 

resetting any cooking function.

Lock Controls or 
Control Lockout 
feature is activated

If 

LOC ON

 appears in the display, the range control is 

locked. Turn this feature off to use the range. See the Lock 
Control feature in the Oven Controls section.

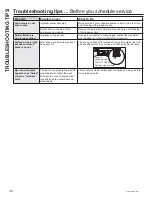
Burners do not light

3OXJRQUDQJHLVQRWFRPSOHWHO\LQVHUWHG

in the electrical outlet.

Make sure electrical plug is plugged into a live, properly 
grounded outlet.

Gas supply not connected or turned on.

See the Installation Instructions that came with your range.

A fuse in your home may be blown or 
the circuit breaker tripped.

Replace the fuse or reset the circuit breaker.

Burner parts not replaced correctly.

See the Care and Cleaning of the range section.

Burner slots near the electrode, or the 
round lighter port on the oval burner, 
may be clogged.

Remove the burners and clean them. Check the electrode 
area for burned-on food or grease. See the Care and 
Cleaning of the range section.

Food residue on electrode

Lightly polish flat tip of electrode with nail file or sandpaper 
until shiny.

Troubleshooting tips ...

 Before you schedule service


Содержание PCGS960

Страница 1: ...al Electric Company Manufactured under trademark license SAFETY INFORMATION 3 USING THE RANGE In Case of a Power Failure 8 Surface Burners 8 Griddle 10 Oven Controls 11 Cooking Options 12 Settings 13 Sabbath Mode 14 Oven Racks 15 Aluminum Foil and Oven Liners 15 Oven Cooking Modes 16 Oven Air Vents 17 Oven Probe 17 Oven Cooking Guide 18 Air Fry Cooking Guide 20 CARE AND CLEANING Range Exterior 21 ...

Страница 2: ...very GE Appliances product and we think you will too Among other things registration of your appliance ensures that we can deliver important product information and warranty details when you need them Register your GE appliance now online Helpful websites and phone numbers are available in the Consumer Support section of this Owner s Manual You may also mail in the pre printed registration card in...

Страница 3: ... to the anti tip device properly WARNING If the information in this manual is not followed exactly a fire or explosion may result causing property damage personal injury or death Do not store or use gasoline or other flammable vapors and liquids in the vicinity of this or any other appliance WHAT TO DO IF YOU SMELL GAS Ŷ R QRW WU WR OLJKW DQ DSSOLDQFH Ŷ R QRW WRXFK DQ HOHFWULFDO VZLWFK GR QRW XVH ...

Страница 4: ...KLQJ RU LPSDFWLQJ JODVV GRRUV cooktops or control panels Doing so may lead to glass breakage Do not cook on a product with broken glass Shock fire or cuts may occur Ŷ R QRW OHDYH FKLOGUHQ DORQH RU XQDWWHQGHG LQ DQ area where an appliance is in use They should never be allowed to climb sit or stand on any part of the appliance Ŷ CAUTION Do not store items of interest to children in cabinets above a...

Страница 5: ...e that could spread to surrounding cabinets Ŷ 1HYHU OHDYH RLO XQDWWHQGHG ZKLOH IU LQJ I DOORZHG to heat beyond its smoking point oil may ignite resulting in fire that may spread to surrounding FDELQHWV 8VH D GHHS IDW WKHUPRPHWHU ZKHQHYHU possible to monitor oil temperature Ŷ 7R DYRLG RLO VSLOORYHU DQG ILUH XVH WKH PLQLPXP amount of oil when using a shallow pan frying and avoid cooking frozen foods...

Страница 6: ...ff during the self cleaning cycle of any range Move birds to another well ventilated room SAFETY INFORMATION IMPORTANT SAFETY INFORMATION READ ALL INSTRUCTIONS BEFORE USING THE APPLIANCE READ AND SAVE THESE INSTRUCTIONS WARNING OVEN SAFETY INSTRUCTIONS WARNING NEVER cover any slots holes or passages in the oven bottom or cover an entire rack with materials such as aluminum foil or oven liners Doin...

Страница 7: ...ff and on the user is encouraged to try to correct the interference by one or more of the following measures Ŷ 5HRULHQW RU UHORFDWH WKH UHFHLYLQJ DQWHQQD Ŷ QFUHDVH WKH VHSDUDWLRQ EHWZHHQ WKH HTXLSPHQW DQG receiver Ŷ RQQHFW WKH HTXLSPHQW LQWR DQ RXWOHW RQ D FLUFXLW different from that to which the receiver is connected Ŷ RQVXOW WKH GHDOHU RU DQ H SHULHQFHG UDGLR 79 technician for help b accept any ...

Страница 8: ...ectric spark igniting the burner When one burner is turned to LITE all burners will spark Sparking will continue as long as the knob remains at LITE Once gas is ignited turn the knob to adjust the flame size Using the Surface Burners NOTES Ŷ R QRW RSHUDWH WKH EXUQHU IRU DQ H WHQGHG SHULRG RI time without cookware on the grate The finish on the grate may discolor or chip without cookware to absorb ...

Страница 9: ...e levels above allowable standards This could be hazardous to your health 8VH D IODW ERWWRPHG ZRN Do not use stove top grills Top of Range Cookware Aluminum Medium weight cookware is recommended because it heats quickly and evenly Most foods brown HYHQO LQ DQ DOXPLQXP VNLOOHW 8VH VDXFHSDQV ZLWK WLJKW fitting lids when cooking with minimum amounts of water Stainless Steel This metal alone has poor ...

Страница 10: ...YH WKH FHQWHU JUDWH LI SUHVHQW DQG UHSODFH LW ZLWK WKH JULGGOH R QRW WXUQ RQ WKH FHQWHU EXUQHU V XQWLO RX DUH FHUWDLQ WKH griddle has been positioned correctly Preheating Your Griddle LWK D UHYHUVLEOH JULGGOH SUHKHDW RXU JULGGOH E VHWWLQJ RXU FHQWHU EXUQHU WR L IRU PLQXWHV EHIRUH SODFLQJ IRRG RQ WKH JULGGOH 2QFH WKH JULGGOH LV SUHKHDWHG WXUQ WKH NQRE RQ WKH EXUQHU V WR WKH FRRN VHWWLQJ RXWOLQHG LQ...

Страница 11: ...V WKH Timer pad and use the number pads to program the WLPH LQ KRXUV DQG PLQXWHV 3UHVV WKH Start Enter pad The oven will continue to operate when the timer countdown is complete To turn the timer off press the Timer pad 8 Air Fry Lower Oven Only Air Fry cooking mode is designed to produce foods with a crispier exterior than traditional oven cooking See the Oven Cooking Modes section for more infor...

Страница 12: ...tion for more information The probe can only be used with Bake Convection Bake and Convection Roast Settings The Cooking Options and Settings pads open up more detailed menus in the display that allow access to additional functions For each you select the function in the display using the associated number pad You can exit at any time by pressing the Cooking Options or Settings pad again WiFi Conn...

Страница 13: ...uetooth Select Pair and follow the corresponding instructions included with the mating Chef Connect enabled product The range will cancel pairing mode after two minutes if no mating device is detected Select Remove to confirm product is paired or to un pair from UDQJH 7KH 3UHFLVLRQ RRNLQJ 3UREH FDQ DOVR EH SDLUHG using the Bluetooth feature Auto Conv Auto Conversion When using Convection Bake and ...

Страница 14: ...EOH RYHQ XQLW XVH WKH 1 through 5 number pads to select a different preset cooking temperature and press Start Enter 2 Since no feedback is given during temperature change an oven thermometer can be used to confirm temperature changes Starting a Timed Bake 3UHVV WKH Bake pad I WKH GHVLUHG WHPSHUDWXUH LV XVH WKH 6 through 0 number pads to select a cooking time If a cooking WHPSHUDWXUH RWKHU WKDQ LV...

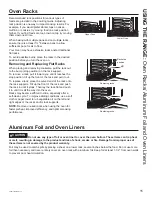
Страница 15: ...a rack place the curved end of the rack onto the rack supports Tilt up the front of the rack and push the rack in until it stops Then lay the rack flat and push it in until it is all the way into the oven Racks may become difficult to slide especially after a self clean cycle To improve sliding conditions use a soft cloth or paper towel to rub vegetable oil on the left and ULJKW HGJHV RI WKH UDFNV...

Страница 16: ... to vary the intensity RI WKH KHDW WR WKH IRRG 3ODFH IRRGV FORVHU WR WKH EURLO element when a seared surface and rare interior are desired For best performance center the food below the broil heating element 3UHVV WKH Broil pad twice for High or once for Low depending on the amount of searing and the internal temperature that is preferred The High setting is best for WKLQQHU FXWV RI PHDW DQG RU IR...

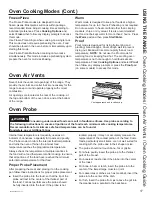
Страница 17: ...select Proof then follow any display prompts or press the Proof pad RQ VRPH PRGHOV WR DFFHVV WKLV PRGH Oven Probe Internal food temperature is frequently used as an indicator of doneness especially for roasts and poultry 7KH 3UREH PRGH PRQLWRUV WKH LQWHUQDO IRRG WHPSHUDWXUH and turns the oven off when the internal food temperature reaches the programmed temperature Always check the temperature at ...

Страница 18: ...let Ŷ 7R DYRLG GDPDJLQJ RXU SUREH GR QRW XVH WRQJV WR pull on the cable when removing it Ŷ 7R DYRLG EUHDNLQJ WKH SUREH PDNH VXUH IRRG LV completely defrosted before inserting the probe Ŷ 7R SUHYHQW SRVVLEOH EXUQV GR QRW XQSOXJ WKH SUREH from the outlet until the oven has cooled Ŷ 1HYHU OHDYH WKH SUREH LQVLGH WKH RYHQ GXULQJ D VHOI RU steam clean cycle Ŷ R QRW VWRUH WKH SUREH LQ WKH RYHQ Oven Cooki...

Страница 19: ...es Broil skin side down first Watch food closely when broiling For best performance when broiling center food below the broil heater or burner Boneless chicken breasts Broil Low Bake Lower 2 0RYH IRRG GRZQ IRU PRUH GRQHQHVV OHVV VHDULQJ DQG XS IRU JUHDWHU VHDULQJ EURZQLQJ ZKHQ EURLOLQJ RU EHVW SHUIRUPDQFH ZKHQ EURLOLQJ center food below the broil element or burner Whole turkey Bake Convection Roas...

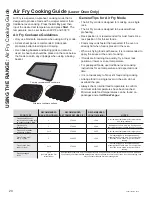
Страница 20: ...g Arrange food in a single layer on the pan do not overload the pan Always check internal food temperature to confirm minimum safe temperatures have been reached Minimum safe food temperatures can be found on packages and at IsItDoneYet gov FOOD TYPE RECOMMENDED RACK POSITION S RECOMMENDED SET TEMPERATURES F RECOMMENDED COOK TIME MIN NOTES Fresh boneless fish or poultry pieces breaded such as nugg...

Страница 21: ... cause discoloration and should be wiped up immediately Let hot surfaces cool then clean and rinse Painted Surfaces 3DLQWHG VXUIDFHV LQFOXGH WKH VLGHV RI WKH UDQJH DQG WKH door top of control panel and the drawer front Clean these with soap and water or a vinegar and water solution Do not use commercial oven cleaners cleaning powders steel wool or harsh abrasives on any painted surface including B...

Страница 22: ...ety Instructions at the beginning of this manual before using the Self Clean Mode Self Clean uses very high temperatures to clean the oven interior For a moderately soiled oven run a 3 hour self clean cycle For a heavily soiled oven run D KRXU VHOI FOHDQ F FOH 2QO VHOI FOHDQ EODFN UDFNV and grates may remain in the oven during the self clean F FOH OO RWKHU LWHPV LQFOXGLQJ QLFNHO SODWHG VLOYHU UDFN...

Страница 23: ...pillovers which could clog the burner openings Lift burners off when cool Wash with hot soapy water Rinse with clean water For more stubborn stains use a brush with plastic bristles NOTE Do not use steel wool or scouring pads to clean the burner parts as these may clog the openings Never wash burner heads in your dishwasher as dishwasher Doing so may cause them to discolor The ports in the burner ...

Страница 24: ...n the oven if your grates have rubber bumpers Doing so will destroy the rubber bumpers and may affect the function of your surface burners 3RUFHODLQ FRDWHG JUDWHV PD JUDGXDOO GXOO LI FRQWLQXDOO exposed to self clean temperatures I RXU RYHQ LV HTXLSSHG ZLWK VHOI FOHDQ EODFN UDFNV it is recommended to follow the instructions for placing grates on racks If your oven is equipped with nickel SODWHG VLO...

Страница 25: ...her surface Stainless Steel Surfaces on some models Do not use a steel wool pad it will scratch the surface To clean the stainless steel surface use warm sudsy water or a stainless steel cleaner or polish Always wipe the surface in the direction of the grain Follow the cleaner instructions for cleaning the stainless steel surface To inquire about purchasing cleaning products including stainless st...

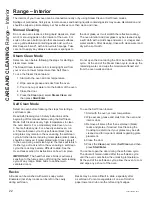
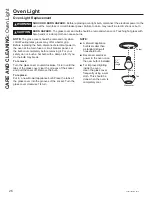
Страница 26: ...e bulb cool completely before removing it For your safety do not touch a hot bulb with a damp cloth If you do the bulb may break To remove 7XUQ WKH JODVV FRYHU FRXQWHUFORFNZLVH WXUQ XQWLO WKH tabs of the glass cover clear the grooves of the socket and pull the cover off Remove the bulb To replace 3XW LQ D QHZ ZDWW DSSOLDQFH EXOE 3ODFH WKH WDEV RI the glass cover into the grooves of the socket Turn...

Страница 27: ...W DQG down to the locked position 5 Close the oven door Removal position 3XOO KLQJH ORFNV XS WR XQORFN 3XVK KLQJH ORFNV GRZQ WR lock Rest notch on bottom edge of hinge slot Notch Bottom edge of slot Hinge arm Lift Off Upper Oven Door The door is very heavy Be careful when removing and lifting the door Do not lift door by the handle To Remove the Door XOO RSHQ WKH GRRU 2 Lift up on the hinge lock t...

Страница 28: ... foil on broil pan wrap tightly and add slits conforming to those in the pan to allow grease to drain Oven temperature too hot or too cold Oven temperature needs adjustment See the Cooking Modes section Oven and or display appears not to work A fuse in your home may be blown or the circuit breaker tripped Replace the fuse or reset the circuit breaker Oven controls improperly set 6HH WKH 8VLQJ WKH ...

Страница 29: ...ashes in the display The self clean cycle has been selected but the door is not closed Close the oven door F and a number or letter flash in the display You have a function error code 3UHVV WKH Cancel Off pad Allow the oven to cool for one KRXU 3XW WKH RYHQ EDFN LQWR RSHUDWLRQ I WKH IXQFWLRQ FRGH UHSHDWV GLVFRQQHFW DOO SRZHU WR WKH RYHQ IRU DW OHDVW seconds and then reconnect power If the function...

Страница 30: ...made the conversion Surface burners light but bake and broil burners do not Gas to the oven burners may have been shut off The oven gas shut off is located on the gas regulator near the gas line attachment to your range Locate it and flip the lever My oven door glass appears to be tinted or have a rainbow color The inner oven glass is coated with a heat barrier to reflect the heat back into the ov...

Страница 31: ... Notes ...

Страница 32: ...32 Notes ...

Страница 33: ...33 Notes ...

Страница 34: ...rranties of merchantability or fitness for a particular purpose are limited to one year or the shortest period allowed by law This limited warranty is extended to the original purchaser and any succeeding owner for products purchased for home XVH ZLWKLQ WKH 86 I WKH SURGXFW LV ORFDWHG LQ DQ DUHD ZKHUH VHUYLFH E D SSOLDQFHV XWKRUL HG 6HUYLFHU LV QRW available you may be responsible for a trip charg...

Страница 35: ...luminum Griddle Reversible Cast Iron Griddle Cleaning Supplies LWUX6KLQH 6WDLQOHVV 6WHHO LSHV 6WDLQOHVV 6WHHO 3ROLVKLQJ ORWK Burnt On Grease Remover ACCESSORIES Looking For Something More GE Appliances offers a variety of accessories to improve your cooking and maintenance experiences Refer to the Consumer Support page for website information The following products and more are available Accessori...

Страница 36: ...V KRXUV Extended Warranties 3XUFKDVH D SSOLDQFHV H WHQGHG ZDUUDQW DQG OHDUQ DERXW VSHFLDO GLVFRXQWV WKDW DUH DYDLODEOH ZKLOH RXU warranty is still in effect You can purchase it on line anytime GE Appliances Services will still be there after your ZDUUDQW H SLUHV Remote Connectivity RU DVVLVWDQFH ZLWK ZLUHOHVV QHWZRUN FRQQHFWLYLW IRU PRGHOV ZLWK UHPRWH HQDEOH visit our website at Parts and Accessor...

Отзывы: