


18
ZUGSS Trim Kit
Unified Stainless Steel Grille Panel
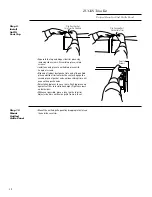
Step 9
Install
Soffit
Vent Top
• Separate the top and hinge side trim pieces by
removing side screws. Discard top piece; retain
screws.
• Install one end piece to unified top piece with
2 original screws.
• Slip end of rubber dust gasket into end of top unified
piece and slide trim towards the center. Engage the
second piece of gasket and continue sliding trim until
even with opposite ends.
• Reinstall end pieces to case trims. Push top piece up
against soffit or to installation height. Tighten screws
on both sides.
• Whenever possible, place a level on the top trim.
Adjust side trims until entire grille frame is level.
Slip Second Dust
Gasket Into Trim
Slip Dust Gasket
Into Trim On One End
Reinstall
Screws
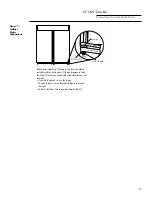
Step 10
Mount
Unified
Grille Panel
• Mount the unified grille panel by dropping into slots on
the outside case trim.