


11
Installation
36" Stainless Steel Refrigerators, Freezers
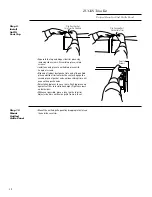
Step 5
Level
Refrigerator
These products have a 4-point leveling system. The
front is supported by leveling legs, the rear is supported
by wheels.
• Adjust rear wheels beneath the product to just barely
touch the 2x4 block.
• Turn the 7/16" hex nut located above the front wheels.
Turn to raise or lower.
• For front leveling legs, use a 1-1/4" open-end wrench.
• Adjust carefully; the product should be level and
plumb with cabinetry, and should align with toekick
height.
Leveling Leg
Hex Nut Adjusts
Rear Wheels
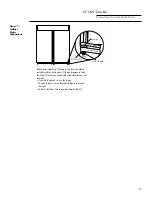
Step 6
Secure
Product
to Sides
When using 1/2" to 3/4" side panels, the front flange of
the case trim is attached to the side panel.
• Open door to access case trim.
• Drill hole in trim below interior opening. Drive screw
through trim and side panel.
• Follow the same procedure on opposite side.
If installed between cabinets with no side panels or in
a custom enclosure, install a spacer block as shown.
• Open door to access case trim.
• Drill hole in trim below opening. Drive screw through
trim and into block.
• Follow the same procedure on opposite side.
NOTE:
Whenever possible, perform
this step for additional anti-tip
security. This step can be used as
an alternate to Step 4, Anti-Tip
bracket installation, whenever
brackets cannot be used.
OR
Stud
Spacer
Block
Refrigerator
Cabinet
Door
PRUDENCE
Les roues de nivellement arrière et les pattes de
nivellement avant permettent un réglage maximal
de 25 mm (1 po). Si l’ouverture pour le réfrigérateur
a une hauteur supérieure à 2,15 m (84-1/2 po),
l’installateur doit élever le réfrigérateur sur une
feuille de contre-plaqué ou des glissières. Il est
également possible d’ajouter des baguettes de
finition des placards sur le haut de l’ouverture afin
de la réduire.
Lever le réfrigérateur de plus de 25 mm
(1 po) endommage les pattes de nivellement avant
et les roues de nivellement arrière.
CAUTION
The rear leveling wheels and front leveling legs are
limited to a maximum height adjustment of 1". If the
installation requires more than 84-1/2" height, the
installer should elevate the refrigerator on a sheet
of plywood or runners. Cabinetry trim could also be
added across the top of the opening to shorten the
opening
.
If you attempt to raise the refrigerator more
than 1", you will damage the front leveling legs and
rear leveling wheels.