background image

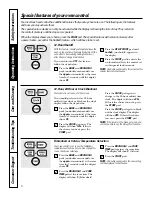
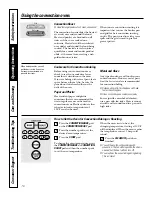
Auto Recipe

Conversion

When using convection bake, the Auto Recipe

Conversion feature will automatically convert
entered regular baking temperatures to
convection baking temperatures.

This feature is activated so the display 
will show the actual converted (reduced)
temperature. For example, if you enter a regular
recipe temperature of 350°F and press the

START

pad, the display will show 

CON 

and the converted temperature of 325°F.

NOTE: 

This feature does not convert convection

bake cooking times, only regular baking
temperatures.

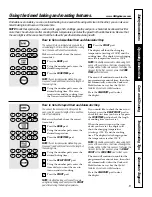
To deactivate the feature:

Press the 

BAKE

and 

BROIL HI/LO

pads (on double oven models, use
the 

upper

oven controls) at the

same time for 3 seconds, until the
display shows

SF

.

Press the 

CONVECTION BAKE

pad.

The display will show

CON ON

. Press

the 

CONVECTION BAKE

pad again.

The display will show

CON OFF

.

Press the 

START

pad.

To reactivate the feature, repeat steps 1–3
above but press the 

START

pad when

CON ON

is in the display.

Safety Instructions

Operating Instructions

Care and Cleaning

Tr

oubleshooting T

ips

Consumer Support

7

www.GEAppliances.com

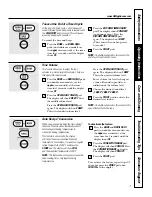
Tones at the End of a Timed Cycle

At the end of a timed cycle, 3 short beeps will
sound followed by one beep every 6 seconds until
the 

CLEAR/OFF

pad is pressed. This continuous 

6-second beep may be canceled.

To cancel the 6-second beep:

Press the 

BAKE

and 

BROIL HI/LO

pads (on double oven models use
the 

upper

oven controls) at the same

time for 3 seconds, until the display
shows 

SF.

Press the 

KITCHEN TIMER ON/OFF

pad. The display shows 

CON BEEP

(continuous beep). Press the

KITCHEN TIMER ON/OFF

pad 

again. The display shows 

BEEP.

(This cancels the one beep every
6 seconds.)

Press the 

START

pad.

NOTE:

On double oven models, this cancels the

end-of-cycle tone for both ovens.

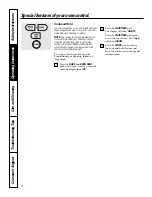
Tone Volume

This feature allows you to adjust the tone
volumes to a more acceptable volume. There are
three possible volume levels.

Press the 

BAKE

and 

BROIL HI/LO

pads

(on double oven models, use the

upper

oven controls) at the same

time for 3 seconds, until the display
shows

SF

.

Press the 

OVEN LIGHT ON/OFF 

pad.

The display will show

2 BEEP

. This is

the middle volume level.

Press the 

OVEN LIGHT ON/OFF

pad

again. The display will show

3 BEEP

.

This is the loudest volume level.

Press the 

OVEN LIGHT ON/OFF

pad

again. The display will show

1 BEEP

.

This is the quietest volume level.

For each time the level is changed, 
a tone will sound to provide an
indication of the volume level.

Choose the desired sound level 
(

1 BEEP

2 BEEP

3 BEEP

).

Press the 

START

pad to activate the

desired level shown.

NOTE:

On double oven models, this activates this

special feature for both ovens.

Содержание JT912

Страница 1: ...ler Pan and Grid 24 Cleaning Oven Door 23 Control Panel 25 Lift Off Oven Door 23 Light Bulb 22 Oven Floor 23 Probe 24 Removing Packaging Tape 22 Shelves 24 Stainless Steel Surfaces 25 Troubleshooting Tips 26 28 Consumer Support Consumer Support Back Cover Product Registration 29 30 Warranty 31 Write the model and serial numbers here Model __________________ Serial ____________________ You can find...

Страница 2: ... house structure Never allow anyone to climb sit stand or hang on the oven door Never leave the oven door open when you are not watching the oven Always keep combustible wall covering curtains or drapes a safe distance from your oven Always keep dish towels dishcloths pot holders and other linens a safe distance from your oven Always keep wooden and plastic utensils and canned food a safe distance...

Страница 3: ...or REMEMBER The inside surface of the oven may be hot when the door is opened Never leave jars or cans of fat drippings in or near your oven Do not store or use combustible materials gasoline or other flammable vapors and liquids in the vicinity of this or any other appliance Stand away from the oven when opening the oven door Hot air or steam which escapes can cause burns to hands face and or eye...

Страница 4: ...be used in or around any part of the oven Residue from oven cleaners will damage the inside of the oven when the self clean cycle is used Before self cleaning the oven remove the broiler pan grid and other cookware Be sure to wipe up excess spillage before starting the self cleaning operation If the self cleaning mode malfunctions turn the oven off and disconnect the power supply Have it serviced ...

Страница 5: ... cleaning function See the Using the self cleaning oven section OVEN LIGHT ON OFF Pad Press to turn the oven light on or off DELAY START Pad Use along with COOKING TIME or SELF CLEAN STD LOW pads to set the oven to start and stop automatically at a time you set COOK TIME Pad Press and then press the number pads to set the amount of time you want your food to cook The oven will shut off automatical...

Страница 6: ...leshooting Tips Consumer Support 12 Hour 24 Hour or Clock Blackout Your control is set to use a 12 hour clock If you would prefer to have a 24 hour military time clock or black out the clock display follow the steps below Press the BAKE and BROIL HI LO pads on double oven models use the upper oven controls at the same time for 3 seconds until the display shows SF Press the CLOCK pad once The displ...

Страница 7: ...s until the CLEAR OFF pad is pressed This continuous 6 second beep may be canceled To cancel the 6 second beep Press the BAKE and BROIL HI LO pads on double oven models use the upper oven controls at the same time for 3 seconds until the display shows SF Press the KITCHEN TIMER ON OFF pad The display shows CON BEEP continuous beep Press the KITCHEN TIMER ON OFF pad again The display shows BEEP Thi...

Страница 8: ...tion After Timed Baking or Roasting has automatically stopped the programmed cook and hold will automatically start To activate this feature for use after Timed Baking or Roasting follow the steps below Press the BAKE and BROIL HI LO pads at the same time for 3 seconds until the display shows SF Press the COOK TIME pad The display will show Hld OFF Press the COOK TIME pad again to activate the fea...

Страница 9: ...LO pads at the same time until the display shows SF NOTE If bake or broil appears in the display the BAKE and BROIL HI LO pads were not touched at the same time Touch the CLEAR OFF pad and begin again Tap the DELAY START pad until SAb bAtH appears in the display Touch the START pad and will appear in the display Touch the COOK TIME pad Touch the number pads to set the desired length of cooking tim...

Страница 10: ...pport tilt up the front and push the shelf in The oven has 7 shelf positions How to Set the Oven for Baking or Roasting Press the BAKE pad Press the number pads to set the desired temperature Press the START pad Check food for doneness at minimum time on recipe Cook longer if necessary Press the CLEAR OFF pad when cooking is complete NOTE A cooling fan may automatically turn on and off to cool int...

Страница 11: ...than Medium 1 to 11 2 lbs E 10 8 1 thick cook Well Done E 12 10 through before browning Rare 11 2 thick E 10 8 Pan frying is Medium 2 to 21 2 lbs E 15 14 16 recommended Well Done E 25 20 25 Slash fat Chicken 1 whole C 25 10 Reduce time about 2 to 21 2 lbs 5 to 10 minutes split lengthwise per side for cut up chicken Brush each side with melted butter Broil skin side down first Lobster Tails 2 4 C 1...

Страница 12: ...he number pads until the amount of time you want shows in the display For example to set 2 hours and 45 minutes press 2 4 and 5 in that order If you make a mistake press the KITCHEN TIMER ON OFF pad and begin again Press the START pad After pressing the START pad SET disappears this tells you the time is counting down although the display does not change until one minute has passed Seconds will no...

Страница 13: ... cook for the programmed amount of time then shut off automatically unless the Cook and Hold feature was set See the Special features of your oven control section Press the CLEAR OFF pad to clear the display How to Set a Delayed Start and Automatic Stop You can set the oven control to delay start the oven cook for a specific length of time and then turn off automatically Make sure the clock shows ...

Страница 14: ... best test for doneness The temperature probe takes the guesswork out of roasting by cooking foods to the exact doneness you want NOTE Double oven models have a probe in the upper oven only Use of probes other than the one provided with this product may result in damage to the probe Use the handles of the probe and plug when inserting and removing them from the meat and outlet To avoid damaging yo...

Страница 15: ...element In a convection oven a fan circulates hot air over under and around the food This circulating hot air is evenly distributed throughout the oven cavity As a result foods are evenly cooked and browned often in less time with convection heat Ideal for evenly browned baked foods cooked on multiple shelves Good for large quantities of baked foods Good results with cookies biscuits muffins brown...

Страница 16: ... to set the desired oven temperature Press the START pad To change the oven temperature press the CONVECTION BAKE or CONVECTION ROAST pad and then the number pads to set the new temperature When the oven starts to heat the changing temperature starting at 100 F will be displayed When the oven reaches the temperature you set 3 beeps will sound Press the CLEAR OFF pad when finished You will hear a f...

Страница 17: ...On double oven models you will not be able to use the probe in the upper oven during timed oven operations This is because with the probe you are cooking by temperature rather than time For best results when roasting large turkeys and roasts we recommend using the probe included in the convection oven To change the oven temperature during the Convection Roast cycle press the CONVECTION ROAST pad a...

Страница 18: ...sing the timed features for convection cooking On double oven models you can use timed baking or roasting in one oven while using self clean in the other you can also use timed baking or roasting in both ovens at the same time You will hear a fan while cooking with these features The fan will stop when the door is opened but the heat will not turn off NOTE Foods that spoil easily such as milk eggs...

Страница 19: ...n to alternate between increasing and decreasing the oven temperature The oven temperature can be adjusted up to 35 F hotter or 35 F cooler Press the number pads the same way you read them For example to change the oven temperature 15 F press 1 and 5 When you have made the adjustment press the START pad to go back to the time of day display Use your oven as you would normally The type of margarine...

Страница 20: ...e first oven s clean cycle On double oven models you can use timed baking in one oven and self clean the other at the same time Wipe up heavy soil on the oven bottom appearance may vary How to Set the Oven for Cleaning Press the SELF CLEAN STD LOW pad once for a 4 hour clean time or twice for a 3 hour clean time A 3 hour self clean time is recommended for use when cleaning small contained spills A...

Страница 21: ...until the temperature drops below the lock temperature and the LOCKED light goes off When the LOCKED light goes off you will be able to open the door NOTE On double oven models you can set a delay clean in both ovens at the same time The second oven set will automatically delay the start of cleaning until the end of the first oven s clean cycle To recall the start time of the second oven set press...

Страница 22: ...s should be removed only when cold Wearing latex gloves may offer a better grip Before replacing the bulb disconnect electrical power to the oven at the main fuse or circuit breaker panel Let the bulb cool completely before removing it For your safety do not touch a hot bulb with a damp cloth If you do the bulb will break To remove Turn the glass cover counterclockwise 1 4 turn until the tabs of t...

Страница 23: ...ext use Safety Instructions Operating Instructions Care and Cleaning Troubleshooting Tips Consumer Support 23 www GEAppliances com The gasket is designed with a gap at the bottom to allow for proper air circulation Do not rub or clean the door gasket it has an extremely low resistance to abrasion If you notice the gasket becoming worn frayed or damaged in any way or if it has become displaced on t...

Страница 24: ...iler pan from the oven Remove the grid from the pan Carefully pour out the grease from the pan into a proper container Wash and rinse the broiler pan and grid in hot water with a soap filled or plastic scouring pad If food has burned on sprinkle the grid with detergent while hot and cover with wet paper towels or a dishcloth Soaking the pan will remove burned on foods Both the broiler pan and grid...

Страница 25: ...h A 50 50 solution of vinegar and hot water works well Stainless Steel Surfaces on some models Do not use a steel wool pad it will scratch the surface To clean the stainless steel surface use warm sudsy water a stainless steel cleaner such as Kleen King or an all purpose liquid or spray cleaner Always scrub in the direction of the grain Rinse thoroughly with a sponge or cloth and clean water Dry w...

Страница 26: ...stment section Food does not Oven controls improperly set Make sure you press the BROIL HI LO pad broil properly Improper shelf position See the Broiling Guide being used Food being cooked Use the broiling pan and grid that came with your oven in a hot pan Make sure it is cool Cookware not suited Use the broiling pan and grid that came with your oven for broiling The probe is plugged into the Unpl...

Страница 27: ... This is normal popping sound metal heating and cooling during both the cooking and cleaning functions Excessive smoking Excessive soil Press the CLEAR OFF pad Open the windows to rid during clean cycle the room of smoke Wait until the LOCKED light goes off Wipe up the excess soil and reset the clean cycle Oven door will Oven too hot Allow the oven to cool below locking temperature not open after ...

Страница 28: ...This is reminding you to Enter a probe temperature the display enter a probe temperature after plugging in the probe Power outage Power outage or surge Reset the clock If the oven was in use you must reset clock flashes it by pressing the CLEAR OFF pad setting the clock and resetting any cooking function Steam from the vent When using the convection This is normal feature it is normal to see steam...

Страница 29: ... protection or you may request your money back on the remaining value of your contract No questions asked It s that simple Protect your refrigerator dishwasher washer and dryer range TV VCR and much more any brand Plus there s no extra charge for emergency service and low monthly financing is available Even icemaker coverage and food spoilage protection is offered You can rest easy knowing that al...

Страница 30: ...l Number Cut here Complete and mail your Consumer Product Ownership Registration today Have the peace of mind of knowing we can contact you in the unlikely event of a safety modification After mailing the registration below store this document in a safe place It contains information you will need should you require service Our service number is 800 GE CARES 800 432 2737 Read your Owner s Manual ca...

Страница 31: ...e caused by possible defects with this appliance Damage caused after delivery What GE Will Not Cover This warranty is extended to the original purchaser and any succeeding owner for products purchased for home use within the USA In Alaska the warranty excludes the cost of shipping or service calls to your home Some states do not allow the exclusion or limitation of incidental or consequential dama...

Страница 32: ... extended warranty and learn about special discounts that are available while your warranty is still in effect You can purchase it on line anytime or call 800 626 2224 during normal business hours GE Consumer Home Services will still be there after your warranty expires Parts and Accessories www GEAppliances com Individuals qualified to service their own appliances can have parts or accessories se...

Отзывы: