background image

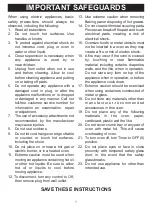
– 56 –

Model JKP45  Wiring Diagram

Содержание JKP18 Series

Страница 1: ...C PUB 31 9084 07 01 MODEL SERIES TECHNICAL SERVICE GUIDE GE Consumer Home Services Training 27 In Built In Electric Wall Oven ZEK957 JKP56 JKP45 JKP27 JCKP18 JKP18 ZEK937 JCKP15 JKP15 JCKS05 JKS05 JKP85 ...

Страница 2: ...ersonal injury disconnect power before servicing this prod uct If electrical power is required for diagnosis or test purposes disconnect the power immediately after performing the necessary checks RECONNECT ALL GROUNDING DEVICES If grounding wires screws straps clips nuts or washers used to complete a path to ground are removed for service they must be returned to their original position and prope...

Страница 3: ...Airflow 17 Electronic Oven Control System 18 Control Panel 18 Electronic Control EC 18 Control Voltage 19 Key Panel Test 19 Ohmmeter Test 20 ERC Failure Codes 21 Special Functions 23 Oven Sensor and Sensor Circuits 23 Oven Sensor and Door Switch Ohmmeter Test 24 Sensor and Lock Switch Connectors 24 Oven Circuits 25 Oven Calibration 25 Motorized Door Lock 26 Oven Thermal Switch 27 Lock Thermal Swit...

Страница 4: ...h Voltage Diode 34 Microwave High Voltage Transformer 35 Microwave Magnetron 35 Microwave Magnetron Fan 36 Microwave Magnetron TCO 36 Microwave Fan Thermal Switch 37 Microwave Fuse 37 Microwave Flame TCO 37 Microwave Gas Humidity Sensor 38 Microwave Interlocks and Monitor 38 Microwave Oven LampAssembly 40 Microwave Turntable Motor 40 Microwave Performance Test 40 Microwave Leak Test 40 Microwave F...

Страница 5: ...els is our new microwave and oven combination unit The Electronic Touch Controls are simple to understand and easy to operate Just read and touch It s easy to see how GE s fresh ideas can make anyone more creative in the kitchen The information on the following pages will help you service these new 27 in Built In Electric Wall Ovens effectively and efficiently Model JKP45 Model JKP85 ...

Страница 6: ... repeats every 12 years Example T 1974 T 1986 T 1998 J K P 4 5 C D 1 C C GE Cooking Product ZE Monogram Electric Configuration K 27 in Wall Oven CK Camco 27 in Wall Oven Oven Type P Self Clean S Standard Product Color CC Bisque WW White BB Black AA Almond SS Stainless Steel Indicator for Engineering and Product Service Only The model serial number tag of your built in oven is located behind the do...

Страница 7: ...er outage START Pad Must be pressed to start any cooking or cleaning function COOKING TIME Pad Pressthispadandthenpressthenumber pads to set the amount of time you want your food to cook The oven will shut off when the cooking time has run out DELAY START Pad Use along with COOKING TIME or SELF CLEAN pads to set the oven to start and stop automatically at a time you set CLOCK Pad Press this pad be...

Страница 8: ...connect the power to the oven and call for service If your oven was set for a timed oven operation and a power outage occurred the clock and all programmed functions must be reset The time of day will flash in the display when there has been a power outage SELF CLEAN Pad Press this pad to select the self cleaning function See the Using the self cleaning oven section OVEN LIGHT Pad Press this pad t...

Страница 9: ...utage OVEN LIGHT ON OFF Pad Press this pad to turn the oven light on or off DELAY START Pad Use along with COOKING TIME or SELF CLEAN pads to set the oven to start and stop automatically at a time you set COOKING TIME Pad PressthispadandthenpresstheHOUR and MIN and pads to set the amount of time you want your food to cook The oven will shut off when the cooking time has run out CLEAR OFF Pad Press...

Страница 10: ...of day will flash in the display when there has been a power outage START Pad Must be pressed to start any cooking function COOKING TIME Pad Pressthispadandthenpressthenumber pads to set the amount of time you want your food to cook The oven will shut off when the cooking time has run out DELAY START Pad Use along with COOKING TIME pad to set the oven to start and stop automatically at a time you ...

Страница 11: ...TIMER ON OFF Pad Press this pad to select the timer feature DELAY START Pad Use along with COOKING TIME or SELF CLEAN pads to set the oven to start and stop automatically at a time you set COOKING TIME Pad Press this pad and then press the number pads to set the amount of time you want your food to cook The oven will shut off when the cooking time has run out CLOCK Pad Press this pad before settin...

Страница 12: ...nt to set Watch the display while pressing this pad to select the power level Number Pads After pressing a function pad press the number pads to set the exact amount of time you want to cook for For example if you press the 1 2 and 5 pads you have set 1 minute and 25 seconds CLEAR OFF Press once to interrupt or change a function Press twice to clear the display START After all selections are made ...

Страница 13: ... TCO High Voltage Capacitor Fan Magnatron Oven Lamp Assembly Interlock Monitor and Door Sensing Switches Power Control Board PCB PCBoards Connectors Fuse Fan TCO Gas Sensor Flame Sensor Low Voltage Transformer High Voltage Diode High Voltage Transformer AirDuct ...

Страница 14: ...Oven Cooling Fan Door Jam Switch Harness Top View Lock Motor DoorLock Thermal Switch Fan Thermal Switch LockMotor Connector Power Connector Rear View Upper Oven Thermal Switch Lower Oven Thermal Switch Lower Oven Cooling Fan ...

Страница 15: ...or J 5 L1 N Lower Lock Mtr Oven Sensor Oven Sensor Door Jam SW BR2 Upper Lock Mtr BA1 BR1 BA2 J6 J4 Upper Oven Temp Sensor LKSW1 and LKSW2 J3 Lower Oven Temp Sensor Therm SW LKSW1 and LKSW2 Door Lock Therm SW Motorized Door Lock Fan Therm SW Oven Light ...

Страница 16: ...ooling Fan Door Jam Switch Harness Top View Lock Motor DoorLock Thermal Switch Fan Thermal Switch LockMotor Connector Power Connector Neutral Oven Lamp OV1 L1 Neutral L1 TCO Light Bake LockMotor Broil LockMotor OvenSensor LKSW 1 LKSW 2 Keyboard Ribbon Connector ...

Страница 17: ...tom edge of the hinge slot The notch in the hinge arm must be fully seated into the bottom of the slot 3 Fully open the door 4 Push the hinge locks up against the front frame of the oven cavity to the locked position 5 Close the oven door Door Assembly The door assembly can be broken down into 2 basic assemblies 1 The outer assembly consists of the door handle vent trim outer glass bottom trim and...

Страница 18: ...ws can damage handle Hand tighten ONLY Make sure handle fits snug to door panel Oven Door Gasket The gasket forms a seal around the front edge of the oven liner and the inner door panel except for approximately a 6 in opening at the center bottom The gasket is attached to the inner door panel by a chain of spring clips To remove door gasket 1 Open the door completely 2 Pull the end of the gasket o...

Страница 19: ... frame 3 Remove 2 screws from each side of the door and separate the door liner and the outer glass assembly 4 Remove 3 screws from the door liner to remove each door hinge assembly Note When assembling make sure the hinge arms are parallel to each other and perpendicular to the front frame If not the hinge may bind on the receiving channel of the door Note If the new hinge is not in the cocked an...

Страница 20: ... control transformer lock motor relay some models sensor and lock motor connector some models along with a series of 1 4 in terminals for connect ing power to the control and heating units SENSOR 1084 72 F RM DR LOCK COM DR LOCKED DR UNLOCK RIBBON CONNECTOR P 101 MDL BROIL DLB L1 A CONV COM CONV FAN BAKE K1 K8 K7 OV LIGHT L1 N GND K4 K3 K2 K9 C5 C33 C7 L2 TR1 CUT WM SURFACE T101 C5 C15 C12 C14 C1 ...

Страница 21: ...n is calling for heat BAKE BROIL relay contacts closed 120 VAC when light is off OV1 OV2 ModelJKP15 TERMINALS L1A B TO N L1A B TO BAKE L1A B TO BROIL OVL1 OVL2 AUX1 N VOLTAGE 120 VAC ALL THE TIME 240 VOLTS when oven is not calling for heat BAKE BROIL relay contacts open 120 VAC when light is off 120 VAC locking or unlocking Models ZEK937 and JKP18 TERMINALS L1 N N to COM L1 1 BAKE 1 L1 1 BROIL 1 L...

Страница 22: ... 11 to 13 12 ro 13 10 to 14 10 to 13 3 to 4 9 to 14 1 2 3 4 5 6 7 8 9 10 11 12 13 14 Models JKP27 JKP15 JCKP15 JKS05 and JCKS05 ModelJKP45 ModelJKP85 FUNCTION Bake 2 14 10 14 Broil 2 13 10 13 Cooking Time 1 13 9 13 Delay Start Time 1 14 9 14 Clean 3 14 11 14 Oven Light 3 13 11 13 Start 16 19 18 19 Clear 15 19 17 19 Temp Up 6 14 8 14 Temp Down 5 14 7 14 UPPER OVEN CONDUCTOR CONDUCTOR COMMON FUNCTIO...

Страница 23: ...ileovenabove650 F open thermalswitchinyellowleads Coolingfanorairflowtocontrolarea CORRECTION MEANING 1 Insideovencavityasmeasuredbysensorover650 F unlatchedor915 Flatched 2 Coolingfanstallwhileovenabove650 F openthermal switchinyellowleads SensorCircuitsupervisorFailure F5 Replace Control Models ZEK957 JKP56 JKP45 JCKP18 and JKP18 F A I L U R E CODE DetermineifproblemiswithKeyPanelorControlbydisc...

Страница 24: ... Ham radio cordless phone etc Control senses oven temperature above 615 F with the door circuit in the unlock mode Control senses oven temperature above 915 F with the door in the door locked mode Replace control Disconnect power to range Disconnect sensor connector from control Measure sensor resistance at control connector take care not to damage terminals Should read 1100Ω at room ambient appro...

Страница 25: ...unctions are tried display will show Off Press CLEAN again for Loc Off controlunlocked 12 hour shutdowncomes set to shut down after 12 hours of continuous operations this can be eliminated Press Delay Start pad Display will show No Shdn To turn back on press Delay Start pad again and display will show 12 Shdn Note Sabbath is between No Shdn and 12 Shdn Sales Mode special feature added for sales fl...

Страница 26: ...CTOR OVEN SENSOR CIRCUIT PINS 4 6 5 JUMPER Model JCKS05 4 6 SENSOR CONNECTOR OVEN SENSOR CIRCUIT PINS 4 6 5 ModelJKS05 If abnormal reading is observed remove sensor from oven and check at disconnect block Wiggle leads while checking resistance If more than 10Ω replace sensor Models ZEK937 JKP18 and JCKP18 CIRCUIT TERMINALS OHMS UPPER OVEN Oven Sensor 6 to 8 1100Ω Rm Temp Door Unlatched 3 to 5 0Ω 4...

Страница 27: ... a m r e h T k c o L F 0 9 1 C 8 8 e t i h W 8 0 0 P 2 5 1 1 B 6 2 3 O N W S l a m r e h T n a F F 8 3 1 C 9 5 e n o N 5 0 0 P 9 6 8 4 C 9 2 2 C N t u o t u C l a m r e h T F 0 3 3 C 6 6 1 e g n a r O 4 4 1 C W S r e p p U s n e v O l l a W e l b u o D C N W S l a m r e h T k c o L F 0 4 2 C 8 1 1 e g n a r O 4 0 0 P 0 7 8 4 C 9 2 2 O N W S l a m r e h T n a F F 8 3 1 C 9 5 e n o N 5 0 0 P 9 6 8 4...

Страница 28: ...ess is behind the trim cover between the 2 ovens Motorized Door Lock Operation The lock motor is energized when the control is set for Clean and Clean Time selected The K1 relay contact will close and complete the circuit that supplies the voltage to the lock motor Note The display of the Control will flash LOCK DOOR if the door switch is in the C to NC position Door open The words LOCKED DOOR wil...

Страница 29: ... F If the thermal switch opens during 1 Oven Temperature Below 600 F Program is cancelled when thermal switch opens Lock motor will run and the words LOCKED DOOR will be flashing in the display 2 OvenTemperatureAbove 600 F Any mode of operation control will go to F9 or F2 failure code When this condition exists check the fan operation look for obstructions and inspect oven installation make sure g...

Страница 30: ...he screen in the center To access convection bake element 1 Disconnect the power to range remove the oven door and the oven racks 2 Remove 4 screws from the mounting panel 2 on each side and pull forward To remove convection bake element Remove 3 screws mounting the element to the back wall and pull forward Disconnect the wires To service fan Note Convection fan blade nut has left handed threads F...

Страница 31: ...iological health immediately D Make the following safety checks on all ovens to be serviced before activating the magnetron or other microwave source Make repairs as necessary 1 Interlock operation 2 Proper door closing 3 Seal and sealing surfaces arching wear and other damage 4 Damage to and loosening of hinges and latches 5 Evidence of dropping or abuse E Before turning on microwave power for an...

Страница 32: ...rom the oven 2 Remove 1 screw and the exhaust vent cover 3 Remove 8 screws and the air tunnel 4 Remove 1 screw from each trim mounting bracket 5 Remove the screws from the right side panel Lift up to release the upper tabs from the chassis and remove the panel 6 Remove 2 screws from the left side of the case and 2 screws from the back of the case 7 Slide the case back to separate the case tabs fro...

Страница 33: ...rol panel is hinged on the bottom allowing access to the PCB and component compartment when in the service position The replaceable parts on the control panel are the oven PCB and microwave PCB Replacement control panel parts do not come with an oven PCB and a microwave PCB To place control panel in service position 1 Open the oven door and remove 2 torx screws from the left side of the control pa...

Страница 34: ...ect a faulty PCB If 120 VAC is present use the chart to check the voltage output of the low voltage trans former If the voltage output or resistance is not correct replace the PCB t r a h C r o t a c o L B C P n i a M r o t c e n n o C e r i W s r o l o C f o r e b m u N s l a n i m r e T n o i t p i r c s e D 2 0 N O C e u l B e g n a r O e t i h W 3 n a F g a M e l b a T n r u T l a r t u e N 3 ...

Страница 35: ...nder normal operation the capacitor should fully discharge within 30 seconds The microwave must be removed from the oven to service the high voltage capacitor The high voltage capacitor is mounted to the base plate at the rear of the component compartment If the capacitor is open no high voltage will be available to the magnetron High Voltage CapacitorTest 1 Disconnect the leads and check for shor...

Страница 36: ...f the ohm meter to the negative terminal of a 9 volt battery 3 Connect the positive diode terminal to the positive terminal of the battery 4 Connect the common lead of the ohmmeter to the diode ground terminal Note Reading may differ with various types and brands of meters Ohmmeter reading should be approximately 1 400 ohms To test reverse bias 1 Set ohmmeter to highest ohm setting 2 Connect the l...

Страница 37: ...ance of the filament wind ings terminal 4 to 3 a Disconnect connector from magnetron b Connect ohmmeter between terminals of connector c Resistance should be less than 1 ohm Microwave Magnetron The microwave must be removed from the oven to replace the magnetron WARNING When replacing the magnetron be certain the R F gasket is in place and mounting screws are tightened securely to the waveguide Fa...

Страница 38: ... Test Microwave Magnetron Fan The microwave must be removed from the oven to service the magnetron fan The magnetron fan operates whenever the mag netron is operating The magnetron fan will also operate if the fan thermal switch reaches 158 F The fan draws external air into the component compartment through holes in the rear panel The air is circulated through the magnetron air vanes providing coo...

Страница 39: ...e service position Warning When the 20 amp fuse is blown due to the operation of the monitor switch the monitor switch must be replaced Also replace relays and or interlock switches when continuity check shows contacts shorted A 20 amp fuse is connected to the line in side of the unit s circuitry and is common to all functions and the door switches If this fuse blows open no functions will operate...

Страница 40: ...Place 1 3 cup tap water in microwave 2 Press the popcorn pad 3 After 1 2 minutes the control should beep and the display should begin a countdown 4 Press CLEAR OFF pad a If sensor fails test go to step 5 b If sensor passes test sensor is OK 5 Press and hold the 7 and 8 number pads at the same time 6 Observe the diagnostic number in the display 15 to 184 sensor OK 185 or higher sensor failed open s...

Страница 41: ... 1 Place the key panel in the service position 2 Loosen the latch board mounting screws at the vertical flange 3 Adjust the latch board for proper switch opera tion and door fit Retighten screws nents except the oven lamp Acook cycle cannot take place until the door is firmly closed thereby activating the interlock switches Interlock Monitor This switch is intended to render the unit inopera tive ...

Страница 42: ... temperature of 59 F to 75 F in a 1000 ml beaker WB64X0073 Do not use any other load or dish as results will vary from the standard 1 Measure the line voltage loaded This test is based on normal voltage variations of 105 VAC to 130 VAC Low voltage will affect power and temperature rise 2 Place beaker containing 1 liter of water on glass shelf in the center of the oven and record initial water temp...

Страница 43: ...as Entire perimeter of door and control panel Viewing surface of door window Exhaust vents Warning Maximumallowableleakageis4MW cm2 6 Record data on service invoice and microwave leakage report Microwave Fault Codes The following fault codes will be shown in the display and a 4 beep signal will occur when the control panel or sensor malfunctions Fault code F3 will occur when the key panel is short...

Страница 44: ... keys do not operate check for Child Lock Out Display does not show what was entered check control for display turned OFF Display erratic Display blank check control for display turned OFF Cannot clear display Perform Low Voltage Transformer Test Does transformer pass test YES NO Replace PCB Perform Key Panel Test Does key panel pass Test YES NO Replace key panel Replace PCB Check ribbons Are ribb...

Страница 45: ...Pass test Replace monitor NO Perform High Voltage Transformer Test Pass test Replace high voltage transformer NO YES Perform High Voltage Capacitor Test Pass test Replace high voltage capacitor NO YES Perform Magnetron Test Pass test YES Replace magnetron NO System checks normal Replace fuse YES Check for continuity Black wire line in to RY2 White wire CON02 connector to neutral Continuity OK YES ...

Страница 46: ...s ground 120 VAC present NO Perform High Voltage Transformer Test Pass test Does turntable motor operate Open primary interlock switch circuit YES Replace high voltage transformer Perform High Voltage Capacitor Test Pass test Replace capacitor Perform High Voltage Diode Test Pass test Replace diode Perform Magnetron Test Pass test Replace magnetron System checks OK Repeat procedure NO NO YES NO Re...

Страница 47: ... 45 Schematics and Wiring Diagrams Models ZEK957 JKP56 and JKP45 Schematic ...

Страница 48: ... 46 Model JKP27 Schematic ...

Страница 49: ... 47 Models ZEK937 JKP18 and JKP15 Schematic ...

Страница 50: ... 48 d Model JKS05 Schematic ...

Страница 51: ... 49 Model JCKS05 Schematic ...

Страница 52: ... 50 Models JCKP18 and JCKP15 Schematic ...

Страница 53: ... 51 Model JKP85 Schematic ...

Страница 54: ... 52 Microwave Schematic FAN THERM SW N O ...

Страница 55: ... 53 Model ZEK957 Wiring Diagram ...

Страница 56: ... 54 Model ZEK937 Wiring Diagram ...

Страница 57: ... 55 Model JKP56 Wiring Diagram ...

Страница 58: ... 56 Model JKP45 Wiring Diagram ...

Страница 59: ... 57 Model JKP27 Wiring Diagram ...

Страница 60: ... 58 Model JCKP18 Wiring Diagram ...

Страница 61: ... 59 Model JKP18 Wiring Diagram ...

Страница 62: ... 60 Model JCKP15 Wiring Diagram ...

Страница 63: ... 61 Model JKP15 Wiring Diagram ...

Страница 64: ... 62 Model JCKS05 Wiring Diagram ...

Страница 65: ... 63 Model JKS05 Wiring Diagram ...

Страница 66: ... 64 Model JKP85 Wiring Diagram ...

Страница 67: ... 65 Microwave Wiring Diagram FAN THERMALSW N O ...

Страница 68: ...pad and show some resistance without depressing the pad __True __False 5 Replacement of the oven thermal cutout switch and the convection fan motor are the only components that require removal of the oven from installation __True __False 6 What test is made to check for a damaged varister __Resistance __Voltage __Visual 7 The F codes for the oven and the F codes for the microwave are all very simi...

Страница 69: ...is extended to the original purchaser and any succeeding owner for products purchased for home use within the USA In Alaska the warranty excludes the cost of shipping or service calls to your home Some states do not allow the exclusion or limitation of incidental or consequential damages This warranty gives you specific legal rights and you may also have other rights which vary from state to state...

Страница 70: ... by accident fire floods or acts of God Incidental or consequential damage caused by possible defects with this appliance What GE Will Not Cover This warranty is extended to the original purchaser and any succeeding owner for products purchased for home use within the USA In Alaska the warranty excludes the cost of shipping or service calls to your home Some states do not allow the exclusion or li...

Отзывы: