background image

17

Safety Instructions

Operating Instructions

Care and Cleaning

Installation Instructions

Troubleshooting T

ips

Customer Service

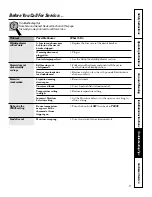
Before You Call For Service…

Troubleshooting Tips 
Save time and money! Review the chart on this page 
first and you may not need to call for service.

Problem

Possible Causes

What To Do

Warming drawer

A fuse in your home may

Replace the fuse or reset the circuit breaker.

will not work

be blown or the circuit 
breaker tripped.

Warming drawer not

Plug in.

plugged in.

Controls improperly set.

See the 

Using the warming drawer

section.

Drawer does not

Ball bearings out

Fully extend the drawer and push it all the way in. 

slide smoothly

of alignment.

See the 

Care and cleaning

section.

or drags

Drawer over-loaded or

Reduce weight to less than 50 pounds. Redistribute

load unbalanced.

drawer contents.

Excessive 

Liquid in warming

Remove liquid.

condensation

drawer pan.

Uncovered foods.

Cover food with lid or aluminum foil.
Temperature setting

Reduce temperature setting.

too high.

Incorrect Moisture

Set the Moisture Selector to the open vent setting to

Selector setting.

allow venting.

No heat in the

Room temperature 

Turn the knob to 

LOW

then back to 

PROOF.

PROOF setting

may prevent the 
thermostat from 
tripping on.

Food dries out

Moisture escaping.

Cover food with lid or aluminum foil.
Содержание JKD910

Страница 1: ...ms 8 Drawer 7 Features 5 Moisture Selector 6 ON Signal Light 6 Pans 6 Proofing Yeast Bread and Dough 8 Rack 7 Temperature Selection Charts 8 9 Warming Serving Bowl and Plates 7 Care and Cleaning Control Knob 10 Rack 10 Stainless Steel 10 Warming Drawer Pan 10 Installation 11 16 Troubleshooting Tips 17 Customer Service Product Registration 2 Service Telephone Numbers 2 Back Cover Warranty for Custo...

Страница 2: ...chase date is needed to obtain service under the warranty You ll find many answers to common problems in the Before You Call For Service section If you review our chart of Troubleshooting Tips first you may not need to call for service at all If you do need service you can relax knowing help is only a phone call away A list of toll free customer service numbers is included in the back section of t...

Страница 3: ...e household distribution panel by removing the fuse or switching off the circuit breaker Do not leave children alone children should not be left alone or unattended in an area where an appliance is in use They should never be allowed to sit or stand on any part of the appliance Do not allow anyone to climb stand or hang on the drawer They could damage the warming drawer or cause severe personal in...

Страница 4: ...r surface of the warming drawer These surfaces may be hot enough to burn REMEMBER The inside surface of the warming drawer may be hot when the drawer is opened Do not store or use combustible materials gasoline or other flammable vapors and liquids in the vicinity of this or any other appliance Never leave jars or cans of fat drippings in or near your warming drawer Use care when opening the drawe...

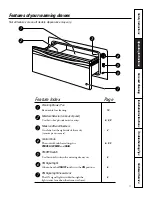
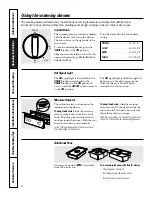
Страница 5: ...e Selector on back of panel Use this to keep foods moist or crisp 6 8 9 Model and Serial Numbers On a label on the right side of the cavity 2 remove pan to access Control Knob The control knob has settings for 6 8 9 PROOF LOW MED and HIGH ON OFF Switch Use this switch to turn the warming drawer on 6 ON Signal Light Glows when the ON OFF switch is in the ON position 6 ON Signal Light Viewer Lens Th...

Страница 6: ...d below the ON OFF switch and glows when the ON OFF switch is in the ON position It stays on until the ON OFF switch is moved to the OFF position The ON signal light is visible through the light viewer in the drawer front panel when the drawer is closed This is a reminder that the heat is on Additional Pans An accessory pan kit JXPN1 is available from GE at extra cost Five commercial pans with lid...

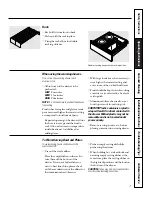
Страница 7: ...preheated LOW 8 minutes MED 15 minutes HIGH 20 minutes NOTE It is not necessary to preheat the drawer for proofing Food in heat safe glass and glass ceramic pans may need higher thermostat setting as compared to food in metal pans Repeated opening of the drawer allows the hot air to escape and the food to cool Allow extra time for temperature inside the drawer to stabilize after adding items With ...

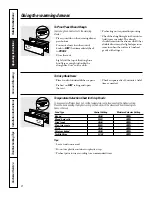
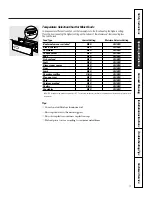
Страница 8: ...ains when the surface is touched gently with a finger To Crisp Stale Items Place food in low sided dishes or pans Preheat on LOW setting and open the vent Check crispness after 45 minutes Add time as needed Temperature Selection Chart for Crisp Foods Food Type Control Setting Moisture Selector Setting Bacon HIGH OPEN Bread hard rolls MED OPEN Fried foods HIGH OPEN Pies two crusts MED OPEN Pizza HI...

Страница 9: ...D Pies one crust MED CLOSED Pork MED CLOSED Potatoes mashed MED CLOSED Poultry HIGH CLOSED Vegetables MED CLOSED USDA FSIS recommends an internal temperature of 145 F as the minimum doneness for beef Use a portable meat thermometer to check internal temperatures Tips Cover food with lid or aluminum foil Do not put water in the warming pan Do not use plastic containers or plastic wrap Preheat prior...

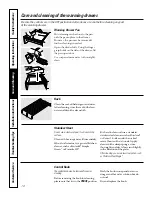
Страница 10: ...ean with hot soapy water Rinse and dry If food soil remains try a general kitchen cleaner such as Fantastik Simple Green or Formula 409 For hard to clean soil use a standard stainless steel cleaner such as Bon Ami or Cameo Soils can also be soaked several hours with wet towels Apply cleaner with a damp sponge rinse thoroughly and dry Always scrub lightly in the direction of the grain After cleanin...

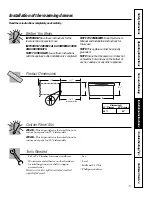
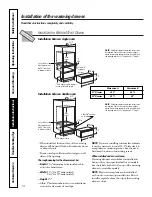
Страница 11: ...E This appliance must be properly grounded NOTE Insure that the power cord does not contact the hot surfaces on the bottom of ovens cooktops or any other appliance Tools Needed 2 x4 or 2 x 2 lumber for runners and brace Wood screws and adhesive or other hardware for installing runners or shelf to support warmer drawer Runners must be level rigidly mounted and capable of supporting 150 pounds Saw L...

Страница 12: ...rong receptacle should be located within reach of the drawer s 56 long power cord Locate the receptacle in an adjacent cabinet within 42 of the right side or within 16 of the left side or A recessed receptacle may be located on the right side of the cutout 7 maximum from the back of the cabinet In this location the excess power cord should be coiled to the right side of the unit using the cord cli...

Страница 13: ...k 231 4 from floor to bottom of cutout is recommended for under countertop installation NOTE If you are installing in frameless cabinets it may be necessary to install 1 2 wide cleats to accept drawer mounting screws See drawer to find exact locations of mounting screws When installed under a cooktop Warming drawers are suitable for installation below only certain specified cooktop models See the ...

Страница 14: ...nstalled as shown for countertop installations Do not install receptacle above the top of the warming drawer cutout 231 2 Min 2x2 or 2x4 anti tip block against rear wall 9 from floor to bottom of block 1 Min above toekick or adjust to oven installation height A B Oven cutout NOTE Additional clearance between cutouts may be required Check to be sure that oven supports above the warming drawer locat...

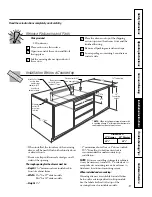
Страница 15: ...double oven check to be sure that any oven supports above the cutout do not obstruct the 231 2 required depth of the warming drawer cutout A 2 minimum clearance between oven and warming drawer cutouts are required Additional clearance may be required if 2 x 4 blocks are used to support runners or solid floor of the oven above The warming drawer may be supported by either a solid bottom 2 x 4 or 2 ...

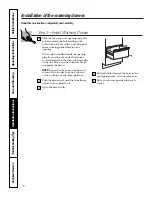
Страница 16: ...and install it in the clip on the right side of the unit Make sure the cord does not get trapped by the drawer NOTE Insure that the power cord does not contact the hot surfaces on the bottom of ovens cooktops or any other appliance Push the drawer back until the front flange is flush to the cabinet front Open the drawer fully Drill pilot holes through the holes in the overlapping frame one on each...

Страница 17: ...ection Drawer does not Ball bearings out Fully extend the drawer and push it all the way in slide smoothly of alignment See the Care and cleaning section or drags Drawer over loaded or Reduce weight to less than 50 pounds Redistribute load unbalanced drawer contents Excessive Liquid in warming Remove liquid condensation drawer pan Uncovered foods Cover food with lid or aluminum foil Temperature se...

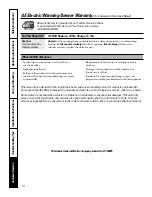
Страница 18: ...es or resetting of circuit breakers Damage to the product caused by accident fire floods or acts of God Incidental or consequential damage to personal property caused by possible defects with this appliance What GE Will Not Cover This warranty is extended to the original purchaser and any succeeding owner for products purchased for home use within the USA In Alaska the warranty excludes the cost o...

Страница 19: ...re technician For service call 1 800 361 3400 Service trips to your home to teach you how to use the product Improper installation Failure of the product if it is abused misused or used for other than the intended purpose or used commercially Replacement of house fuses or resetting of circuit breakers Damage to the product caused by accident fire floods or acts of God Incidental or consequential d...

Страница 20: ...ll in effect and you ll receive a substantial discount GE Consumer Service will still be there after your warranty expires In Canada call 1 800 461 3636 Parts and Accessories In the U S 800 626 2002 Individuals qualified to service their own appliances can have parts or accessories sent directly to their homes VISA MasterCard and Discover cards are accepted Instructions contained in this manual co...

Отзывы: