background image

IMPORTANT SAFETY 

 California Safe Drinking 

 and 

Enforcement 

 requires the Governor of

California to publish a list of substances 
to the state to cause cancer, birth defects or 
reproductive harm, and requires businesses   warn
customers of potential exposure to such substances.
Gas appliances can cause minor exposure   four
of these substances, namely 


monoxide, formaldehyde and soot, caused primarily
by the incomplete combustion of 

 gas or

LP fuels. Properly adjusted burners, indicated by
a bluish rather than a yellow flame, will 
incomplete combustion, Exposure to these
substances can be minimized by venting with an
open window or using a ventilation fan   hood.

When You 

 Your 

● 

Have the installer 

 you the location 

the range gas cut-off valve and how   shut

it off if necessary.

– 

● 

Have your range installed 

 properly

grounded by a qualified 

   accordance

with the Installation Instructions. Any adjustment
and service should be performed only by qualified
gas range installers or service technicians.

● 

Plug your range into a 120-volt grounded

outlet only. 

 not remove the round 

prong from the plug. If   doubt 

 the

grounding of the home electrical system, it is your
personal responsibility and obligation   have an
ungrounded outlet replaced with a properly
grounded, three-prong outlet in accordance with
the National Electrical Code. Do not use an
extension cord with this appliance.

● 

Be sure all packing materials are removed

from the range before operating it to prevent
fire or smoke damage should the packing
material ignite.

● 

Locate range out 

of kitchen 

 path and

out of drafty locations to prevent pilot outage

and poor air circulation.

● 

Be 

sure your range is correctly adjusted by a

qualified service technician   


 the

 of gas 

 or 

 that   to   

Your range can be converted 


 with either

type of gas. See 

 Installation Instructions.

 After prolonged use of a range, 

high floor

temperatures may result and 


coverings will 

 withstand this kind   use.

Never install the range over 

 tile or linoleum

that cannot withstand such type of use. Never
install it directly over interior kitchen carpeting.

Using Your Range


 leave children alone or unattended

where a 

 is 

   in operation. 

They

could be seriously burned.

● 

 allow anyone to climb, 

 or hang

on the oven door, storage drawer or range top.

 could damage the range and even tip it over,

causing severe personal injury.

 CAUTION: 


 INTEREST TO

CHILDREN 

 NOT BE STORED 

CABINETS ABOVE A RANGE 

 ON THE

BACKSPLASH 

 A RANGE--CHILDREN

CLIMBING ON THE RANGE TO REACH
ITEMS COULD BE SERIOUSLY INJURED.


 tip and

injury could 

 To-prevent

accidental tipping of the range,
from abnormal usage, including
excess loading of the oven door,
attach it to the 

 or 

 by

installing 

 Anti-Tip device

supplied. To insure the device is

properly installed and engaged,
remove the drawer panel and
inspect the rear leveling leg. Make
sure   fits securely into the slot.

If you pull the range out from the wall for any
reason, make sure the Anti-Tip device is properly
engaged before you push the range back. Please
refer to the Anti-Tip device information in the
Installation Instructions. Failure to take this
precaution could result in tipping of the range
and injury.
Do not allow the chain or bracket to damage the gas
plumbing in any way.

3

Содержание JGSP20GER

Страница 1: ...ng Guide 20 21 Self Cleaning Instructions 24 26 Thermostat Adjustment 12 Vent 4r 12 Surface Cooking 9 10 Control Settings 9 SuperBurner 9 Care and cleaning 27 31 Cooktop 2 7 DoorRemoval 29 Removable Oven Bottom 3l m m iiirll Problem Solver w 34 More questions call GEAnswer Center 800 6262000 Minor Adjustments 32 Flooring and Leveling 7 Consumer Services 35 Appliance Registration 2 Model and Serial...

Страница 2: ...pleased write all the in the back of this book details including your phone number to We re proud Gf our service and want you to be Manager Consumer Relations pleased If for some reason you are not happy with the GE Appliances service you receive here Me three steps to follow for Appliance Park further help Louisville KY 40225 FIRST contact the people who serviced your FINALLY if your problem is s...

Страница 3: ...n traffk path and out of drafty locations to prevent pilot outage and poor air circulation Be sure your range is correctly adjusted by a qualified service technician or instder for the type of gas natiral or LP that is to be used Your range can be converted for use with either type of gas See the Installation Instructions After prolonged use of a range high floor temperatures may result and nwny f...

Страница 4: ...ooking c Always use the LITE position when igniting top burners and make sure the burners have ignited Never leave surface burners unattended at high flame settings Boilover causes smoking and greasy spillovers that may catch on fire Adjust top burner flame size so it does not extend beyond the edge of the cookware Excessive flame is hazardcms Use only dry pot holders moist or damp pot holders cm ...

Страница 5: ...not hang long curtains that could blow over the top burners and create a fire hazard If you smell gas turn off the gas to the range and call a qualified service technician Never use an open flame to locate a leak Baking Broiling and Roasting Do not use oven for a storage area Items stored in the oven can ignite Stand away from the range when opening the door of a hot oven The hot air and steam tha...

Страница 6: ...n door gasket The door gasket is essential for a good seal Be careful not to rub damage or move it c Do not use oven cleaners No commercial oven cleaner or oven liner protective coating of any kind should be used in or around any part of the oven If the self cleaning mode malfunctions turn off and disconnect power supply Have serviced by a qualified technician Don t attempt to repair or replace an...

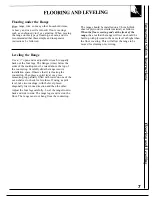
Страница 7: ...vering This will allow the range to be moved for cleaning or servicing Leveling the Range Use a 1 M open end or adjustable wrench to equally back out the four legs The flanges rims below the sides of the cooktop must be raised above the top of the countertop Carefully slide the range into its installation space Observe that it is clearing the countertop Then place a spirit level or a glass measuri...

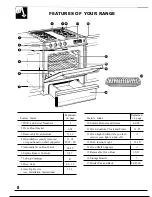
Страница 8: ... 7 Lift Jp Coaktop 8 Oven Vent 9 Anti Tip Device see Installation Instructions Explained on page Explained Feature Index on page 2 10 Surface Burners and Grates I 4 9 28 6 24 31 32 11 18 25 26 30 24 25 9 27 27 4 5 12 3 31 11 Oven Controls Clock and Timer 13 14 12 Oven Light Switch lets you turn 12 interior oven light on and off 13 Oven Interior Light I 12 30 14 Oven Shelf Supports 11 15 Removable ...

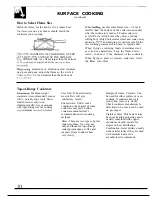
Страница 9: ... on the left control the left front and left rear burner This burner can provide 3090 more power burners The two knobs on the right nearest to the than any one of the other three Use it for canning or control panel control the right front and right large pans rear burners To Light a Surface Burner Push the control knob in and turn it After the burner ignites turn the counterclockwise to knob to ad...

Страница 10: ...bottom of tl f 1 Cookwal c When frying in glass or ceramic cookware lower the flame even more Top of Range Cookware Ahminurn Medium weight cookware IS recommended because it he t quickly and evenly Most foods brown evenly in an aluminum skillet Use saucepans with tight fitting lids for cooking Lvith minimum almounts of water Cast Iron If heated slowly most skillets will give satisfactory results E...

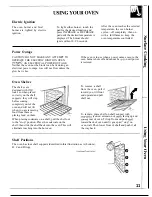
Страница 11: ...age Gas will not flow unless the glow bar is hot Oven Shelves The shelves are designed with stop locks so when placed correctly on the shelf supports they will stop before coming completely out of the oven and will not tilt when you are removing food from them or placing food on them To remove a shelf from the oven pull it toward you tilt front end upward and pull shelf out To replace place shelf ...

Страница 12: ...and could cause burns Adjusting Oven Thermostat When cooking food for the first time in your new oven use time given on recipes as a guide Oven thermostats over a period of years may drift from the factory setting and differences in timing between an old al d a new oven of 5 to 10 minutes are not unusual Your new oven has been set correctly at the factory and is more likely to be accurate than the...

Страница 13: ... this pad decrease time or temperature by small amounts Press and hold pad to decrease time or temperature by larger amounts BAKE Press this pad to select bake function BROIL Press this pad to select broil function CLEAN Press this pad to select self cleaning function See Self Cleaning Instructions k 11 COOK TIME Press this pad for Time Bake operations 12 STOP TIME Use this pad along with COOK TIM...

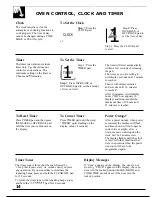
Страница 14: ... 9 hours and 55 minutes is reached To Reset Timer To Cancel Timer Power Outage Press TIMER pad and then press Press TIMER pad until the word After a power outage when power INCREASE or DECREASE pad TIMER quits flashing on the is restored the display will flash until the time you want shows on display about 4 seconds and time shown will no longer be the display correct for example after a 5 minute ...

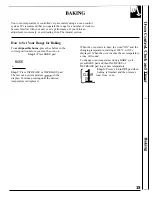
Страница 15: ...heat the word ON and the correct position before you turn the oven on changing temperature starting at 100 F will be n Step 1 Press BAKE pad displayed When the oven reaches the set temperature a tone will sound BAKE To change oven temperature during BAKE cycle press BAKE pad and then INCREASE or DECREASE pad to get new temperature Step 2 Press INCREASE or DECREASE pad The last oven set temperature...

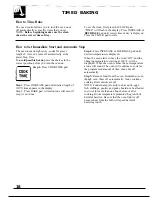
Страница 16: ...desired length of baking time appears in the display Step 3 Press BAKE pad Attention tone will occur if step 3 is not done Step 4 Press INCREASE or DECREASE pad until desired temperature is displayed When the oven starts to heat the word ON and the changing temperature starting at 100 F will be displayed When the oven reaches the set temperature a tone will sound The oven will continue to cook for...

Страница 17: ...s 3 hours Adding 3 hours to the time of day equals 5 00 Step 4 Change Stop Time from 5 00 to 7 00 by pressing INCREASE pad until 7 00 appears in the display f Step 5 Press BAKE pad II BAKE Step 6 Press INCREASE pad The last oven set temperature appears in the display Continue pressing the pad until 325 is displayed At 4 00 the oven will turn on automatically When the oven starts to heat the word O...

Страница 18: ...e preheat 10 higher temperature does not shorten preheat time minutes After the oven is preheated place the food in the oven as quickly as possible to prevent heat from escaping Baking Pans Use the proper baking pan The type of finish on the pan determines the amount of browning that will occur Q Dark rough or dull pans absorb heat resulting in a browner crisper crust Use this type for pies Shiny ...

Страница 19: ...d or bent pans will cause uneven baking results and poorly shaped products A cake baked in a pan larger than the recipe recommended will usually be crisper thinner and drier than it should be If baked in a pan smaller than recommended it may be undercooked and batter may overflow Check the recipe to make sure the pan size used is the one recommended Aluminum Foil Never cover a shelf entirely with ...

Страница 20: ...perature starting at 100 F will be displayed When the oven reaches the set temperature a tone will sound To change oven temperature during roasting press the BAKE pad and then INCREASE or DECREASE pad to get new temperature c1 Step 5 Press the CLEAIUOFF pad when roasting is finished and then CLEAR remove foodfrom oven OFF Step 6 Most meats continue to cook slightly while standing after being remov...

Страница 21: ... air to circulate and brown the meat Type Meat Tender cuts rib high quality sirloin tip rump or top round Lamb leg or bone in shoulder Veal shoulder leg or loin Pork loin rib or shouldert Ham precooked Ham raw Poultry Chicken or Duck Chicken pieces Turkey ROASTING GUIDE Oven Temperature 325 325 325 325 325 325 325 350 325 Approximate Roasting Time Doneness in Minutes per Pound Rare Medium Well Don...

Страница 22: ...od Step 8 When broiling is completed press the CLEAWOFF pad Serve food immediately and leave pan outside oven to cool during meal for easiest cleaning Use of Aluminum Foil 1 You can use aluminum foil to line your broiler pan and broiler rack However you must mold the foil tightly to the rack and cut slits in it just like the rack Without the slits the foil will prevent fat and meat juices from dra...

Страница 23: ... 7 Medium 2 to 2X lb B 15 9 12 Well Done B 25 16 18 Chicken 1 whole A LO 28 30 18 20 2 to 2fi lbs split lengthwise Bakery Products Bread Toast or 2 to 4 slices c HI 2 3 Toaster Pastries 1 2 1 1 pkg 2 English Muffins 2 split c 3 4 Lobster Tails 2 4 c HI 13 16 Do not 6 to 8 oz each turn over Fish I lb fillets 1 4 to B HI 5 5 1 2 inch thick Ham Slices I inch thick c LO 8 8 precooked Pork Chops 2 1 2 ...

Страница 24: ...m getting in these slots when cleaning open the door as far as it will go Do not rub or clean the door gasket C the fiberglass material of the gasket has an extremely low resistance to abrasion An intact and well fitting oven door gasket is essential for energy efficient oven operation and good baking results If you notice the gasket becoming worn frayed or damaged in any way or if it has become d...

Страница 25: ...e display The self clean cycle will automatically begin 3 hours before the Stop Time you select For example Let s say it s 7 00 and you want the oven to begin self cleaning at 9 00 after you re finished in the kitchen The oven is just soiled a normal amount so the normal Clean Time of 3 hours is preferred Step 1 Prepare the oven for cleaning Step 2 Close the oven door CLEAN Step 3 Press the CLEAN ...

Страница 26: ... I hear during cleaning normal A Yes This is the sound of the metal heating and cooling during both the cooking and cleaning functions Q Should there be any odor during the cleaning A Yes there maybe a slight odor during the first few cleanings Failure to wipe out excessive soil might also cause a strong odor when cleaning Q What causes the hair like lines on the enameled surface of my oven A This...

Страница 27: ...e cooktop may be rifted up and supported in the up position wells and lift up Dual support rods will hold the cooktop up while you clean underneath it Porcelain Cooktop on some models There are a number of precautions you can take to avoid marring the porcelain enamel surface of the cooktop and prevent it from becoming dull If you spill foods with a lot of acid tomatoes sauerkraut fruit juices etc...

Страница 28: ...og burner holes and the strong action of the dishwasher detergent can damage the burner heads Do not clean in self cleaning oven Before putting the burners back shake out excess water and dry them thoroughly by setting them in a warm oven for 30 minutes r Lighter Flas r Air Shu Ports support To replace burners 1 Slip the air shutter over the gas valve orifice 2 Lower the burner assembly and hook t...

Страница 29: ...ing hinge and the oven frame as the spring hinge could snap back and pinch your fingers TO CLEAN THE DOOR Inside of door Clean ONLY the door liner outside the gasket with soap and water The door is automatically cleaned if the oven is in the self cleaning cycle Do not rub or damage the gasket Avoid getting soap and water on the gasket or in any openings on the door Rinse well NOTE Soap left on lin...

Страница 30: ...erved Scrub with a soap filled or plastic scouring pad Do not store a soiled broiler pan and rack in the oven Do not clean in self cleaning oven The broiler pan and rack may also be cleaned in the dishwasher To replace Put in a new 40 watt appliance bulb NOTE A 40 watt appliance bulb is smaller than a standard 40 watt household bulb Install lamp cover Replace 3 screws and tighten making sure cover...

Страница 31: ...low the oven to cool first Remove oven bottom from oven You can then clean the oven bottom with soap and water a mild abrasive cleanser or soap filled abrasive pads Rinse well to remove any soap before self cleaning Anti Tip Device A If your range is removed for cleaning servicing or any reason be sure anti tip device is re engaged properly when the range is replaced Failure to take this precautio...

Страница 32: ...s will resettle Visually check the color of the flames every six months If they look like illustration A on the Problem Solver in this guide call for service Surface Burner Air Adjustment Shutters An air adjustment shutter for each surface burner regulates the flow of air to the flame When the right amount of air flows into the burner the flame will be steady relatively quiet and will have approxi...

Страница 33: ... B Yellow tips on inner C Soft blue flames Call for service cones Normal for LP gas Normal for natural gas If burner flames look like A call for service Normal burner flames should look like B or C depending on the type of gas you use With LP gas some yellow tipping on inner cones is normal If range is connected to LP gas check all steps in the Installation Instructions To turn from OFF position p...

Страница 34: ...et self clean operation Allow the range to cool to room temperature and reset controls If you need more help call toll free GE Answer Center CARE AND CLEANING continued Range Top Burners ept clean at all times nhampered flame inely especially after lese holes Burners screw was removed burners in place to during shipment screw the right to In the burner lbly then pull e to free the air e the burner...

Страница 35: ...heir own appliances can have needed parts or accessories sent directly to their home The GE parts system pro vides access to over 47 000 parts and all GE Genuine Renewal Parts are fully warranted VISA MasterCard and Discover cards are accepted User maintenance instructions contained in this booklet cover proce dures intended to be performed by any user Other servicing generally should be referred ...

Страница 36: ...ng the product please contact your dealer or our Consumer Affairs office at the address below or call toll free GE Answer Center 800 626 2000 consumer information service Improper installation If you have an installation problem contact your dealer or installer You are responsible for providing adequate electrical gas exhausting and other connecting facilities as described in the Installation Inst...

Отзывы: