background image

Customer Service

Installation Instructions

Troubleshooting T

ips

Operating Instructions

Safety Instructions

41

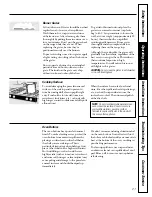
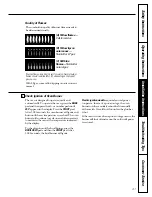
Quality of Flames

The combustion quality of burner flames needs to

be determined visually.

If burner flames look like (A), call for service. Normal burner
flames should look like (B) or (C), depending on the type of 
gas you use.

With LP gas, some yellow tipping on outer cones is

normal.

(C) Soft blue
flames—

Normal for 

natural gas

(B) Yellow tips on
outer cones—

Normal for LP gas

(A) Yellow flames—

Call for service

Check Ignition of Oven Burner

The oven is designed to operate quietly and

automatically. To operate the oven, press the 

BAKE

pad and then press the 

+/–

or number pads until

350°

appears in the display. Press the 

START

pad.

After 30-90 seconds, the oven burner will ignite and

burn until the set temperature is reached. The oven

burner will continue to cycle on and off as necessary

to maintain the oven at the temperature indicated

by the display.
To check ignition of the broil burner, press the

BROIL HI/LO

pad and then the 

START

pad. After 

30-90 seconds, the broil burner will ignite.

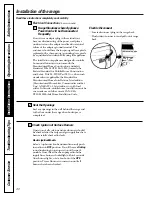
Electric ignition models

require electrical power 

to operate. In case of a power outage, the oven

burners on these models cannot be lit manually

with a match. Gas will not flow unless the glow bar 

is hot.
If the oven is in use when a power outage occurs, the

burner will shut off and cannot be re-lit until power

is restored.

Содержание JGBP35

Страница 1: ...l Settings 9 Care and Cleaning 25 31 Broiler Pan and Grid 28 Burner Assembly 25 26 Burner Grates 27 Control Panel and Knobs 30 Cooktop 27 Door Removal 28 Oven Bottom 27 Oven Vents 30 Self Cleaning Instructions 24 Shelves and Racks 31 Storage Drawer 29 Top Light 31 Warming Drawer 29 Before You Call For Service Thermostat Adjustment Do It Yourself 21 Troubleshooting Tips 44 47 Installation 34 43 Air...

Страница 2: ...ot use any phone in your building Immediately call your gas supplier from a neighbor s phone Follow the gas supplier s instructions If you cannot reach your gas supplier call the fire department Installation and service must be performed by a qualified installer service agency or the gas supplier WARNING If the information in this manual is not followed exactly a fire or explosion may result causi...

Страница 3: ...e you a great deal of time and money over the life of your range READ THIS MANUAL IF YOU NEED SERVICE You ll find many answers to common problems in the Before You Call For Service section If you review our chart of Troubleshooting Tips first you may not need to call for service at all If you do need service you can relax knowing help is only a phone call away A list of toll free customer service ...

Страница 4: ...ce should be performed only by qualified gas range installers or service technicians Do not attempt to repair or replace any part of your range unless it is specifically recommended in this manual All other service should be referred to a qualified technician Plug your range into a 120 volt grounded outlet only Do not remove the round grounding prong from the plug If in doubt about the grounding o...

Страница 5: ...a range or on the backsplash of a range children climbing on the range to reach items could be seriously injured For your safety never use your appliance for warming or heating the room Never wear loose fitting or hanging garments while using the appliance Be careful when reaching for items stored in cabinets over the range Flammable material could be ignited if brought in contact with flame or ho...

Страница 6: ...stir together before heating or as fats melt slowly Use a deep fat thermometer whenever possible to prevent overheating fat beyond the smoking point Use the least possible amount of fat for effective shallow or deep fat frying Filling the pan too full of fat can cause spillovers when food is added When flaming foods are under the hood turn the fan off The fan if operating may spread the flames Do ...

Страница 7: ...broiler pan When broiling if meat is too close to the flame the fat may ignite Trim excess fat to prevent excessive flare ups Make sure the broiler pan is in place correctly to reduce the possibility of grease fires If you should have a grease fire in the broiler pan press the CLEAR OFF pad and keep the oven door closed to contain fire until it burns out Stand away from the range when opening the ...

Страница 8: ...nd canned food a safe distance away from your warming drawer Do not warm food in the warming drawer for more than two hours Do not touch the heating element or the interior surface of the warming drawer These surfaces may be hot enough to burn REMEMBER The inside surface of the warming drawer may be hot when the drawer is opened Use care when opening the drawer Open the drawer a crack and let hot ...

Страница 9: ...surface burners on your range with a match Hold a lit match to the burner then push in and turn the control knob to the LITE position Use extreme caution when lighting burners this way Surface burners in use when an electrical power failure occurs will continue to operate normally Before Lighting a Burner If drip pans are supplied with your range they should be used at all times Make sure all grat...

Страница 10: ...carbon monoxide levels above allowable current standards This can be hazardous to your health Top of Range Cookware Aluminum Medium weight cookware is recommended because it heats quickly and evenly Most foods brown evenly in an aluminum skillet Use saucepans with tight fitting lids when cooking with minimum amounts of water Cast Iron If heated slowly most skillets will give satisfactory results E...

Страница 11: ...d Allow the oven to cool for one hour Put the oven back into operation If the function error code repeats disconnect the power to the range and call for service If a flashing time of day is in the display you have experienced a power failure Reset the clock If your oven was set for a timed oven operation when the power outage occurred the clock and all programmed functions must be reset COOKING TI...

Страница 12: ...isconnect the power to the range and call for service If a flashing time of day is in the display you have experienced a power failure Reset the clock If your oven was set for a timed oven operation when the power outage occurred the clock and all programmed functions must be reset COOKING TIME Pad Pressthispadandthenpressthenumberpads to set the amount of time you want your food to cook The oven ...

Страница 13: ...in and the display will show no shdn no shut off Press the START pad to activate the no shut off and leave the control set in this special features mode Fahrenheit or Centigrade Temperature Selection Your oven control is set to use the Fahrenheit temperature selections but you may change this to use the Centigrade selections Press the BAKE and BROIL HI LO pads at the same time for 3 seconds until ...

Страница 14: ... hour clock If you would prefer to have a 24 hour military time clock or black out the clock display follow the steps below Press the BAKE and BROIL HI LO pads at the same time for 3 seconds until the display shows SF Press the CLOCK pad once The display will show 12 hr If this is the choice you want press the START pad Press the CLOCK pad again to change to the 24 hour military time clock The dis...

Страница 15: ...e START pad to activate the cook and hold feature and leave the control set in this special features mode Appearance may vary Changing the Speed of the Increase or Decrease Pads on some models As you use the INCREASE or DECREASE pads when setting a time or temperature you may notice the display changes slowly This special feature allows you to change the speed To set the speed you prefer follow th...

Страница 16: ...e lit until power is restored This is because the flow of gas is automatically stopped and will not resume when power is restored until the glow bar has reached operating temperature Oven Light Use the switch on the lower control panel to turn the light on or off Oven Vent Your oven is vented through ducts at the rear of the range Do not block these ducts when cooking in the oven it is important t...

Страница 17: ...ults when baking cakes cookies pastry and breads For ovens without a preheat indicator light or tone preheat 10 minutes Baking results will be better if baking pans are centered in the oven as much as possible Pans should not touch each other or the walls of the oven If you need to use two shelves stagger the pans so one is not directly above the other and leave approximately 11 2 between pans fro...

Страница 18: ...1 thick C 8 8 precooked 1 2 thick D 6 6 Pork Chops 2 1 2 thick D 10 8 Slash fat Well Done 2 1 thick about 1 lb D 15 8 Lamb Chops Medium 2 1 thick about 10 D 8 4 7 Slash fat Well Done to 12 oz D 10 10 Medium 2 11 2 thick about 1 lb D 10 4 6 Well Done D 17 12 14 How to Set the Oven for Broiling Place the meat or fish on the broiler grid in the broiler pan Follow suggested shelf positions in the Broi...

Страница 19: ...ed Make sure the clock is set to the correct time of day To Set the Timer The timer does not control oven operations The maximum setting on the timer is 11 hours and 59 minutes Press the KITCHEN TIMER ON OFF pad Press the or or number pads to set the time For example to enter 2 hours and 45 minutes touch 2 4 and 5 in that order If you make a mistake press the KITCHEN TIMER ON OFF pad and begin aga...

Страница 20: ...to cook for the programmed amount of time then shut off automatically Press the CLEAR OFF pad to clear the display if necessary Remove the food from the oven Remember even though the oven shuts off automatically foods continue cooking after controls are off How to Set a Delayed Start and Automatic Stop You can set the oven control to delay start the oven cook for a specific length of time and then...

Страница 21: ... 35 F hotter or 35 F cooler Press the number pads the same way you read them For example to change the oven temperature 15 F press 1 and 5 When you have made the adjustment press the START pad to go back to the time of day display Use your oven as you would normally NOTE This adjustment will not affect the broiling or self cleaning temperatures It will be retained in memory after a power failure T...

Страница 22: ...s start with hot food Do not use to heat cold food other than crisping crackers chips or dry cereal Do not line the warming drawer with aluminum foil Allow time for the drawer to be preheated LO 10 minutes Medium 25 30 minutes HI 25 35 minutes Food in heat safe glass and glass ceramic utensils may need a higher thermostat setting as compared to food in metal utensils Repeated opening of the drawer...

Страница 23: ...es LO Pizza HI Potatoes baked HI Potatoes mashed LO Tortilla Chips LO To Crisp Stale Items Place food in low sided dishes or pans Preheat on LO setting Check crispness after 45 minutes Add time as needed To Warm Serving Bowls and Plates To warm serving bowls and plates set the control on LO Use only heat safe dishes Place the empty dishes on the rack to raise them off the bottom of the drawer If y...

Страница 24: ...DOOR light is off slide the latch handle to the left as far as it will go and open the door If your range does not have a latch the door will unlock automatically How to Delay the Start of Cleaning Latch the door Press the SELF CLEAN pad Press the or or number pads to set the Clean Time The Clean Time is preset for 4 hours You can change the Clean Time to any time between 3 and 5 hours depending o...

Страница 25: ...rface burner in a solution of mild liquid detergent and hot water Soak the surface burner for 20 to 30 minutes For more stubborn stains use a cleanser like Soft Scrub brand or Bon Ami brand Rinse well to remove any traces of the cleanser that might clog the surface burner openings Do not use steel wool because it will clog the surface burner openings and scratch the surface burners If the holes be...

Страница 26: ...ke out excess water and then dry it thoroughly by setting it in a warm oven for 30 minutes Replace the burner heads and caps Make sure that the heads and caps are replaced in the correct location There is one small 2 medium and one large head and cap NOTE On some models there are 2 large one medium and one small head and cap NOTE Before removing the burner heads and caps remember their size and lo...

Страница 27: ... cleaning oven Cooktop Surface To avoid damaging the porcelain enamel surface of the cooktop and to prevent it from becoming dull clean up spills right away Foods with a lot of acid tomatoes sauerkraut fruit juices etc or foods with high sugar content could cause a dull spot if allowed to set When the surface has cooled wash and rinse For other spills such as fat spatterings etc wash with soap and...

Страница 28: ...side of the door Spillage of marinades fruit juices tomato sauces and basting materials containing acids may cause discoloration and should be wiped up immediately When the surface is cool clean and rinse Do not use oven cleaners cleansing powders or harsh abrasives on the outside of the door Broiler Pan and Grid After broiling remove the broiler pan from the oven Remove the grid from the pan Care...

Страница 29: ...d flammable material in the drawer The storage drawer may be removed for cleaning under the range Clean the storage drawer with a damp cloth or sponge Never use harsh abrasives or scouring pads To remove storage drawer Pull drawer straight out until it stops Tilt the front of the drawer up and free of the range To replace storage drawer Set the stops on the back of the drawer over the stops in the...

Страница 30: ...l not to pinch your fingers Vent appearance and location vary Some models have dual support rods that will hold the cooktop up while you clean underneath it Operating Instructions Safety Instructions Installation Instructions Troubleshooting Tips Customer Service 30 Control Panel and Knobs It s a good idea to wipe the control panel after each use of the oven Clean with mild soap and water or vineg...

Страница 31: ... after cleaning spread a thin film of baby oil on the surface Wipe away excess oil with a clean soft cloth Fluorescent Top Light on some models CAUTION Do not touch the bulb with wet hands or when the bulb is hot Never wipe the light area with a wet cloth Electrical power must be shut off if you have to replace the bulb Pinch the clips on the back on both sides and free the back of the canopy Roll...

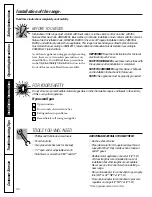
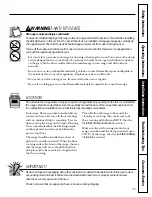
Страница 32: ...ep this Owner s Manual and Installation Instructions for future use NOTE This appliance must be properly grounded FOR YOUR SAFETY Do not store or use combustible materials gasoline or other flammable vapors and liquids in the vicinity of this or any other appliance If you smell gas Open windows Don t touch electrical switches Extinguish any open flame Immediately call your gas supplier TOOLS YOU W...

Страница 33: ...eat generated by the range up to 200 F Avoid placing cabinets above the range To reduce the hazard caused by reaching over the open flames of operating burners install a ventilation hood over the range that projects forward at least 5 beyond the front of the cabinets The ventilating hood must be constructed of sheet metal not less than 0 0122 thick Install above the cooktop with a clearance of not...

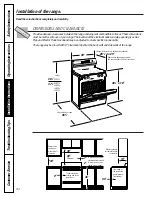
Страница 34: ... the range 28 1 4 to 29 Depth with door closed includes door handle Depth varies depending on model See specifications sheet for your model 30 361 4 1 4 To cabinets below cooktop and at the range back 30 30 1 2 Minimum 13 To wall on either side standard burner models To wall on either side sealed burner models Maximum depth for cabinets above countertops Front edge of the range side panel forward ...

Страница 35: ...overing This will allow the range to be moved for cleaning or servicing Also make sure your floor covering will withstand 180 F See the Installation Safety Instructions section Make sure the wall coverings around your range can withstand the heat generated up to 200 F by the range See the Installation Safety Instructions section All ranges can tip and injury could result To prevent accidental tipp...

Страница 36: ...nstalling a new range If the hard piping method is used you must carefully align the pipe the range cannot be moved after the connection is made To prevent gas leaks put pipe joint compound on or wrap pipe thread tape with Teflon around all male external pipe threads Install a manual gas line shut off valve in the gas line in an easily accessed location outside of the range Make sure everyone oper...

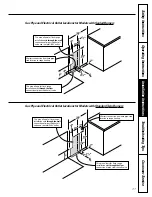
Страница 37: ...tion of pipe stub shut off valve and rear wall 120V outlet This area allows for flush range installation with through the wall connection of pipe stub shut off valve and rear wall 120V outlet This area allows for flush range installation with through the floor connection of pipe stub shut off valve This area allows for flush range installation with through the floor connection of pipe stub shut of...

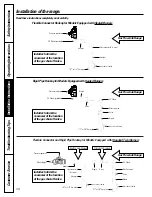
Страница 38: ... Gas pipe 1 2 or 3 4 Gas pipe 1 2 or 3 4 Gas pipe Adapter Flex connector 6 ft max Manifold pipe Pressure regulator 1 2 or 3 4 Gas pipe Adapter Gas shut off valve Gas shut off valve Gas shut off valve Gas shut off valve Nipple Union Black iron pipe 90 Elbow Nipple Union Black iron pipe 90 Elbow Installer Inform the consumer of the location of the gas shut off valve Installer Inform the consumer of ...

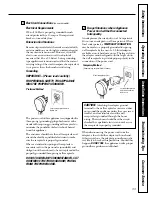
Страница 39: ...n of the customer to have it replaced with a properly grounded three prong wall receptacle DO NOT UNDER ANY CIRCUMSTANCES CUT OR REMOVE THE THIRD GROUND PRONG FROM THE POWER CORD Usage Situations where Appliance Power Cord will be Disconnected Infrequently An adapter may be used only on a 15 amp circuit Do not use an adapter on a 20 amp circuit Where local codes permit a TEMPORARY CONNECTION may b...

Страница 40: ...e Sites Communities and Set Ups ANSI A225 1 latest edition or with local codes In Canada mobile home installation must be in accordance with the current CAN CSA Z240 MH Mobile Home Installation Code Electric Disconnect Locate disconnect plug on the range back Pinch sides of connector and pull out of range back Seal the Openings Seal any openings in the wall behind the range and in the floor under ...

Страница 41: ...operate the oven press the BAKE pad and then press the or number pads until 350 appears in the display Press the START pad After 30 90 seconds the oven burner will ignite and burn until the set temperature is reached The oven burner will continue to cycle on and off as necessary to maintain the oven at the temperature indicated by the display To check ignition of the broil burner press the BROIL H...

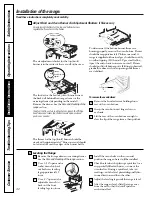
Страница 42: ...ames should not lift off burner ports If lifting is observed gradually reduce air shutter opening until flames are stabilized To remove the oven bottom Remove the knurled screws holding down rear of the oven bottom Grasp the oven bottom at finger slots on each side Lift the rear of the oven bottom enough to clear the lip of the range frame then pull out Oven bottom Air adjustment shutter Loosen Le...

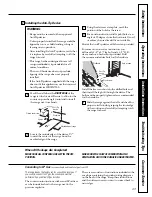
Страница 43: ...he screw provided For cement or concrete construction you will need a 1 4 x 11 2 lag bolt and a 1 2 O D sleeve anchor which are not provided Drill the recommended size hole for the hardware Install the sleeve anchor into the drilled hole and then install the lag bolt through the device The bolts must be properly tightened as recommended for the hardware Slide the range against the wall and check f...

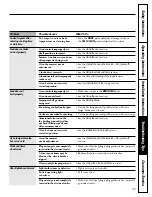
Страница 44: ...o gas ratio If range is connected to LP gas contact the person large or yellow who installed your range or made the conversion Surface burners light The oven gas shut off valve To check the oven gas shut off valve on standard but oven does not may have accidentally been twin burner models raise the cooktop and look moved during cleaning or for the gas shut off lever at the extreme right rear movin...

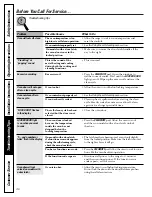
Страница 45: ... Using the oven section Improper shelf position See the Broiling Guide being used Food being cooked in a hot pan Use the broiling pan and grid that came with your range Make sure it is cool Cookware not suited for broiling Use the broiling pan and grid that came with your range Aluminum foil used on the See the Using the oven section the broiling pan and grid has not been fitted properly and slit ...

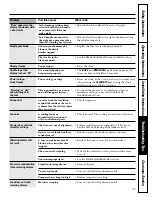
Страница 46: ...or a longer period of time LOCK DOOR flashes The self clean cycle has been Close the oven door in the display selected but the door is not closed LOCKED DOOR light The oven door is locked Press the CLEAR OFF pad Allow the oven to cool is on when you want because the temperature and then on models with a door latch unlock to cook inside the oven has not the door dropped below the locking temperatur...

Страница 47: ...unction Burning or oily This is normal in a new oven To speed the process set a self clean cycle for a odor emitting from and will disappear in time minimum of 3 hours See the Using the self the vent cleaning oven section Strong odor An odor from the insulation This is temporary around the inside of the oven is normal for the first few times the oven is used Fan noise A cooling fan may This is nor...

Страница 48: ...Operating Instructions Safety Instructions Installation Instructions Troubleshooting Tips Customer Service 48 Notes ...

Страница 49: ...49 Notes Customer Service Operating Instructions Safety Instructions Installation Instructions Troubleshooting Tips ...

Страница 50: ...50 Notes Operating Instructions Safety Instructions Installation Instructions Troubleshooting Tips Customer Service ...

Страница 51: ...otection or you may request your money back on the remaining value of your contract No questions asked It s that simple Protect your refrigerator dishwasher washer and dryer range TV VCR and much more any brand Plus there s no extra charge for emergency service and low monthly financing is available Even icemaker coverage and food spoilage protection is offered You can rest easy knowing that all y...

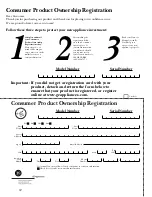
Страница 52: ... to ensure that your product is registered or register online at www geappliances com 1 2 3 Model Number Serial Number Cut here Complete and mail your Consumer Product Ownership Registration today Have the peace of mind of knowing we can contact you in the unlikely event of a safety modification After mailing the registration below store this document in a safe place It contains information you wi...

Страница 53: ...53 Notes Customer Service Operating Instructions Safety Instructions Installation Instructions Troubleshooting Tips ...

Страница 54: ... or resetting of circuit breakers Damage to the product caused by accident fire floods or acts of God Incidental or consequential damage caused by possible defects with this appliance What GE Will Not Cover This warranty is extended to the original purchaser and any succeeding owner for products purchased for home use within the USA In Alaska the warranty excludes the cost of shipping or service c...

Страница 55: ...his full one year warranty GE will also provide free of charge all labor original purchase and in home service to replace the defective part Service trips to your home to teach you how to use the product Improper installation Failure of the product if it is abused misused or used for other than the intended purpose or used commercially Replacement of house fuses or resetting of circuit breakers Da...

Страница 56: ...ceive a substantial discount GE Consumer Service will still be there after your warranty expires In Canada call 1 800 461 3636 Parts and Accessories 800 626 2002 Individuals qualified to service their own appliances can have parts or accessories sent directly to their homes VISA MasterCard and Discover cards are accepted Instructions contained in this manual cover procedures to be performed by any...

Отзывы: